My plan for the gnome buildbot

Answering to Olav post about my plans for the gnome buildbot: the more slaves, the better :). However, it is obvious that I cannot review all build errors on all modules for all the slaves, besides it makes not much sense… for me, the good way to go here would be that project maintainers and core developers (at least) subscribe to the modules they are experts on and whenever they receive notification that any of these projects fail to build, drop by the buildbot and check what’s going on with it. I’m sure they’ll know better and will realize sooner in most cases what’s going on there, so they can fix the problem in the repository if needed or give feedback to us so we can fix the build for that module (for example using appropriate build flags, installing missing dependencies, etc.).

Btw, I removed the test coverage stuff to build scrollkeeper successfully at least once, so modules failing to build due to its dependency on this module can build. Unfortunately, I see that gnome-doc-utils failing to build is also causing a lot of build problems in other modules. Is there anyone who can help us out to fix this build error?:


xsltproc -o "C/db2html-bibliography.xml"
--stringparam basename "db2html-bibliography"
--stringparam xsl_file "/usr/local/buildslave/gnome/work/src/gnome-doc-utils/doc/xslt/../../xslt/docbook/html/db2html-bibliography.xsl"
"./xsldoc-docbook.xsl" "C/db2html-bibliography.xsldoc"
db2html-bibliography: No documentation for template mode l10n.format.mode

See complete Log here.

First post in Planet Gnome

Hi everyone!

This is my first post in Planet Gnome, so I’ll introduce myself first: my name is Iago Toral, I’m Spanish and work at Igalia. I’m an active member of the BuildBrigade and currently, I’m basically devoted to maintain an enhance the Gnome Buildbot.

For those of you who do not know about the Gnome Buildbot yet:

  • It is a continuous integration system that builds all gnome modules from a moduleset trying to detect build problems.
  • Runs the tests defined for each built module (through ‘make check’) and can also provide detailed information of failed/passed tests
  • Provides code coverage statistics based on the execution of the tests to guide and help developers with their testing effort.

Of course, it has some more interesting features (and more are comming), but you get the idea :). For those of you further interested in the Build Brigade and the Gnome Buildbot, I’ll give a talk at Guadec about this topic. I’m looking forward to meet you all there, but meanwhile I’ll try to keep you updated through my blog 🙂

This is a list of some other mates I’d like to introduce and thank for his help with the Build Brigade effort:

  • José Dapena Paz (dape), a work mate at Igalia, who did the main development of the Gnome Buildbot.
  • Alejandro Piñeiro (API) another Igalia mate that has joined the Build Brigade recently, working on the feeds support.
  • Olav Vitters, who’s helping me on setting up the Gnome Buildbot on a Gnome server.
  • Thomas Vander Stichele, who’s working on adding new slaves to the continuous integration loop.
  • Frederic Peters, who reviewed, improved and merged upstream some patches for jhbuild, besides kindly accepting to host the Gnome Buildbot source code in jhbuild.
  • Igalia, that allows me and other work mates to devote work time to this purpose.

And finally, I’d like to thank Philip Van Hoof for helping me out with getting my blog aggregated in Planet Gnome. Thanks Philip!

It’s been long…

It’s been long since my last post now, I’ve been quite busy lately (and I still am), but I wanted to write something to let you know I’m still alive 😉

  • I’ve attended to Guademy, where I had the chance to meet some cool mates. Some interesting notes about this great event:
  • I’ve also continued my work on the Build Brigade. I spent most time working on:
    • Enhancing gnome-buildbot multislave view [*].
    • Assisting Thomas Vander Stichiele, who’s kindly setting up new gnome-buildbot slaves for Fedora builds.
    • Creating installation guides for both the slave and master sides of the Gnome buildbot. Olav Vitters has kindly offered to host the Gnome master and a slave in a Gnome server, so I took the chance to write these guides.
    • Another Igalia mate has joined the Build Brigade, his name is Alejandro Piñeiro and he’s working on the RSS support, which is a must have feature for the Gnome buildbot. He’s doing a great work [*].
    • I applied for a talk at Guadec Core which has finally been accepted, so I hope I can introduce many of this features to you all at that moment.

[*] Multislave support (2 slaves) and RSS support

Buildbot multislave and RSS

[*] Multislave support (waterfall view)

Buildbot multislave, waterfall view

Gnome Buildbot: The continuous integration system for Gnome

We have formally introduced the Gnome Buildbot to the community at FOSDEM. It seems people liked it very much and I hope the community use it extensively and provide as much feedback as possible to improve it.

For those of you that missed the talk, this is a summary of its main features:
* Continuous builds of the Gnome modules using jhbuild.
* List of modules that build successfuly and modules that fail to build properly.
* Access to the build logs to detect the causes of build failures.
* Execution of test suites through “make check”.
* Integration of autotools tests and Check unit tests.
* HTML report with a summary of the test and unit tests executed.
* Tests code coverage reports using gcov.

There is also some work on going to provide some other interesting features, like RSS support.

The main idea behind the Gnome buildbot is to be a reference in Gnome to know the current state of the Gnome build, a reference for both developers/maintainers and end users. It’s also a tool for maintainers, to know whether their projects are building properly in “clean” environments, and even in different SOs/architectures (we are currently working on providing Gnome builds in Fedora Core too, currently we are building in a Debian Sid).

So, if you’re maintaing a project and it is not building properly, please, take a look to the build logs and fix the problem! 😉

Enjoy it!

Howto: Integrate unit tests with buildbot

After my latest post about unit tests integration with buildbot some people asked me how I’ve done it, and got interested in setting up something like that for their own projects. I hope this post helps with this.

Here we go:

1. Setup Automake unit tests for your project

The first step is to provide a set of Automake compliant unit tests for the project. In my case, I used simple tests, so I just needed to define in my Makefile.am something like this:


if HAVE_CHECK
    TESTS = gtkbutton 
            gtkentry 
            ...
    TESTS_ENVIRONMENT = CK_FORK=yes
    CK_VERBOSITY=verbose
else
    TESTS =
endif

By defining the TESTS variable I’m instructing Automake to create a “check” target for make, that will build and execute each of the programs listed. For each test program, Automake will assume that an exit code 0 means successful, while any other exit code means failure. Once a tests is executed, Automake prints to stdout a message like:

PASS: [test]
FAIL: [test]

as appropriate. This is important, because I’ll use this later on, when setting up buildbot, to detect the passed and failed tests.

The HAVE_TESTS variable should be set at configure time, after checking we have all the tools we need to build and run the tests, so we can disable the tests in case the systemt does not provide the necessary stuff. We’ll see how to do this in the next section.

2. Adding unit tests to your project

Ok, now we have to provide an implementation for all those tests. You can use any unit testing framework to implement them (of course, you can decide not to use any framework too, it is up to you). I have used Check for my tests, so I’ll explain how to set up autotools to use it properly. In case you use use a different tool, a similar setup should be needed.

First, you need to define in your Makefile.am all the stuff needed to build these test programs, for example, in my case, I added something like:


DEPS =                                                                                  
    $(top_builddir)/gdk-pixbuf/libgdk_pixbuf-$(GTK_API_VERSION).la   
    $(top_builddir)/gdk/$(gdktargetlib)                                           
    $(top_builddir)/gtk/$(gtktargetlib)

INCLUDES =                                        
    -I$(top_srcdir)                                
    -I$(top_builddir)/gdk                         
    -I$(top_srcdir)/gdk                           
    -I$(top_srcdir)/gtk                            
    -DGDK_PIXBUF_DISABLE_DEPRECATED   
    -DGDK_DISABLE_DEPRECATED              
    -DGTK_DISABLE_DEPRECATED              
    $(GTK_DEBUG_FLAGS)                         
    $(GTK_DEP_CFLAGS)                           
    $(CHECK_CFLAGS)

LDADD =                                                                                
    $(CHECK_LIBS)                                                                   
    $(top_builddir)/gdk-pixbuf/libgdk_pixbuf-$(GTK_API_VERSION).la  
    $(top_builddir)/gdk/$(gdktargetlib)                                          
    $(top_builddir)/gtk/$(gtktargetlib)

gtkbutton_SOURCES =    
    check-main.c           
    check-utils.c            
    check-gtkbutton.c

...

$(CHECK_LIBS) and $(CHECK_CFLAGS) are provided by Check at configure time, providing the neccessary libs and flags to compile Check based tests.

There is only one thing missing, that is to detect whether the system has Check installed. As I said before, we have to check this at configure time, so add this lines to your configure.in script:


AM_PATH_CHECK([0.9.2-4],[have_check="yes"],
AC_MSG_WARN([Check not found; cannot run unit tests!])
[have_check="no"])
AM_CONDITIONAL(HAVE_CHECK, test x"$have_check" = "xyes")

The AM_PATH_CHECK macro is provided by Check (you might want to add it to your acinclude.m4 file), and is used here to ensure that an appropriate version of Check is installed, setting HAVE_CHECK to True in case it is (and thus, enabling the build of the Check based tests defined in Makefile.am).

Now, re-run your autogen.sh and configure scripts. If all goes well you should be able to run “make check” to execute your tests:


iago@venus:[/home/iago/tests/gtk+/ut]# make check
make  check-TESTS
make[1]: Entering directory `/home/iago/tests/gtk+/ut'
Running suite(s): GtkButton
[...]
100%: Checks: 7, Failures: 0, Errors: 0
check-gtkbutton.c:144:P:new_with_label:test_new_with_label_regular: Passed
check-gtkbutton.c:202:P:new_with_mnemonic:test_new_with_mnemonic_regular: Passed
check-gtkbutton.c:251:P:new_from_stock:test_new_from_stock_regular: Passed
check-gtkbutton.c:290:P:set_get_label:test_set_get_label_regular: Passed
check-gtkbutton.c:313:P:set_get_label:test_set_get_label_invalid: Passed
check-gtkbutton.c:349:P:pressed_released:test_pressed_released_clicked_regular: Passed
check-gtkbutton.c:359:P:pressed_released:test_pressed_released_clicked_invalid: Passed
PASS: gtkbutton
Running suite(s): GtkEntry
[...]

Do you see the blue line? That’s an Automake output. The lines above that one are Check output stating the result for each unit test executed.

3. Setting up buildbot to build and test your project

Next, you need to install buildbot and configure it to build your project(s). I’ll assume you’ve already done this, but if you haven’t yet, you can follow chapter 2 of this manual:

http://buildbot.sourceforge.net/manual-0.7.5.html

It is very easy, really.

Once the above is done, we need to add the build step that will take care of testing. To do this, in the master setup of your project, edit the master.cfg file. Go to the Builders section, where you configured the build phases of your project, it might look more or less like this:


f = factory.BuildFactory()
f.addStep(SVN, svnurl=projecturl)
f.addStep(step.ShellCommand, command=["make", "all"])
f.addStep(step.ShellCommand, command=["make", "install"])

Now, let’s add a new step which will take care of the testing:


f.addStep(step.ShellCommand, command=["make", "check"])

You can reboot buildbot now to see how it works. Once buildbot finishes to build the project you can see that all you get for the phase that takes care of the tests is a plain text log with the “make check” command stdout. Let’s now see how we can get a better report.

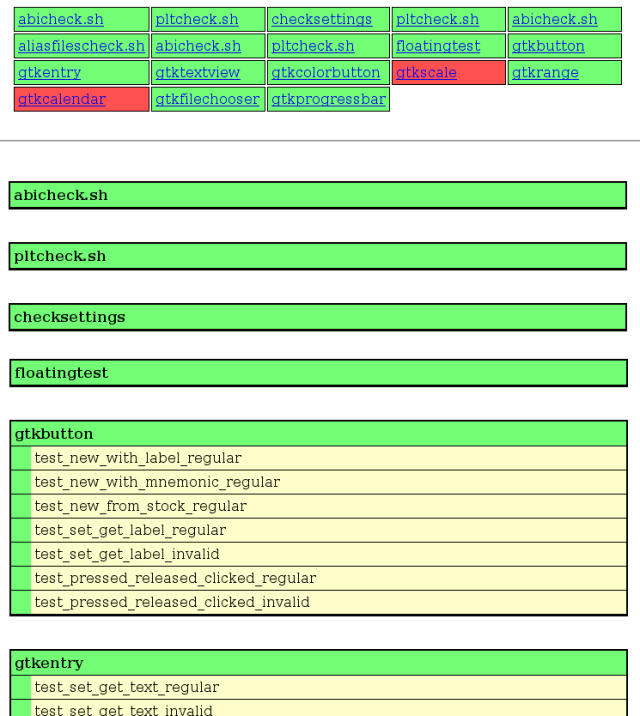
4. Adding the tests HTML report

To get the HTML report I showed in my latest post I created a new customized build step class, inheriting from steps.shell.ShellCommand, which is a base class for shell based commands. This new class will be specialized for “make check” commands:


class TestCommand(steps.Shell.ShellCommand):
    failedTestsCount = 0
    passedTestsCount = 0
    testsResults = []

    def __init__(self, stage=None,module=None, moduleset=None, **kwargs):
        steps.shell.ShellCommand.__init__(self, description="Testing",
                                                      descriptionDone="Tests", 
                                                      command=["make", "check"], **kwargs)
        self.failedTestsCount = 0
        self.passedTestsCount = 0
        self.testsResults = []
        testFailuresObserver = UnitTestsObserver ()
        self.addLogObserver('stdio', testFailuresObserver)

    def createSummary(self, log):
        if self.failedTestsCount > 0 or self.passedTestsCount > 0:
            self.addHTMLLog ('tests summary', self.createTestsSummary())

    def getText(self, cmd, results):
        text = steps.shell.ShellCommand.getText(self, cmd, results)
        if self.failedTestsCount > 0 or self.passedTestsCount > 0:
            text.append("tests failed: " + str(self.failedTestsCount))
            text.append("tests passed: " + str(self.passedTestsCount))
        return text

    def evaluateCommand(self, cmd):
        if self.failedTestsCount > 0:
            return WARNINGS
        else:
            return SUCCESS

    def createTestsSummary (self):
            # Create a string with your html report and return it
            ...

The most interesting stuff is in the __init__ method, where we create an observer (UnitTestsObserver) for the stdout log. This means that each time that a new line is output to stdout, that observer will be warned, so it can process it.

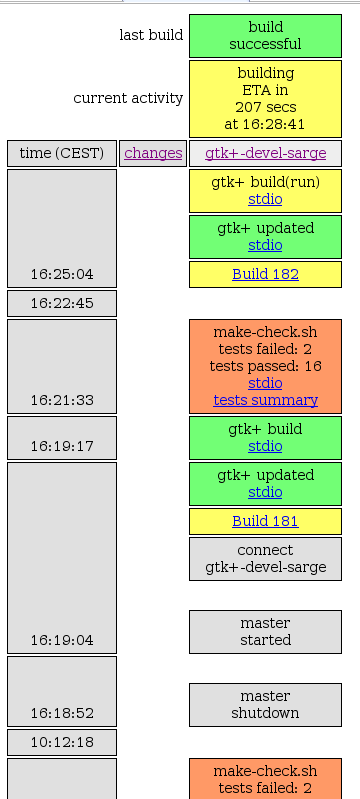
The getText method provides the text that is shown in the phase box of the Waterfall view of the project. In this case it will show the number of passed and failed tests.

The createSummary method is used to add additional information (for example, extra logs). In this case I use this method to link a new log with the html summary of the tests done.

The evaluateCommand method is called when the “make check” command finishes, to decide the final status of the phase. In this case I set the status to “WARNING” (orange color in Waterfallview) when there are failed tests, or SUCCESS otherwise. I could set it to FAILURE if there are failed tests, but I decided not to flag a build as FAILED when there are failed tests.

Finally, the createTestsSummary method is used to generate the HTML with the tests summary that is being linked in createSummary. In this method you must create and return a string with the HTML page contents.

Ok, so as we’ve seen the main stuff here is the log observer, which will be responsible for parsing and extracting all the interesting information from stdout in order to provide the data we need to generate the results (passed and failed tests). Let’s see how I implemented it:


class UnitTestsObserver(buildstep.LogLineObserver):
    regroupfailed = []
    regrouppassed = []
    reunittest = []
    unittests = []

    def __init__(self):
        buildstep.LogLineObserver.__init__(self)
        if len(self.regroupfailed) == 0:
            self.regroupfailed.append((re.compile('^(FAIL:) (.*)$'), 1))
        if len(self.regrouppassed) == 0:
            self.regrouppassed.append((re.compile('^(PASS:) (.*)$'), 1))
        if len(self.reunittest) == 0:
            self.reunittest.append((re.compile('^([^:]*):([^:]*):([^:]*):([^:]*):([^:]*):([^:]*).*$'), 4, 5))

    def outLineReceived(self, line):
        matched = False
        for r in self.regroupfailed:
            result = r[0].search(line)
            if result:
                self.step.failedTestsCount += 1
                self.step.testsResults.append((result.groups()[r[1]].strip(), False, self.unittests))
                self.unittests = []
                matched = True
        if not matched:
            for r in self.regrouppassed:
                result = r[0].search(line)
                if result:
                    self.step.passedTestsCount += 1
                    self.step.testsResults.append((result.groups()[r[1]].strip(), True, self.unittests))
                    self.unittests = []
                    matched = True
        if not matched:
            for r in self.reunittest:
                result = r[0].search(line)
                if result:
                    err_msg = result.groups()[r[2]].strip()
                    if err_msg == "Passed":
                        self.unittests.append((result.groups()[r[1]].strip(), True, err_msg))
                    else:
                        self.unittests.append((result.groups()[r[1]].strip(), False, err_msg))
                    matched = True

regroupfailed and regrouppassed are lists of regular expressions that match failed and passed tests. In my case, because I’m using Automake, I know that failed tests output a FAIL: [testname] to stdout while passed tests output PASSED: [testname], so I added regular expressions to match these cases. This provides integration with Automake. reunittest is a list of regular expressions that match Check‘s output for each unit test executed. When Check is used in verbose mode it prompts, for each unit test done, a line like this one to stdout:

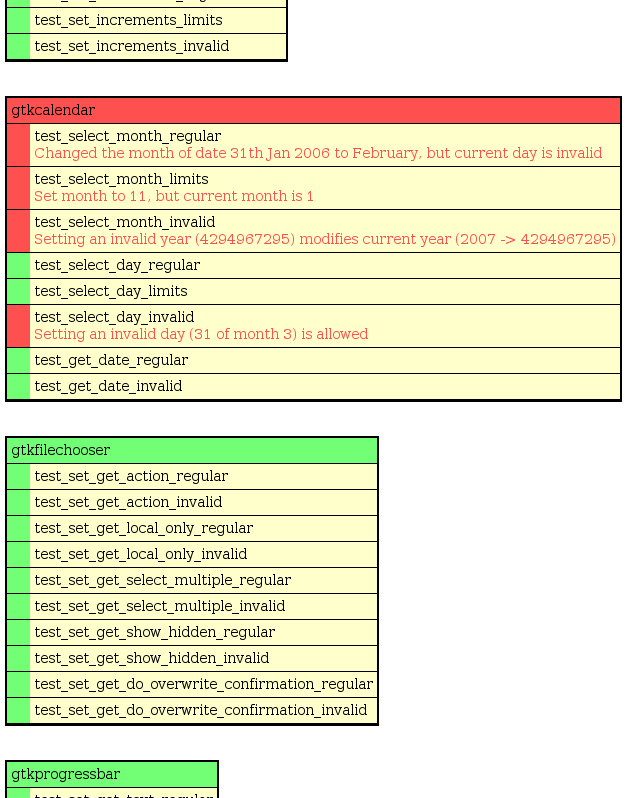
check-gtkfilechooser.c:80:P:set_get_action:test_set_get_action_regular: Passed

In this example, test_set_get_action_regular is the name of the unit test, and the last component is “Passed” if the test was successful or an error message otherwise.Thus, I added to the list a regular expression to matches such lines and extracts the interesting information from them.

Because Automake does not print its output until all the unit tests of the test program are done, I do not know which test program the unit tests belong to until I get the Automake output. That’s why I keep the matched unit tests in the unittests variable until I match an Automake passed/failed line (at that moment, I add all the unit tests matched to that test program and reset the unittests variable).

After processing the entire stdout log, the testsResults attribute of the TestCommand instance will provide a list with one element per test done. If we name one of those elements as ‘t’, then:

  • t[0] is the name of the test program.
  • t[1] is True if it is a passed test or False otherwise.
  • t[2] will be a list with all unit tests executed for that this program.

If we name an element of t[2] as ‘u’, then:

  • u[0] is the name of the unit test.
  • u[1] is True if it is a passed unit test or False otherwise.
  • u[2] is a string containing the string “Passed” for passed tests or the error message for failed tests.

This is all the information that we need to write the HTML report in the createTestsSummary method.

Ok, we are almost there, now we just need to replace in our master.cfg file the testing phase we added before by:


f.addStep(TestCommand)

In summary, I’ve built a custom build step inheriting from steps.shell.ShellCommand. This custom step will just execute a “make check” command. I also rewrited some methods to customize the information reported once the command is finished. I used the createSummary method to link an HTML log with a personalized tests summary. In order to get all the information that I need to create all these methods (information about the passed and failed tests), I added an observer to the stdout log, that parses each line output by the command execution to stdout looking for Automake or Check messages and storing the relevant information for a later usage.

… and that’s all. I really hope this helps you. If you have any suggestion for improving this, I’ll very glad to know!

Final note: because I use jhbuild to build gtk+ and its dependencies from buildbot, the code above is not exactly the same I’m using, so it is possible that I missed something or made mistakes. If you find any mistake, please, let me know and I’ll fix it.

Gnome buildbot and integration of unit tests

Using buildbot you can include a “make check” step in your automatic build process.This way you can realize if your tests succeed or fail on each automatic build. This is very useful, along with the option to include references to the commits made to the projet repository, to find out what commit broke something.

When something goes wrong with the tests, the first step is to find out what is actually failing. To do this, buildbot provides a complete text log with all the stdout generated by the “make check” command. Although this may be enough for developers, it is not very confortable, you have to explore by hand a complete text log looking for the test(s) that have failed, skipping passed tests and any other kind of (maybe) irrelevant output generated by the tests.
In order to make this easier, I’ve playing a little with the gnome-buildbot setup by Dape some time ago, trying to add the capability to parse the tests output and generate a more visual and efficient html report with a summary of the tests and the error messages.

This parser looks for strings like: “PASS: ” or “FAIL: “, which are the regular automake output for each test program executed. Besides, I’ve also included support for Check based unit tests, so you can get a detail of each unit tests done for each test program.

Let’s see this with an example, in the following image one can see the buildbot automated building of the gtk+ project. In orange you can see the tests phase, which is actually the result of executing “make check”, previously, I’ve added a set of Check based tests to the project. The orange color of that phase means there are failed tests. Besides the number of passed and failed tests one can see a link to the buildbot plain text stdout log and a link to access the html summary report.

Waterfall view with tests phase

In the next image one can see a piece of the html report with the tests summary, which shows one table per test done. The table title is the name of the test as prompted by automake and each table row is a single test (done with Check) in that test program. If you do not use Check for your unit tests, then you’d only get the table titles. Of course, green means test passed, red means test failed ;). In case a test fails, the error message is shown too.

Tests summary report

Finally, for an easy access to the tests of interest, I’ve added a header table with links to each test detail in the report:

Tests summary report header

GTK+ unit tests, the whole story

This post tries to give some links and context to my last one (GTK+ unit tests brainstorming (conclusions)), so people interested in this topic can follow all the story behind the work on Gtk+ unit tests.

The last GUADEC in Barcelona the build-brigade was born. Some of the tasks of the build-brigade have to do with the deployment of a continuous integration system for Gnome, as well as to take care of testing and the integration of these tests, among other quality tools, into the continuous integration system. You can have a look here (Gtk+ integration loop), here (Gtk+ module integration loop details), here (Gtk+ module tests results) and here (Gtk+ module tests code coverage statistics) to see a sample demo of what I mean for GTK+, but the idea would be to extend it to all gnome modules.

Igalia, the company I work for, is interested in helping with this to become real, and thus, encouraged me and my partner -and also friend- Dape, to work on the build-brigade to this purpose. Dape has been working more on the continuous integration tool side (you can see his latest posts on his work here, here or here), while I’ve been working more on the testing side.

Regarding my work on the testing side, thomasvs, another member of the build-brigade, told us that there was people inside GTK+ that would be interested in having some Check based unit tests. We were already using Check here in Igalia, so that was nice.

Fernando Herrera warned me that there was a previous project of Sun that aimed the same target, gtkvts, and a forked (and maintained) version of LSB, so I first took a look at it, then I tried to (unseccessfuly) get feedback from GTK+ people and finally drop my conclusions here and here. Basically, I think that starting from scratch and trying to get feedback from GTK+ guys (using a buildbot demo as Fer suggested) would be better.

Thus, I started writing some unit tests for GTK+ using Check and following a similar approach as the one pointed out by Stefan Kost in his GUADEC presentation on check based unit testing, while, at the same time, I tried to get them integrated into the buildbot demo that Dape was preparing. Once I had something functional to show, and integrated into the buildbot demo so people can see the whole picture underneath, I asked for feedback to Gtk+ guys.

After that, a successful brainstorming was started by Tim Janik on this topic, and now, I’m trying to get a set of conclusions to start the work in a proper way, which was the topic of my last post. I think this has been all till now 🙂