Author Archives: berto

More ways to install software in SteamOS: Distrobox and Nix

Introduction

In my previous post I talked about how to use systemd-sysext to add software to the Steam Deck without modifying the root filesystem. In this post I will give a brief overview of two additional methods.

Distrobox

distrobox is a tool that uses containers to create a mutable environment on top of your OS.

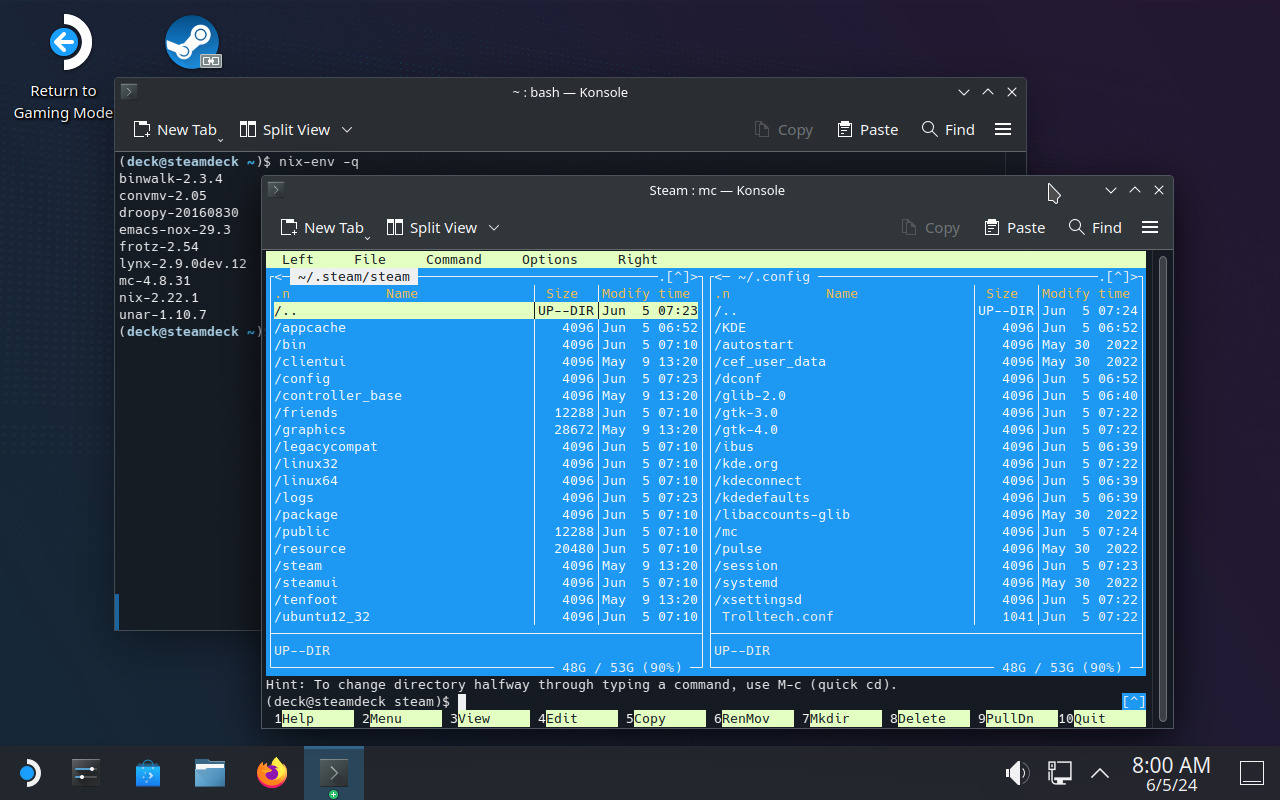
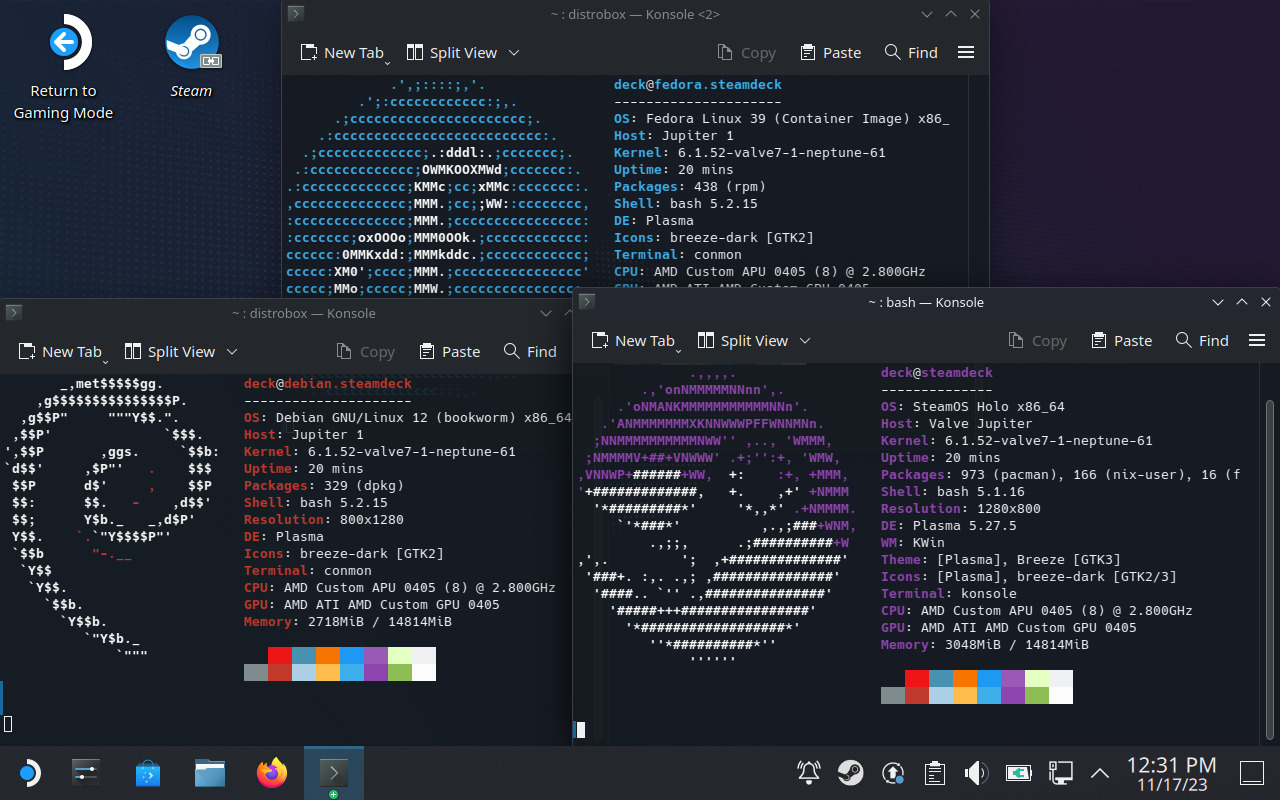
Distrobox running in SteamOS

With distrobox you can open a terminal with your favorite Linux distro inside, with full access to the package manager and the ability to install additional software. Containers created by distrobox are integrated with the system so apps running inside have normal access to the user’s home directory and the Wayland/X11 session.

Since these containers are not stored in the root filesystem they can survive an OS update and continue to work fine. For this reason they are particularly suited to systems with an immutable root filesystem such as Silverblue, Endless OS or SteamOS.

Starting from SteamOS 3.5 the system comes with distrobox (and podman) preinstalled and it can be used right out of the box without having to do any previous setup.

For example, in order to create a Debian bookworm container simply open a terminal and run this:

$ distrobox create -i debian:bookworm debbox

Here debian:bookworm is the image that this container is created from (debian is the name and bookworm is the tag, see the list of supported tags here) and debbox is the name that is given to this new container.

Once the container is created you can enter it:

$ distrobox enter debbox

Or from the ‘Debian’ entry in the desktop menu -> Lost & Found.

Once inside the container you can run your Debian commands normally:

$ sudo apt update
$ sudo apt install vim-gtk3

Nix

Nix is a package manager for Linux and other Unix-like systems. It has the property that it can be installed alongside the official package manager of any distribution, allowing the user to add software without affecting the rest of the system.

Nix running in SteamOS

Nix installs everything under the /nix directory, and packages are made available to the user through a new entry in the PATH and a ~/.nix-profile symlink stored in the home directory.

Nix is more things, including the basis of the NixOS operating system. Explaning Nix in more detail is beyond the scope of this blog post, but for SteamOS users these are perhaps its most interesting properties:

  • Nix is self-contained: all packages and their dependencies are installed under /nix.
  • Unlike software installed with pacman, Nix survives OS updates.
  • Unlike podman / distrobox, Nix does not create any containers. All packages have normal access to the rest of the system, just like native SteamOS packages.
  • Nix has a very large collection of packages, here is a search engine: https://search.nixos.org/packages

The only thing that Nix needs from SteamOS is help to set up the /nix directory so its contents are not stored in the root filesystem. This is already happening starting from SteamOS 3.5 so you can install Nix right away in single-user mode:

$ sudo chown deck:deck /nix
$ wget https://nixos.org/nix/install
$ sh ./install --no-daemon

This installs Nix and adds a line to ~/.bash_profile to set up the necessary environment variables. After that you can log in again and start using it. Here’s a very simple example (refer to the official documentation for more details):

# Install and run Midnight Commander
$ nix-env -iA nixpkgs.mc
$ mc

# List installed packages
$ nix-env -q
mc-4.8.31
nix-2.21.1

# Uninstall Midnight Commander
$ nix-env -e mc-4.8.31

What we have seen so far is how to install Nix in single-user mode, which is the simplest one and probably good enough for a single-user machine like the Steam Deck. The Nix project however recommends a multi-user installation, see here for the reasons.

Unfortunately the official multi-user installer does not work out of the box on the Steam Deck yet, but if you want to go the multi-user way you can use the Determinate Systems installer: https://github.com/DeterminateSystems/nix-installer

Conclusion

Distrobox and Nix are useful tools and they give SteamOS users the ability to add additional software to the system without having to modify the base operating system.

While for graphical applications the recommended way to install third-party software is still Flatpak, Distrobox and Nix give the user additional flexibility and are particularly useful for installing command-line utilities and other system tools.

Adding software to the Steam Deck with systemd-sysext

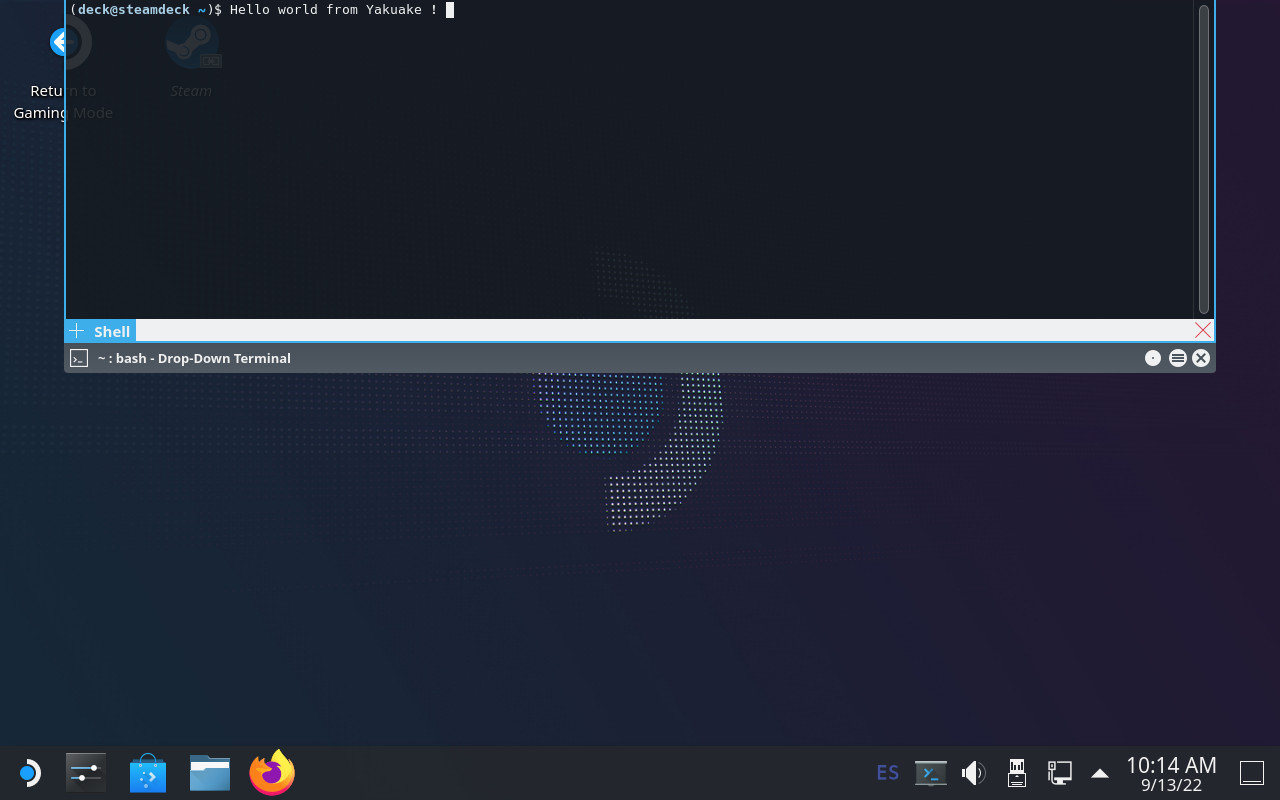
Yakuake on SteamOS

Introduction: an immutable OS

The Steam Deck runs SteamOS, a single-user operating system based on Arch Linux. Although derived from a standard package-based distro, the OS in the Steam Deck is immutable and system updates replace the contents of the root filesystem atomically instead of using the package manager.

An immutable OS makes the system more stable and its updates less error-prone, but users cannot install additional packages to add more software. This is not a problem for most users since they are only going to run Steam and its games (which are stored in the home partition). Nevertheless, the OS also has a desktop mode which provides a standard Linux desktop experience, and here it makes sense to be able to install more software.

How to do that though? It is possible for the user to become root, make the root filesytem read-write and install additional software there, but any changes will be gone after the next OS update. Modifying the rootfs can also be dangerous if the user is not careful.

Ways to add additional software

The simplest and safest way to install additional software is with Flatpak, and that’s the method recommended in the Steam Deck Desktop FAQ. Flatpak is already installed and integrated in the system via the Discover app so I won’t go into more details here.

However, while Flatpak works great for desktop applications not every piece of software is currently available, and Flatpak is also not designed for other types of programs like system services or command-line tools.

Fortunately there are several ways to add software to the Steam Deck without touching the root filesystem, each one with different pros and cons. I will probably talk about some of them in the future, but in this post I’m going to focus on one that is already available in the system: systemd-sysext.

About systemd-sysext

This is a tool included in recent versions of systemd and it is designed to add additional files (in the form of system extensions) to an otherwise immutable root filesystem. Each one of these extensions contains a set of files. When extensions are enabled (aka “merged”) those files will appear on the root filesystem using overlayfs. From then on the user can open and run them normally as if they had been installed with a package manager. Merged extensions are seamlessly integrated with the rest of the OS.

Since extensions are just collections of files they can be used to add new applications but also other things like system services, development tools, language packs, etc.

Creating an extension: yakuake

I’m using yakuake as an example for this tutorial since the extension is very easy to create, it is an application that some users are demanding and is not easy to distribute with Flatpak.

So let’s create a yakuake extension. Here are the steps:

1) Create a directory and unpack the files there:

$ mkdir yakuake
$ wget https://steamdeck-packages.steamos.cloud/archlinux-mirror/extra/os/x86_64/yakuake-21.12.1-1-x86_64.pkg.tar.zst
$ tar -C yakuake -xaf yakuake-*.tar.zst usr

2) Create a file called extension-release.NAME under usr/lib/extension-release.d with the fields ID and VERSION_ID taken from the Steam Deck’s /etc/os-release file.

$ mkdir -p yakuake/usr/lib/extension-release.d/
$ echo ID=steamos > yakuake/usr/lib/extension-release.d/extension-release.yakuake
$ echo VERSION_ID=3.3.1 >> yakuake/usr/lib/extension-release.d/extension-release.yakuake

3) Create an image file with the contents of the extension:

$ mksquashfs yakuake yakuake.raw

That’s it! The extension is ready.

A couple of important things: image files must have the .raw suffix and, despite the name, they can contain any filesystem that the OS can mount. In this example I used SquashFS but other alternatives like EroFS or ext4 are equally valid.

NOTE: systemd-sysext can also use extensions from plain directories (i.e skipping the mksquashfs part). Unfortunately we cannot use them in our case because overlayfs does not work with the casefold feature that is enabled on the Steam Deck.

Using the extension

Once the extension is created you simply need to copy it to a place where systemd-systext can find it. There are several places where they can be installed (see the manual for a list) but due to the Deck’s partition layout and the potentially large size of some extensions it probably makes more sense to store them in the home partition and create a link from one of the supported locations (/var/lib/extensions in this example):

(deck@steamdeck ~)$ mkdir extensions
(deck@steamdeck ~)$ scp user@host:/path/to/yakuake.raw extensions/
(deck@steamdeck ~)$ sudo ln -s $PWD/extensions /var/lib/extensions

Once the extension is installed in that directory you only need to enable and start systemd-sysext:

(deck@steamdeck ~)$ sudo systemctl enable systemd-sysext
(deck@steamdeck ~)$ sudo systemctl start systemd-sysext

After this, if everything went fine you should be able to see (and run) /usr/bin/yakuake. The files should remain there from now on, also if you reboot the device. You can see what extensions are enabled with this command:

$ systemd-sysext status
HIERARCHY EXTENSIONS SINCE
/opt      none       -
/usr      yakuake    Tue 2022-09-13 18:21:53 CEST

If you add or remove extensions from the directory then a simple “systemd-sysext refresh” is enough to apply the changes.

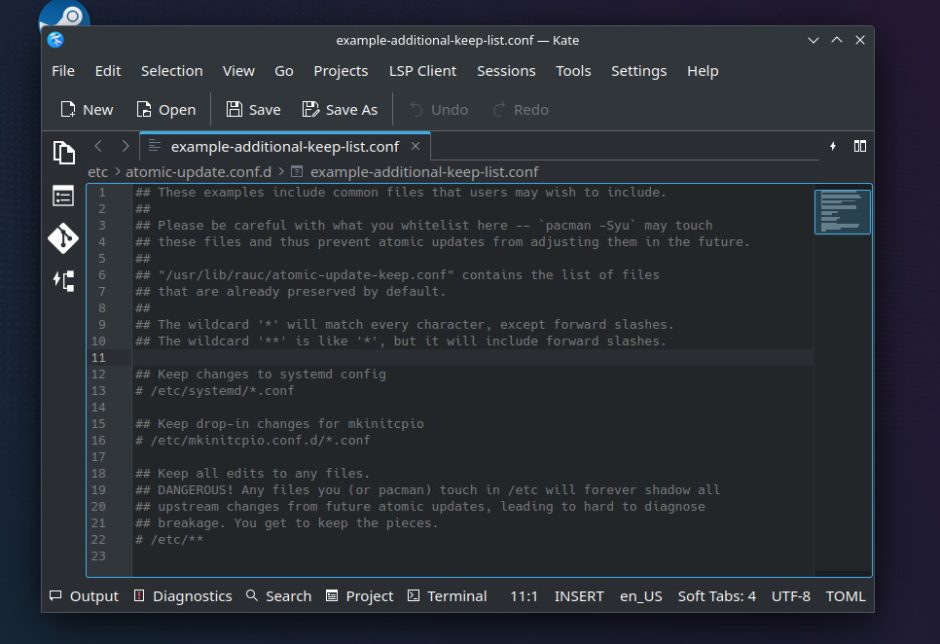
Unfortunately, and unlike distro packages, extensions don’t have any kind of post-installation hooks or triggers, so in the case of Yakuake you probably won’t see an entry in the KDE application menu immediately after enabling the extension. You can solve that by running kbuildsycoca5 once from the command line.

Limitations and caveats

Using systemd extensions is generally very easy but there are some things that you need to take into account:

  1. Using extensions is easy (you put them in the directory and voilĂ !). However, creating extensions is not necessarily always easy. To begin with, any libraries, files, etc., that your extensions may need should be either present in the root filesystem or provided by the extension itself. You may need to combine files from different sources or packages into a single extension, or compile them yourself.
  2. In particular, if the extension contains binaries they should probably come from the Steam Deck repository or they should be built to work with those packages. If you need to build your own binaries then having a SteamOS virtual machine can be handy. There you can install all development files and also test that everything works as expected. One could also create a Steam Deck SDK extension with all the necessary files to develop directly on the Deck 🙂
  3. Extensions are not distribution packages, they don’t have dependency information and therefore they should be self-contained. They also lack triggers and other features available in packages. For desktop applications I still recommend using a system like Flatpak when possible.
  4. Extensions are tied to a particular version of the OS and, as explained above, the ID and VERSION_ID of each extension must match the values from /etc/os-release. If the fields don’t match then the extension will be ignored. This is to be expected because there’s no guarantee that a particular extension is going to work with a different version of the OS. This can happen after a system update. In the best case one simply needs to update the extension’s VERSION_ID, but in some cases it might be necessary to create the extension again with different/updated files.
  5. Extensions only install files in /usr and /opt. Any other file in the image will be ignored. This can be a problem if a particular piece of software needs files in other directories.
  6. When extensions are enabled the /usr and /opt directories become read-only because they are now part of an overlayfs. They will remain read-only even if you run steamos-readonly disable !!. If you really want to make the rootfs read-write you need to disable the extensions (systemd-sysext unmerge) first.
  7. Unlike Flatpak or Podman (including toolbox / distrobox), this is (by design) not meant to isolate the contents of the extension from the rest of the system, so you should be careful with what you’re installing. On the other hand, this lack of isolation makes systemd-sysext better suited to some use cases than those container-based systems.

Conclusion

systemd extensions are an easy way to add software (or data files) to the immutable OS of the Steam Deck in a way that is seamlessly integrated with the rest of the system. Creating them can be more or less easy depending on the case, but using them is extremely simple. Extensions are not packages, and systemd-sysext is not a package manager or a general-purpose tool to solve all problems, but if you are aware of its limitations it can be a practical tool. It is also possible to share extensions with other users, but here the usual warning against installing binaries from untrusted sources applies. Use with caution, and enjoy!

Running the Steam Deck’s OS in a virtual machine using QEMU

SteamOS desktop

Introduction

The Steam Deck is a handheld gaming computer that runs a Linux-based operating system called SteamOS. The machine comes with SteamOS 3 (code name “holo”), which is in turn based on Arch Linux.

Although there is no SteamOS 3 installer for a generic PC (yet), it is very easy to install on a virtual machine using QEMU. This post explains how to do it.

The goal of this VM is not to play games (you can already install Steam on your computer after all) but to use SteamOS in desktop mode. The Gaming mode (the console-like interface you normally see when you use the machine) requires additional development to make it work with QEMU and will not work with these instructions.

A SteamOS VM can be useful for debugging, development, and generally playing and tinkering with the OS without risking breaking the Steam Deck.

Running the SteamOS desktop in a virtual machine only requires QEMU and the OVMF UEFI firmware and should work in any relatively recent distribution. In this post I’m using QEMU directly, but you can also use virt-manager or some other tool if you prefer, we’re emulating a standard x86_64 machine here.

General concepts

SteamOS is a single-user operating system and it uses an A/B partition scheme, which means that there are two sets of partitions and two copies of the operating system. The root filesystem is read-only and system updates happen on the partition set that is not active. This allows for safer updates, among other things.

There is one single /home partition, shared by both partition sets. It contains the games, user files, and anything that the user wants to install there.

Although the user can trivially become root, make the root filesystem read-write and install or change anything (the pacman package manager is available), this is not recommended because

  • it increases the chances of breaking the OS, and
  • any changes will disappear with the next OS update.

A simple way for the user to install additional software that survives OS updates and doesn’t touch the root filesystem is Flatpak. It comes preinstalled with the OS and is integrated with the KDE Discover app.

Preparing all the necessary files

The first thing that we need is the installer. For that we have to download the Steam Deck recovery image from here: https://store.steampowered.com/steamos/download/?ver=steamdeck&snr=

Once the file has been downloaded, we can uncompress it and we’ll get a raw disk image called steamdeck-recovery-4.img (the number may vary).

Note that the recovery image is already SteamOS (just not the most up-to-date version). If you simply want to have a quick look you can play a bit with it and skip the installation step. In this case I recommend that you extend the image before using it, for example with ‘truncate -s 64G steamdeck-recovery-4.img‘ or, better, create a qcow2 overlay file and leave the original raw image unmodified: ‘qemu-img create -f qcow2 -F raw -b steamdeck-recovery-4.img steamdeck-recovery-extended.qcow2 64G

But here we want to perform the actual installation, so we need a destination image. Let’s create one:

$ qemu-img create -f qcow2 steamos.qcow2 64G

Installing SteamOS

Now that we have all files we can start the virtual machine:

$ qemu-system-x86_64 -enable-kvm -smp cores=4 -m 8G \
    -device usb-ehci -device usb-tablet \
    -device intel-hda -device hda-duplex \
    -device VGA,xres=1280,yres=800 \
    -drive if=pflash,format=raw,readonly=on,file=/usr/share/ovmf/OVMF.fd \
    -drive if=virtio,file=steamdeck-recovery-4.img,driver=raw \
    -device nvme,drive=drive0,serial=badbeef \
    -drive if=none,id=drive0,file=steamos.qcow2

Note that we’re emulating an NVMe drive for steamos.qcow2 because that’s what the installer script expects. This is not strictly necessary but it makes things a bit easier. If you don’t want to do that you’ll have to edit ~/tools/repair_device.sh and change DISK and DISK_SUFFIX.

SteamOS installer shortcuts

Once the system has booted we’ll see a KDE Plasma session with a few tools on the desktop. If we select “Reimage Steam Deck” and click “Proceed” on the confirmation dialog then SteamOS will be installed on the destination drive. This process should not take a long time.

Now, once the operation finishes a new confirmation dialog will ask if we want to reboot the Steam Deck, but here we have to choose “Cancel”. We cannot use the new image yet because it would try to boot into Gaming Mode, which won’t work, so we need to change the default desktop session.

SteamOS comes with a helper script that allows us to enter a chroot after automatically mounting all SteamOS partitions, so let’s open a Konsole and make the Plasma session the default one in both partition sets(*):

$ cd /dev

$ sudo steamos-chroot --disk nvme0n1 --partset A --no-overlay
# steamos-readonly disable
# echo '[Autologin]' > /etc/sddm.conf.d/zz-steamos-autologin.conf
# echo 'Session=plasma.desktop' >> /etc/sddm.conf.d/zz-steamos-autologin.conf
# steamos-readonly enable
# exit

$ sudo steamos-chroot --disk nvme0n1 --partset B --no-overlay
# steamos-readonly disable
# echo '[Autologin]' > /etc/sddm.conf.d/zz-steamos-autologin.conf
# echo 'Session=plasma.desktop' >> /etc/sddm.conf.d/zz-steamos-autologin.conf
# steamos-readonly enable
# exit

After this we can shut down the virtual machine. Our new SteamOS drive is ready to be used. We can discard the recovery image now if we want.

(*) Note: in older recovery images the --no-overlay option is not supported. We use cd /dev in this example because some versions of steamos-chroot don’t work well with absolute paths.

Booting SteamOS and first steps

To boot SteamOS we can use a QEMU line similar to the one used during the installation. This time we’re not emulating an NVMe drive because it’s no longer necessary.

$ cp /usr/share/OVMF/OVMF_VARS.fd .
$ qemu-system-x86_64 -enable-kvm -smp cores=4 -m 8G \
   -device usb-ehci -device usb-tablet \
   -device intel-hda -device hda-duplex \
   -device VGA,xres=1280,yres=800 \
   -drive if=pflash,format=raw,readonly=on,file=/usr/share/ovmf/OVMF.fd \
   -drive if=pflash,format=raw,file=OVMF_VARS.fd \
   -drive if=virtio,file=steamos.qcow2 \
   -device virtio-net-pci,netdev=net0 \
   -netdev user,id=net0,hostfwd=tcp::2222-:22

(the last two lines redirect tcp port 2222 to port 22 of the guest to be able to SSH into the VM. If you don’t want to do that you can omit them)

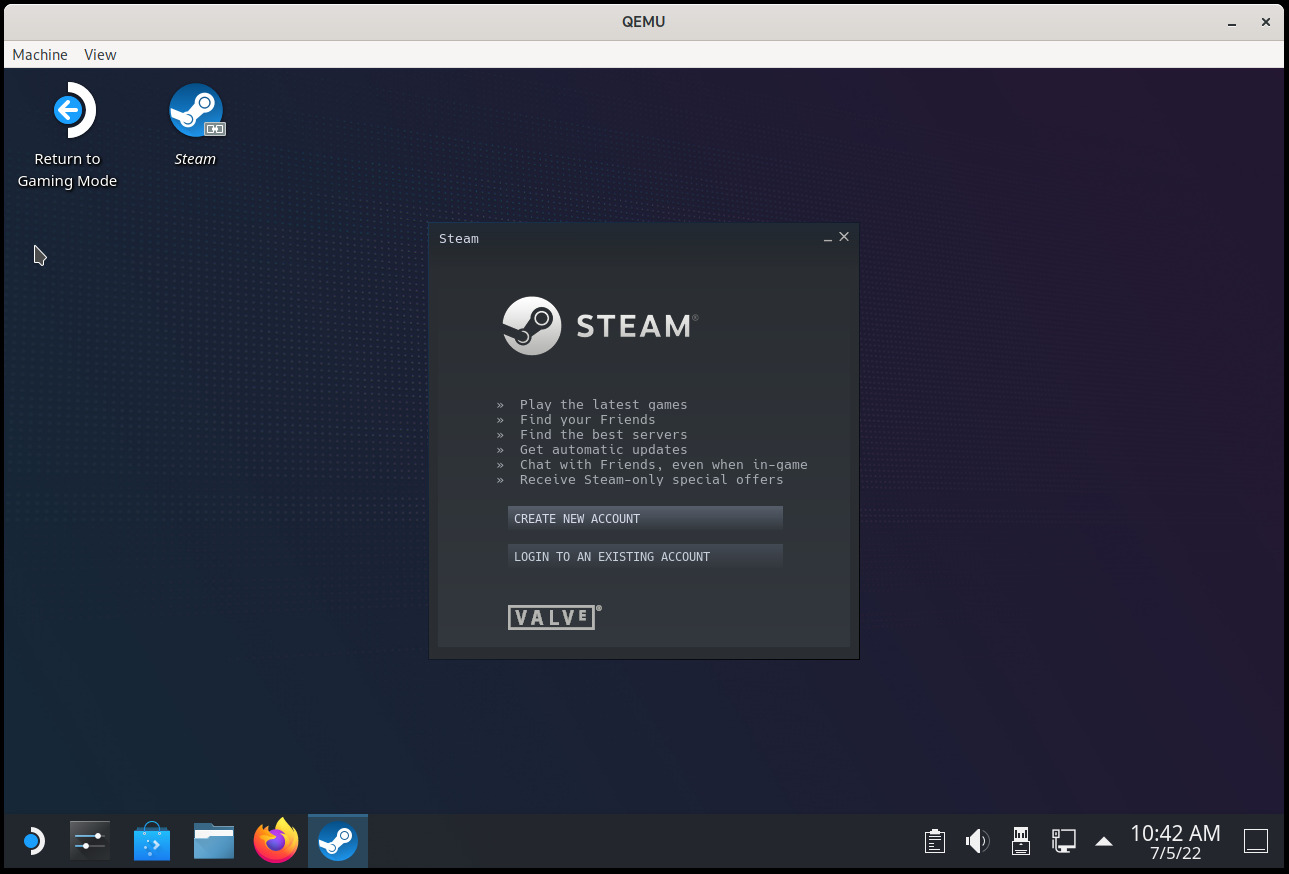
If everything went fine, you should see KDE Plasma again, this time with a desktop icon to launch Steam and another one to “Return to Gaming Mode” (which we should not use because it won’t work). See the screenshot that opens this post.

Congratulations, you’re running SteamOS now. Here are some things that you probably want to do:

  • (optional) Change the keyboard layout in the system settings (the default one is US English)
  • Set the password for the deck user: run ‘passwd‘ on a terminal
  • Enable / start the SSH server: ‘sudo systemctl enable sshd‘ and/or ‘sudo systemctl start sshd‘.
  • SSH into the machine: ‘ssh -p 2222 deck@localhost

Updating the OS to the latest version

The Steam Deck recovery image doesn’t install the most recent version of SteamOS, so now we should probably do a software update.

  • First of all ensure that you’re giving enought RAM to the VM (in my examples I run QEMU with -m 8G). The OS update might fail if you use less.
  • (optional) Change the OS branch if you want to try the beta release: ‘sudo steamos-select-branch beta‘ (or main, if you want the bleeding edge)
  • Check the currently installed version in /etc/os-release (see the BUILD_ID variable)
  • Check the available version: ‘steamos-update check
  • Download and install the software update: ‘steamos-update

Note: if the last step fails after reaching 100% with a post-install handler error then go to Connections in the system settings, rename Wired Connection 1 to something else (anything, the name doesn’t matter), click Apply and run steamos-update again. This works around a bug in the update process. Recent images fix this and this workaround is not necessary with them.

As we did with the recovery image, before rebooting we should ensure that the new update boots into the Plasma session, otherwise it won’t work:

$ sudo steamos-chroot --partset other
# steamos-readonly disable
# echo '[Autologin]' > /etc/sddm.conf.d/zz-steamos-autologin.conf
# echo 'Session=plasma.desktop' >> /etc/sddm.conf.d/zz-steamos-autologin.conf
# steamos-readonly enable
# exit

After this we can restart the system.

If everything went fine we should be running the latest SteamOS release. Enjoy!

Reporting bugs

SteamOS is under active development. If you find problems or want to request improvements please go to the SteamOS community tracker.

Edit 06 Jul 2022: Small fixes, mention how to install the OS without using NVMe.
Edit 04 Apr 2024: add –no-overlay to the steamos-chroot command line. This is required in recent recovery images.
Subcluster allocation for qcow2 images

In previous blog posts I talked about QEMU’s qcow2 file format and how to make it faster. This post gives an overview of how the data is structured inside the image and how that affects performance, and this presentation at KVM Forum 2017 goes further into the topic.

This time I will talk about a new extension to the qcow2 format that seeks to improve its performance and reduce its memory requirements.

Let’s start by describing the problem.

Limitations of qcow2

One of the most important parameters when creating a new qcow2 image is the cluster size. Much like a filesystem’s block size, the qcow2 cluster size indicates the minimum unit of allocation. One difference however is that while filesystems tend to use small blocks (4 KB is a common size in ext4, ntfs or hfs+) the standard qcow2 cluster size is 64 KB. This adds some overhead because QEMU always needs to write complete clusters so it often ends up doing copy-on-write and writing to the qcow2 image more data than what the virtual machine requested. This gets worse if the image has a backing file because then QEMU needs to copy data from there, so a write request not only becomes larger but it also involves additional read requests from the backing file(s).

Because of that qcow2 images with larger cluster sizes tend to:

  • grow faster, wasting more disk space and duplicating data.
  • increase the amount of necessary I/O during cluster allocation,
    reducing the allocation performance.

Unfortunately, reducing the cluster size is in general not an option because it also has an impact on the amount of metadata used internally by qcow2 (reference counts, guest-to-host cluster mapping). Decreasing the cluster size increases the number of clusters and the amount of necessary metadata. This has direct negative impact on I/O performance, which can be mitigated by caching it in RAM, therefore increasing the memory requirements (the aforementioned post covers this in more detail).

Subcluster allocation

The problems described in the previous section are well-known consequences of the design of the qcow2 format and they have been discussed over the years.

I have been working on a way to improve the situation and the work is now finished and available in QEMU 5.2 as a new extension to the qcow2 format called extended L2 entries.

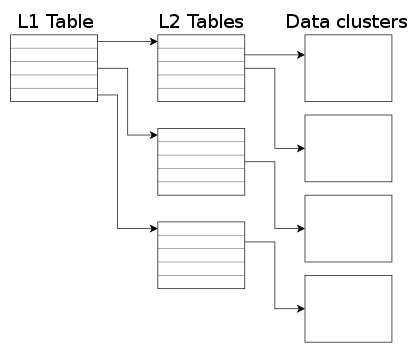
The so-called L2 tables are used to map guest addresses to data clusters. With extended L2 entries we can store more information about the status of each data cluster, and this allows us to have allocation at the subcluster level.

The basic idea is that data clusters are now divided into 32 subclusters of the same size, and each one of them can be allocated separately. This allows combining the benefits of larger cluster sizes (less metadata and RAM requirements) with the benefits of smaller units of allocation (less copy-on-write, smaller images). If the subcluster size matches the block size of the filesystem used inside the virtual machine then we can eliminate the need for copy-on-write entirely.

So with subcluster allocation we get:

  • Sixteen times less metadata per unit of allocation, greatly reducing the amount of necessary L2 cache.
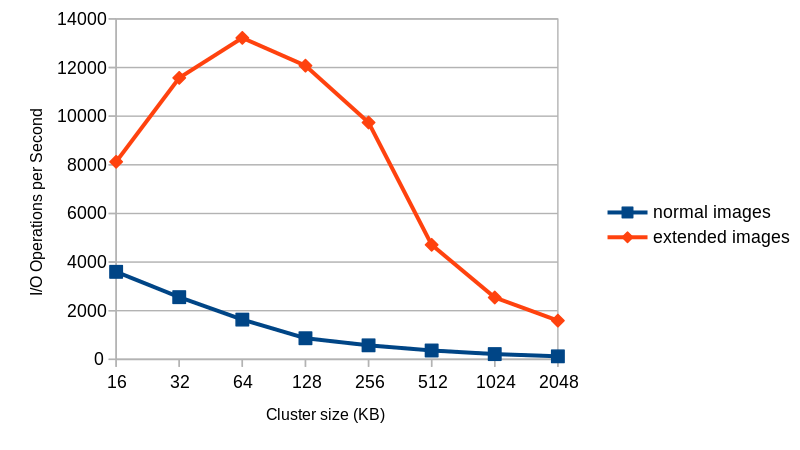
  • Much faster I/O during allocation when the image has a backing file, up to 10-15 times more I/O operations per second for the same cluster size in my tests (see chart below).
  • Smaller images and less duplication of data.

This figure shows the average number of I/O operations per second that I get with 4KB random write requests to an empty 40GB image with a fully populated backing file.

I/O performance comparison between traditional and extended qcow2 images

Things to take into account:

  • The performance improvements described earlier happen during allocation. Writing to already allocated (sub)clusters won’t be any faster.
  • If the image does not have a backing file chances are that the allocation performance is equally fast, with or without extended L2 entries. This depends on the filesystem, so it should be tested before enabling this feature (but note that the other benefits mentioned above still apply).
  • Images with extended L2 entries are sparse, that is, they have holes and because of that their apparent size will be larger than the actual disk usage.
  • It is not recommended to enable this feature in compressed images, as compressed clusters cannot take advantage of any of the benefits.
  • Images with extended L2 entries cannot be read with older versions of QEMU.

How to use this?

Extended L2 entries are available starting from QEMU 5.2. Due to the nature of the changes it is unlikely that this feature will be backported to an earlier version of QEMU.

In order to test this you simply need to create an image with extended_l2=on, and you also probably want to use a larger cluster size (the default is 64 KB, remember that every cluster has 32 subclusters). Here is an example:

$ qemu-img create -f qcow2 -o extended_l2=on,cluster_size=128k img.qcow2 1T

And that’s all you need to do. Once the image is created all allocations will happen at the subcluster level.

More information

This work was presented at the 2020 edition of the KVM Forum. Here is the video recording of the presentation, where I cover all this in more detail:

You can also find the slides here.

Acknowledgments

This work has been possible thanks to Outscale, who have been sponsoring Igalia and my work in QEMU.

Igalia and Outscale

And thanks of course to the rest of the QEMU development team for their feedback and help with this!

The status of WebKitGTK in Debian

Like all other major browser engines, WebKit is a project that evolves very fast with releases every few weeks containing new features and security fixes.

WebKitGTK is available in Debian under the webkit2gtk name, and we are doing our best to provide the most up-to-date packages for as many users as possible.

I would like to give a quick summary of the status of WebKitGTK in Debian: what you can expect and where you can find the packages.

  • Debian unstable (sid): The most recent stable version of WebKitGTK (2.24.3 at the time of writing) is always available in Debian unstable, typically on the same day of the upstream release.
  • Debian testing (bullseye): If no new bugs are found, that same version will be available in Debian testing a few days later.
  • Debian stable (buster): WebKitGTK is covered by security support for the first time in Debian buster, so stable releases that contain security fixes will be made available through debian-security. The upstream dependencies policy guarantees that this will be possible during the buster lifetime. Apart from security updates, users of Debian buster will get newer packages during point releases.
  • Debian experimental: The most recent development version of WebKitGTK (2.25.4 at the time of writing) is always available in Debian experimental.

In addition to that, the most recent stable versions are also available as backports.

  • Debian stable (buster): Users can get the most recent stable releases of WebKitGTK from buster-backports, usually a couple of days after they are available in Debian testing.
  • Debian oldstable (stretch): While possible we are also providing backports for stretch using stretch-backports-sloppy. Due to older or missing dependencies some features may be disabled when compared to the packages in buster or testing.

You can also find a table with an overview of all available packages here.

One last thing: as explained on the release notes, users of i386 CPUs without SSE2 support will have problems with the packages available in Debian buster (webkit2gtk 2.24.2-1). This problem has already been corrected in the packages available in buster-backports or in the upcoming point release.

“Improving the performance of the qcow2 format” at KVM Forum 2017

I was in Prague last month for the 2017 edition of the KVM Forum. There I gave a talk about some of the work that I’ve been doing this year to improve the qcow2 file format used by QEMU for storing disk images. The focus of my work is to make qcow2 faster and to reduce its memory requirements.

The video of the talk is now available and you can get the slides here.

The KVM Forum was co-located with the Open Source Summit and the Embedded Linux Conference Europe. Igalia was sponsoring both events one more year and I was also there together with some of my colleages. Juanjo Sánchez gave a talk about WPE, the WebKit port for embedded platforms that we released.

The video of his talk is also available.

QEMU and the qcow2 metadata checks

When choosing a disk image format for your virtual machine one of the factors to take into considerations is its I/O performance. In this post I’ll talk a bit about the internals of qcow2 and about one of the aspects that can affect its performance under QEMU: its consistency checks.

As you probably know, qcow2 is QEMU’s native file format. The first thing that I’d like to highlight is that this format is perfectly fine in most cases and its I/O performance is comparable to that of a raw file. When it isn’t, chances are that this is due to an insufficiently large L2 cache. In one of my previous blog posts I wrote about the qcow2 L2 cache and how to tune it, so if your virtual disk is too slow, you should go there first.

I also recommend Max Reitz and Kevin Wolf’s qcow2: why (not)? talk from KVM Forum 2015, where they talk about a lot of internal details and show some performance tests.

qcow2 clusters: data and metadata

A qcow2 file is organized into units of constant size called clusters. The cluster size defaults to 64KB, but a different value can be set when creating a new image:

qemu-img create -f qcow2 -o cluster_size=128K hd.qcow2 4G

Clusters can contain either data or metadata. A qcow2 file grows dynamically and only allocates space when it is actually needed, so apart from the header there’s no fixed location for any of the data and metadata clusters: they can appear mixed anywhere in the file.

Here’s an example of what it looks like internally:

In this example we can see the most important types of clusters that a qcow2 file can have:

  • Header: this one contains basic information such as the virtual size of the image, the version number, and pointers to where the rest of the metadata is located, among other things.
  • Data clusters: the data that the virtual machine sees.
  • L1 and L2 tables: a two-level structure that maps the virtual disk that the guest can see to the actual location of the data clusters in the qcow2 file.
  • Refcount table and blocks: a two-level structure with a reference count for each data cluster. Internal snapshots use this: a cluster with a reference count >= 2 means that it’s used by other snapshots, and therefore any modifications require a copy-on-write operation.

Metadata overlap checks

In order to detect corruption when writing to qcow2 images QEMU (since v1.7) performs several sanity checks. They verify that QEMU does not try to overwrite sections of the file that are already being used for metadata. If this happens, the image is marked as corrupted and further access is prevented.

Although in most cases these checks are innocuous, under certain scenarios they can have a negative impact on disk write performance. This depends a lot on the case, and I want to insist that in most scenarios it doesn’t have any effect. When it does, the general rule is that you’ll have more chances of noticing it if the storage backend is very fast or if the qcow2 image is very large.

In these cases, and if I/O performance is critical for you, you might want to consider tweaking the images a bit or disabling some of these checks, so let’s take a look at them. There are currently eight different checks. They’re named after the metadata sections that they check, and can be divided into the following categories:

  1. Checks that run in constant time. These are equally fast for all kinds of images and I don’t think they’re worth disabling.
    • main-header
    • active-l1
    • refcount-table
    • snapshot-table
  2. Checks that run in variable time but don’t need to read anything from disk.
    • refcount-block
    • active-l2
    • inactive-l1
  3. Checks that need to read data from disk. There is just one check here and it’s only needed if there are internal snapshots.
    • inactive-l2

By default all tests are enabled except for the last one (inactive-l2), because it needs to read data from disk.

Disabling the overlap checks

Tests can be disabled or enabled from the command line using the following syntax:

-drive file=hd.qcow2,overlap-check.inactive-l2=on
-drive file=hd.qcow2,overlap-check.snapshot-table=off

It’s also possible to select the group of checks that you want to enable using the following syntax:

-drive file=hd.qcow2,overlap-check.template=none
-drive file=hd.qcow2,overlap-check.template=constant
-drive file=hd.qcow2,overlap-check.template=cached
-drive file=hd.qcow2,overlap-check.template=all

Here, none means that no tests are enabled, constant enables all tests from group 1, cached enables all tests from groups 1 and 2, and all enables all of them.

As I explained in the previous section, if you’re worried about I/O performance then the checks that are probably worth evaluating are refcount-block, active-l2 and inactive-l1. I’m not counting inactive-l2 because it’s off by default. Let’s look at the other three:

  • inactive-l1: This is a variable length check because it depends on the number of internal snapshots in the qcow2 image. However its performance impact is likely to be negligible in all cases so I don’t think it’s worth bothering with.
  • active-l2: This check depends on the virtual size of the image, and on the percentage that has already been allocated. This check might have some impact if the image is very large (several hundred GBs or more). In that case one way to deal with it is to create an image with a larger cluster size. This also has the nice side effect of reducing the amount of memory needed for the L2 cache.
  • refcount-block: This check depends on the actual size of the qcow2 file and it’s independent from its virtual size. This check is relatively expensive even for small images, so if you notice performance problems chances are that they are due to this one. The good news is that we have been working on optimizing it, so if it’s slowing down your VMs the problem might go away completely in QEMU 2.9.

Conclusion

The qcow2 consistency checks are useful to detect data corruption, but they can affect write performance.

If you’re unsure and you want to check it quickly, open an image with overlap-check.template=none and see for yourself, but remember again that this will only affect write operations. To obtain more reliable results you should also open the image with cache=none in order to perform direct I/O and bypass the page cache. I’ve seen performance increases of 50% and more, but whether you’ll see them depends a lot on your setup. In many cases you won’t notice any difference.

I hope this post was useful to learn a bit more about the qcow2 format. There are other things that can help QEMU perform better, and I’ll probably come back to them in future posts, so stay tuned!

Acknowledgments

My work in QEMU is sponsored by Outscale and has been made possible by Igalia and the help of the rest of the QEMU development team.

I/O bursts with QEMU 2.6

QEMU 2.6 was released a few days ago. One new feature that I have been working on is the new way to configure I/O limits in disk drives to allow bursts and increase the responsiveness of the virtual machine. In this post I’ll try to explain how it works.

The basic settings

First I will summarize the basic settings that were already available in earlier versions of QEMU.

Two aspects of the disk I/O can be limited: the number of bytes per second and the number of operations per second (IOPS). For each one of them the user can set a global limit or separate limits for read and write operations. This gives us a total of six different parameters.

I/O limits can be set using the throttling.* parameters of -drive, or using the QMP block_set_io_throttle command. These are the names of the parameters for both cases:

-drive block_set_io_throttle
throttling.iops-total iops
throttling.iops-read iops_rd
throttling.iops-write iops_wr
throttling.bps-total bps
throttling.bps-read bps_rd
throttling.bps-write bps_wr

It is possible to set limits for both IOPS and bps at the same time, and for each case we can decide whether to have separate read and write limits or not, but if iops-total is set then neither iops-read nor iops-write can be set. The same applies to bps-total and bps-read/write.

The default value of these parameters is 0, and it means unlimited.

In its most basic usage, the user can add a drive to QEMU with a limit of, say, 100 IOPS with the following -drive line:

-drive file=hd0.qcow2,throttling.iops-total=100

We can do the same using QMP. In this case all these parameters are mandatory, so we must set to 0 the ones that we don’t want to limit:

   { "execute": "block_set_io_throttle",
     "arguments": {
        "device": "virtio0",
        "iops": 100,
        "iops_rd": 0,
        "iops_wr": 0,
        "bps": 0,
        "bps_rd": 0,
        "bps_wr": 0
     }
   }

I/O bursts

While the settings that we have just seen are enough to prevent the virtual machine from performing too much I/O, it can be useful to allow the user to exceed those limits occasionally. This way we can have a more responsive VM that is able to cope better with peaks of activity while keeping the average limits lower the rest of the time.

Starting from QEMU 2.6, it is possible to allow the user to do bursts of I/O for a configurable amount of time. A burst is an amount of I/O that can exceed the basic limit, and there are two parameters that control them: their length and the maximum amount of I/O they allow. These two can be configured separately for each one of the six basic parameters described in the previous section, but here we’ll use ‘iops-total’ as an example.

The I/O limit during bursts is set using ‘iops-total-max’, and the maximum length (in seconds) is set with ‘iops-total-max-length’. So if we want to configure a drive with a basic limit of 100 IOPS and allow bursts of 2000 IOPS for 60 seconds, we would do it like this (the line is split for clarity):

   -drive file=hd0.qcow2,
          throttling.iops-total=100,
          throttling.iops-total-max=2000,
          throttling.iops-total-max-length=60

Or with QMP:

   { "execute": "block_set_io_throttle",
     "arguments": {
        "device": "virtio0",
        "iops": 100,
        "iops_rd": 0,
        "iops_wr": 0,
        "bps": 0,
        "bps_rd": 0,
        "bps_wr": 0,
        "iops_max": 2000,
        "iops_max_length": 60,
     }
   }

With this, the user can perform I/O on hd0.qcow2 at a rate of 2000 IOPS for 1 minute before it’s throttled down to 100 IOPS.

The user will be able to do bursts again if there’s a sufficiently long period of time with unused I/O (see below for details).

The default value for ‘iops-total-max’ is 0 and it means that bursts are not allowed. ‘iops-total-max-length’ can only be set if ‘iops-total-max’ is set as well, and its default value is 1 second.

Controlling the size of I/O operations

When applying IOPS limits all I/O operations are treated equally regardless of their size. This means that the user can take advantage of this in order to circumvent the limits and submit one huge I/O request instead of several smaller ones.

QEMU provides a setting called throttling.iops-size to prevent this from happening. This setting specifies the size (in bytes) of an I/O request for accounting purposes. Larger requests will be counted proportionally to this size.

For example, if iops-size is set to 4096 then an 8KB request will be counted as two, and a 6KB request will be counted as one and a half. This only applies to requests larger than iops-size: smaller requests will be always counted as one, no matter their size.

The default value of iops-size is 0 and it means that the size of the requests is never taken into account when applying IOPS limits.

Applying I/O limits to groups of disks

In all the examples so far we have seen how to apply limits to the I/O performed on individual drives, but QEMU allows grouping drives so they all share the same limits.

This feature is available since QEMU 2.4. Please refer to the post I wrote when it was published for more details.

The Leaky Bucket algorithm

I/O limits in QEMU are implemented using the leaky bucket algorithm (specifically the “Leaky bucket as a meter” variant).

This algorithm uses the analogy of a bucket that leaks water constantly. The water that gets into the bucket represents the I/O that has been performed, and no more I/O is allowed once the bucket is full.

To see the way this corresponds to the throttling parameters in QEMU, consider the following values:

  iops-total=100
  iops-total-max=2000
  iops-total-max-length=60
  • Water leaks from the bucket at a rate of 100 IOPS.
  • Water can be added to the bucket at a rate of 2000 IOPS.
  • The size of the bucket is 2000 x 60 = 120000.
  • If iops-total-max is unset then the bucket size is 100.

bucket

The bucket is initially empty, therefore water can be added until it’s full at a rate of 2000 IOPS (the burst rate). Once the bucket is full we can only add as much water as it leaks, therefore the I/O rate is reduced to 100 IOPS. If we add less water than it leaks then the bucket will start to empty, allowing for bursts again.

Note that since water is leaking from the bucket even during bursts, it will take a bit more than 60 seconds at 2000 IOPS to fill it up. After those 60 seconds the bucket will have leaked 60 x 100 = 6000, allowing for 3 more seconds of I/O at 2000 IOPS.

Also, due to the way the algorithm works, longer burst can be done at a lower I/O rate, e.g. 1000 IOPS during 120 seconds.

Acknowledgments

As usual, my work in QEMU is sponsored by Outscale and has been made possible by Igalia and the help of the QEMU development team.

igalia-outscale

Enjoy QEMU 2.6!

Improving disk I/O performance in QEMU 2.5 with the qcow2 L2 cache

QEMU 2.5 has just been released, with a lot of new features. As with the previous release, we have also created a video changelog.

I plan to write a few blog posts explaining some of the things I have been working on. In this one I’m going to talk about how to control the size of the qcow2 L2 cache. But first, let’s see why that cache is useful.

The qcow2 file format

qcow2 is the main format for disk images used by QEMU. One of the features of this format is that its size grows on demand, and the disk space is only allocated when it is actually needed by the virtual machine.

A qcow2 file is organized in units of constant size called clusters. The virtual disk seen by the guest is also divided into guest clusters of the same size. QEMU defaults to 64KB clusters, but a different value can be specified when creating a new image:

qemu-img create -f qcow2 -o cluster_size=128K hd.qcow2 4G

In order to map the virtual disk as seen by the guest to the qcow2 image in the host, the qcow2 image contains a set of tables organized in a two-level structure. These are called the L1 and L2 tables.

There is one single L1 table per disk image. This table is small and is always kept in memory.

There can be many L2 tables, depending on how much space has been allocated in the image. Each table is one cluster in size. In order to read or write data to the virtual disk, QEMU needs to read its corresponding L2 table to find out where that data is located. Since reading the table for each I/O operation can be expensive, QEMU keeps a cache of L2 tables in memory to speed up disk access.

The L2 cache can have a dramatic impact on performance. As an example, here’s the number of I/O operations per second that I get with random read requests in a fully populated 20GB disk image:

L2 cache size Average IOPS
1 MB 5100
1,5 MB 7300
2 MB 12700
2,5 MB 63600

If you’re using an older version of QEMU you might have trouble getting the most out of the qcow2 cache because of this bug, so either upgrade to at least QEMU 2.3 or apply this patch.

(in addition to the L2 cache, QEMU also keeps a refcount cache. This is used for cluster allocation and internal snapshots, but I’m not covering it in this post. Please refer to the qcow2 documentation if you want to know more about refcount tables)

Understanding how to choose the right cache size

In order to choose the cache size we need to know how it relates to the amount of allocated space.

The amount of virtual disk that can be mapped by the L2 cache (in bytes) is:

disk_size = l2_cache_size * cluster_size / 8

With the default values for cluster_size (64KB) that is

disk_size = l2_cache_size * 8192

So in order to have a cache that can cover n GB of disk space with the default cluster size we need

l2_cache_size = disk_size_GB * 131072

QEMU has a default L2 cache of 1MB (1048576 bytes)[*] so using the formulas we’ve just seen we have 1048576 / 131072 = 8 GB of virtual disk covered by that cache. This means that if the size of your virtual disk is larger than 8 GB you can speed up disk access by increasing the size of the L2 cache. Otherwise you’ll be fine with the defaults.

How to configure the cache size

Cache sizes can be configured using the -drive option in the command-line, or the ‘blockdev-add‘ QMP command.

There are three options available, and all of them take bytes:

  • l2-cache-size: maximum size of the L2 table cache
  • refcount-cache-size: maximum size of the refcount block cache
  • cache-size: maximum size of both caches combined

There are two things that need to be taken into account:

  1. Both the L2 and refcount block caches must have a size that is a multiple of the cluster size.
  2. If you only set one of the options above, QEMU will automatically adjust the others so that the L2 cache is 4 times bigger than the refcount cache.

This means that these three options are equivalent:

-drive file=hd.qcow2,l2-cache-size=2097152
-drive file=hd.qcow2,refcount-cache-size=524288
-drive file=hd.qcow2,cache-size=2621440

Although I’m not covering the refcount cache here, it’s worth noting that it’s used much less often than the L2 cache, so it’s perfectly reasonable to keep it small:

-drive file=hd.qcow2,l2-cache-size=4194304,refcount-cache-size=262144

Reducing the memory usage

The problem with a large cache size is that it obviously needs more memory. QEMU has a separate L2 cache for each qcow2 file, so if you’re using many big images you might need a considerable amount of memory if you want to have a reasonably sized cache for each one. The problem gets worse if you add backing files and snapshots to the mix.

Consider this scenario:

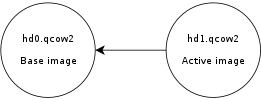
Here, hd0 is a fully populated disk image, and hd1 a freshly created image as a result of a snapshot operation. Reading data from this virtual disk will fill up the L2 cache of hd0, because that’s where the actual data is read from. However hd0 itself is read-only, and if you write data to the virtual disk it will go to the active image, hd1, filling up its L2 cache as a result. At some point you’ll have in memory cache entries from hd0 that you won’t need anymore because all the data from those clusters is now retrieved from hd1.

Let’s now create a new live snapshot:

Now we have the same problem again. If we write data to the virtual disk it will go to hd2 and its L2 cache will start to fill up. At some point a significant amount of the data from the virtual disk will be in hd2, however the L2 caches of hd0 and hd1 will be full as a result of the previous operations, even if they’re no longer needed.

Imagine now a scenario with several virtual disks and a long chain of qcow2 images for each one of them. See the problem?

I wanted to improve this a bit so I was working on a new setting that allows the user to reduce the memory usage by cleaning unused cache entries when they are not being used.

This new setting is available in QEMU 2.5, and is called ‘cache-clean-interval‘. It defines an interval (in seconds) after which all cache entries that haven’t been accessed are removed from memory.

This example removes all unused cache entries every 15 minutes:

-drive file=hd.qcow2,cache-clean-interval=900

If unset, the default value for this parameter is 0 and it disables this feature.

Further information

In this post I only intended to give a brief summary of the qcow2 L2 cache and how to tune it in order to increase the I/O performance, but it is by no means an exhaustive description of the disk format.

If you want to know more about the qcow2 format here’s a few links:

Acknowledgments

My work in QEMU is sponsored by Outscale and has been made possible by Igalia and the invaluable help of the QEMU development team.

Enjoy QEMU 2.5!

[*] Updated 10 March 2021: since QEMU 3.1 the default L2 cache size has been increased from 1MB to 32MB.

I/O limits for disk groups in QEMU 2.4

QEMU 2.4.0 has just been released, and among many other things it comes with some of the stuff I have been working on lately. In this blog post I am going to talk about disk I/O limits and the new feature to group several disks together.

Disk I/O limits

Disk I/O limits allow us to control the amount of I/O that a guest can perform. This is useful for example if we have several VMs in the same host and we want to reduce the impact they have on each other if the disk usage is very high.

The I/O limits can be set using the QMP command block_set_io_throttle, or with the command line using the throttling.* options for the -drive parameter (in brackets in the examples below). Both the throughput and the number of I/O operations can be limited. For a more fine-grained control, the limits of each one of them can be set on read operations, write operations, or the combination of both:

  • bps (throttling.bps-total): Total throughput limit (in bytes/second).
  • bps_rd (throttling.bps-read): Read throughput limit.
  • bps_wr (throttling.bps-write): Write throughput limit.
  • iops (throttling.iops-total): Total I/O operations per second.
  • iops_rd (throttling.iops-read): Read I/O operations per second.
  • iops_wr (throttling.iops-write): Write I/O operations per second.

Example:

-drive if=virtio,file=hd1.qcow2,throttling.bps-write=52428800,throttling.iops-total=6000

In addition to that, it is also possible to configure the maximum burst size, which defines a pool of I/O that the guest can perform without being limited:

  • bps_max (throttling.bps-total-max): Total maximum (in bytes).
  • bps_rd_max (throttling.bps-read-max): Read maximum.
  • bps_wr_max (throttling.bps-write-max): Write maximum.
  • iops_max (throttling.iops-total-max): Total maximum of I/O operations.
  • iops_rd_max (throttling.iops-read-max): Read I/O operations.
  • iops_wr_max (throttling.iops-write-max): Write I/O operations.

One additional parameter named iops_size allows us to deal with the case where big I/O operations can be used to bypass the limits we have set. In this case, if a particular I/O operation is bigger than iops_size then it is counted several times when it comes to calculating the I/O limits. So a 128KB request will be counted as 4 requests if iops_size is 32KB.

  • iops_size (throttling.iops-size): Size of an I/O request (in bytes).

Group throttling

All of these parameters I’ve just described operate on individual disk drives and have been available for a while. Since QEMU 2.4 however, it is also possible to have several drives share the same limits. This is configured using the new group parameter.

The way it works is that each disk with I/O limits is member of a throttle group, and the limits apply to the combined I/O of all group members using a round-robin algorithm. The way to put several disks together is just to use the group parameter with all of them using the same group name. Once the group is set, there’s no need to pass the parameter to block_set_io_throttle anymore unless we want to move the drive to a different group. Since the I/O limits apply to all group members, it is enough to use block_set_io_throttle in just one of them.

Here’s an example of how to set groups using the command line:

-drive if=virtio,file=hd1.qcow2,throttling.iops-total=6000,throttling.group=foo
-drive if=virtio,file=hd2.qcow2,throttling.iops-total=6000,throttling.group=foo
-drive if=virtio,file=hd3.qcow2,throttling.iops-total=3000,throttling.group=bar
-drive if=virtio,file=hd4.qcow2,throttling.iops-total=6000,throttling.group=foo
-drive if=virtio,file=hd5.qcow2,throttling.iops-total=3000,throttling.group=bar
-drive if=virtio,file=hd6.qcow2,throttling.iops-total=5000

In this example, hd1, hd2 and hd4 are all members of a group named foo with a combined IOPS limit of 6000, and hd3 and hd5 are members of bar. hd6 is left alone (technically it is part of a 1-member group).

Next steps

I am currently working on providing more I/O statistics for disk drives, including latencies and average queue depth on a user-defined interval. The code is almost ready. Next week I will be in Seattle for the KVM Forum where I will hopefully be able to finish the remaining bits.

I will also attend LinuxCon North America. Igalia is sponsoring the event and we have a booth there. Come if you want to talk to us or see our latest demos with WebKit for Wayland.

See you in Seattle!