Introduction
Some months ago, my colleague Madeeha Javed and I wrote a tool to convert QEMU disk images into qcow2, writing the result directly to stdout.
This tool is called qcow2-to-stdout.py and can be used for example to create a new image and pipe it through gzip and/or send it directly over the network without having to write it to disk first.
This program is included in the QEMU repository: https://github.com/qemu/qemu/blob/master/scripts/qcow2-to-stdout.py
If you simply want to use it then all you need to do is have a look at these examples:
$ qcow2-to-stdout.py source.raw > dest.qcow2$ qcow2-to-stdout.py -f dmg source.dmg | gzip > dest.qcow2.gz
If you’re interested in the technical details, read on.
A closer look under the hood
QEMU uses disk images to store the contents of the VM’s hard drive. Images are often in qcow2, QEMU’s native format, although a variety of other formats and protocols are also supported.
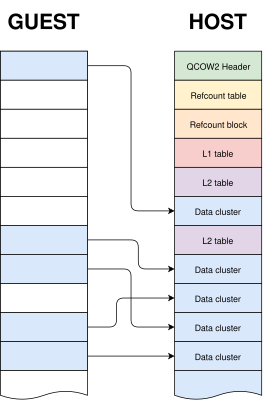
I have written in detail about the qcow2 format in the past (for example, here and here), but the general idea is very easy to understand: the virtual drive is divided into clusters of a certain size (64 KB by default), and only the clusters containing non-zero data need to be physically present in the qcow2 image. So what we have is essentially a collection of data clusters and a set of tables that map guest clusters (what the VM sees) to host clusters (what the qcow2 file actually stores).
qemu-img is a powerful and versatile tool that can be used to create, modify and convert disk images. It has many different options, but one question that sometimes arises is whether it can use stdin or stdout instead of regular files when converting images.
The short answer is that this is not possible in general. qemu-img convert works by checking the (virtual) size of the source image, creating a destination image of that same size and finally copying all the data from start to finish.
Reading a qcow2 image from stdin doesn’t work because data and metadata blocks can come in any arbitrary order, so it’s perfectly possible that the information that we need in order to start writing the destination image is at the end of the input data¹.
Writing a qcow2 image to stdout doesn’t work either because we need to know in advance the complete list of clusters from the source image that contain non-zero data (this is essential because it affects the destination file’s metadata). However, if we do have that information then writing a new image directly to stdout is technically possible.
The bad news is that qemu-img won’t help us here: it uses the same I/O code as the rest of QEMU. This generic approach makes total sense because it’s simple, versatile and is valid for any kind of source and destination image that QEMU supports. However, it needs random access to both images.
If we want to write a qcow2 file directly to stdout we need new code written specifically for this purpose, and since it cannot reuse the logic present in the QEMU code this was written as a separate tool (a Python script).
The process itself goes like this:
- Read the source image from start to finish in order to determine which clusters contain non-zero data. These are the only clusters that need to be present in the new image.
- Write to stdout all the metadata structures of the new image. This is now possible because after the previous step we know how much data we have and where it is located.
- Read the source image again and copy the clusters with non-zero data to stdout.
Images created with this program always have the same layout: header, refcount tables and blocks, L1 and L2 tables, and finally all data clusters.
One problem here is that, while QEMU can read many different image formats, qcow2-to-stdout.py is an independent tool that does not share any of the code and therefore can only read raw files. The solution here is to use qemu-storage-daemon. This program is part of QEMU and it can use FUSE to export any file that QEMU can read as a raw file. The usage of qemu-storage-daemon is handled automatically and the user only needs to specify the format of the source file:
$ qcow2-to-stdout.py -f dmg source.dmg > dest.qcow2
qcow2-to-stdout.py can only create basic qcow2 files and does not support features like compression or encryption. However, a few parameters can be adjusted, like the cluster size (-c), the width of the reference count entries (-r) and whether the new image is created with the input as an external data file (-d and -R).
And this is all, I hope that you find this tool useful and this post informative. Enjoy!
Acknowledgments
This work has been developed by Igalia and sponsored by Outscale, a Dassault Systèmes brand.

¹ This problem would not happen if the input data was in raw format but in this case we would not know the size in advance.