Tag Archives: qcow2

Converting QEMU qcow2 images directly to stdout

Introduction

Some months ago, my colleague Madeeha Javed and I wrote a tool to convert QEMU disk images into qcow2, writing the result directly to stdout.

This tool is called qcow2-to-stdout.py and can be used for example to create a new image and pipe it through gzip and/or send it directly over the network without having to write it to disk first.

This program is included in the QEMU repository: https://github.com/qemu/qemu/blob/master/scripts/qcow2-to-stdout.py

If you simply want to use it then all you need to do is have a look at these examples:

$ qcow2-to-stdout.py source.raw > dest.qcow2
$ qcow2-to-stdout.py -f dmg source.dmg | gzip > dest.qcow2.gz

If you’re interested in the technical details, read on.

A closer look under the hood

QEMU uses disk images to store the contents of the VM’s hard drive. Images are often in qcow2, QEMU’s native format (although a variety of other formats and protocols are also supported).

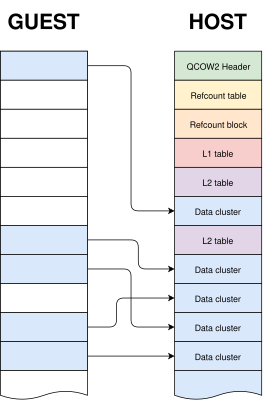
I have written in detail about the qcow2 format in the past (for example, here and here), but the general idea is very easy to understand: the virtual drive is divided into clusters of a certain size (64 KB by default), and only the clusters containing non-zero data need to be physically present in the qcow2 image. So what we have is essentially a collection of data clusters and a set of tables that map guest clusters (what the VM sees) to host clusters (what the qcow2 file actually stores).

A qcow2 file is a collection of data clusters plus some metadata to map them to what the guest VM sees.

qemu-img is a powerful and versatile tool that can be used to create, modify and convert disk images. It has many different options, but one question that sometimes arises is whether it can use stdin or stdout instead of regular files when converting images.

The short answer is that this is not possible in general. qemu-img convert works by checking the (virtual) size of the source image, creating a destination image of that same size and finally copying all the data from start to finish.

Reading a qcow2 image from stdin doesn’t work because data and metadata blocks can come in any arbitrary order, so it’s perfectly possible that the information that we need in order to start writing the destination image is at the end of the input data¹.

Writing a qcow2 image to stdout doesn’t work either because we need to know in advance the complete list of clusters from the source image that contain non-zero data (this is essential because it affects the destination file’s metadata). However, if we do have that information then writing a new image directly to stdout is technically possible.

The bad news is that qemu-img won’t help us here: it uses the same I/O code as the rest of QEMU. This generic approach makes total sense because it’s simple, versatile and is valid for any kind of source and destination image that QEMU supports. However, it needs random access to both images.

If we want to write a qcow2 file directly to stdout we need new code written specifically for this purpose, and since it cannot reuse the logic present in the QEMU code this was written as a separate tool (a Python script).

The process itself goes like this:

  • Read the source image from start to finish in order to determine which clusters contain non-zero data. These are the only clusters that need to be present in the new image.
  • Write to stdout all the metadata structures of the new image. This is now possible because after the previous step we know how much data we have and where it is located.
  • Read the source image again and copy the clusters with non-zero data to stdout.

Images created with this program always have the same layout: header, refcount tables and blocks, L1 and L2 tables, and finally all data clusters.

One problem here is that, while QEMU can read many different image formats, qcow2-to-stdout.py is an independent tool that does not share any of the code and therefore can only read raw files. The solution here is to use qemu-storage-daemon. This program is part of QEMU and it can use FUSE to export any file that QEMU can read as a raw file. The usage of qemu-storage-daemon is handled automatically and the user only needs to specify the format of the source file:

$ qcow2-to-stdout.py -f dmg source.dmg > dest.qcow2

qcow2-to-stdout.py can only create basic qcow2 files and does not support features like compression or encryption. However, a few parameters can be adjusted, like the cluster size (-c), the width of the reference count entries (-r) and whether the new image is created with the input as an external data file (-d and -R).

And this is all, I hope that you find this tool useful and this post informative. Enjoy!

Acknowledgments

This work has been developed by Igalia and sponsored by Outscale, a Dassault Systèmes brand.

Logos of Igalia and Outscale

¹ This problem would not happen if the input data was in raw format but in this case we would not know the size in advance.

Subcluster allocation for qcow2 images

In previous blog posts I talked about QEMU’s qcow2 file format and how to make it faster. This post gives an overview of how the data is structured inside the image and how that affects performance, and this presentation at KVM Forum 2017 goes further into the topic.

This time I will talk about a new extension to the qcow2 format that seeks to improve its performance and reduce its memory requirements.

Let’s start by describing the problem.

Limitations of qcow2

One of the most important parameters when creating a new qcow2 image is the cluster size. Much like a filesystem’s block size, the qcow2 cluster size indicates the minimum unit of allocation. One difference however is that while filesystems tend to use small blocks (4 KB is a common size in ext4, ntfs or hfs+) the standard qcow2 cluster size is 64 KB. This adds some overhead because QEMU always needs to write complete clusters so it often ends up doing copy-on-write and writing to the qcow2 image more data than what the virtual machine requested. This gets worse if the image has a backing file because then QEMU needs to copy data from there, so a write request not only becomes larger but it also involves additional read requests from the backing file(s).

Because of that qcow2 images with larger cluster sizes tend to:

  • grow faster, wasting more disk space and duplicating data.
  • increase the amount of necessary I/O during cluster allocation,
    reducing the allocation performance.

Unfortunately, reducing the cluster size is in general not an option because it also has an impact on the amount of metadata used internally by qcow2 (reference counts, guest-to-host cluster mapping). Decreasing the cluster size increases the number of clusters and the amount of necessary metadata. This has direct negative impact on I/O performance, which can be mitigated by caching it in RAM, therefore increasing the memory requirements (the aforementioned post covers this in more detail).

Subcluster allocation

The problems described in the previous section are well-known consequences of the design of the qcow2 format and they have been discussed over the years.

I have been working on a way to improve the situation and the work is now finished and available in QEMU 5.2 as a new extension to the qcow2 format called extended L2 entries.

The so-called L2 tables are used to map guest addresses to data clusters. With extended L2 entries we can store more information about the status of each data cluster, and this allows us to have allocation at the subcluster level.

The basic idea is that data clusters are now divided into 32 subclusters of the same size, and each one of them can be allocated separately. This allows combining the benefits of larger cluster sizes (less metadata and RAM requirements) with the benefits of smaller units of allocation (less copy-on-write, smaller images). If the subcluster size matches the block size of the filesystem used inside the virtual machine then we can eliminate the need for copy-on-write entirely.

So with subcluster allocation we get:

  • Sixteen times less metadata per unit of allocation, greatly reducing the amount of necessary L2 cache.
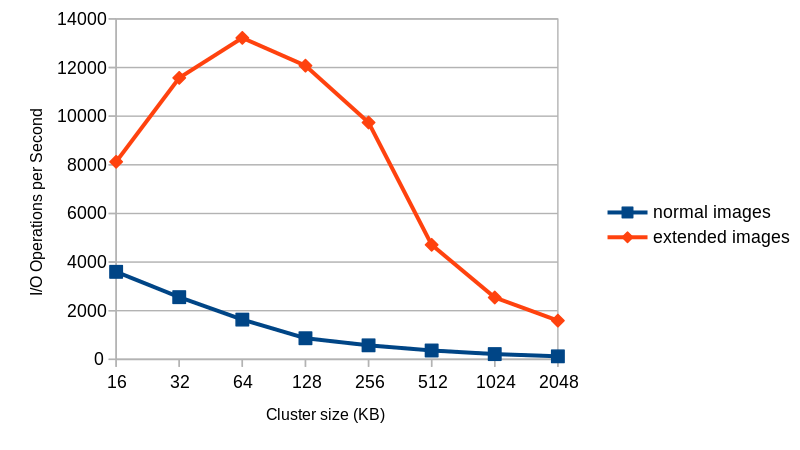
  • Much faster I/O during allocation when the image has a backing file, up to 10-15 times more I/O operations per second for the same cluster size in my tests (see chart below).
  • Smaller images and less duplication of data.

This figure shows the average number of I/O operations per second that I get with 4KB random write requests to an empty 40GB image with a fully populated backing file.

I/O performance comparison between traditional and extended qcow2 images

Things to take into account:

  • The performance improvements described earlier happen during allocation. Writing to already allocated (sub)clusters won’t be any faster.
  • If the image does not have a backing file chances are that the allocation performance is equally fast, with or without extended L2 entries. This depends on the filesystem, so it should be tested before enabling this feature (but note that the other benefits mentioned above still apply).
  • Images with extended L2 entries are sparse, that is, they have holes and because of that their apparent size will be larger than the actual disk usage.
  • It is not recommended to enable this feature in compressed images, as compressed clusters cannot take advantage of any of the benefits.
  • Images with extended L2 entries cannot be read with older versions of QEMU.

How to use this?

Extended L2 entries are available starting from QEMU 5.2. Due to the nature of the changes it is unlikely that this feature will be backported to an earlier version of QEMU.

In order to test this you simply need to create an image with extended_l2=on, and you also probably want to use a larger cluster size (the default is 64 KB, remember that every cluster has 32 subclusters). Here is an example:

$ qemu-img create -f qcow2 -o extended_l2=on,cluster_size=128k img.qcow2 1T

And that’s all you need to do. Once the image is created all allocations will happen at the subcluster level.

More information

This work was presented at the 2020 edition of the KVM Forum. Here is the video recording of the presentation, where I cover all this in more detail:

You can also find the slides here.

Acknowledgments

This work has been possible thanks to Outscale, who have been sponsoring Igalia and my work in QEMU.

Igalia and Outscale

And thanks of course to the rest of the QEMU development team for their feedback and help with this!