Introduction
The Steam Deck is a handheld gaming computer that runs a Linux-based operating system called SteamOS. The machine comes with SteamOS 3 (code name “holo”), which is in turn based on Arch Linux.
Although there is no SteamOS 3 installer for a generic PC (yet), it is very easy to install on a virtual machine using QEMU. This post explains how to do it.
The goal of this VM is not to play games (you can already install Steam on your computer after all) but to use SteamOS in desktop mode. The Gaming mode (the console-like interface you normally see when you use the machine) requires additional development to make it work with QEMU and will not work with these instructions.
A SteamOS VM can be useful for debugging, development, and generally playing and tinkering with the OS without risking breaking the Steam Deck.
Running the SteamOS desktop in a virtual machine only requires QEMU and the OVMF UEFI firmware and should work in any relatively recent distribution. In this post I’m using QEMU directly, but you can also use virt-manager or some other tool if you prefer, we’re emulating a standard x86_64 machine here.
General concepts
SteamOS is a single-user operating system and it uses an A/B partition scheme, which means that there are two sets of partitions and two copies of the operating system. The root filesystem is read-only and system updates happen on the partition set that is not active. This allows for safer updates, among other things.
There is one single /home partition, shared by both partition sets. It contains the games, user files, and anything that the user wants to install there.
Although the user can trivially become root, make the root filesystem read-write and install or change anything (the pacman package manager is available), this is not recommended because
- it increases the chances of breaking the OS, and
- any changes will disappear with the next OS update.
A simple way for the user to install additional software that survives OS updates and doesn’t touch the root filesystem is Flatpak. It comes preinstalled with the OS and is integrated with the KDE Discover app.
Preparing all the necessary files
The first thing that we need is the installer. For that we have to download the Steam Deck recovery image from here: https://store.steampowered.com/steamos/download/?ver=steamdeck&snr=
Once the file has been downloaded, we can uncompress it and we’ll get a raw disk image called steamdeck-recovery-4.img (the number may vary).
Note that the recovery image is already SteamOS (just not the most up-to-date version). If you simply want to have a quick look you can play a bit with it and skip the installation step. In this case I recommend that you extend the image before using it, for example with ‘truncate -s 64G steamdeck-recovery-4.img‘ or, better, create a qcow2 overlay file and leave the original raw image unmodified: ‘qemu-img create -f qcow2 -F raw -b steamdeck-recovery-4.img steamdeck-recovery-extended.qcow2 64G‘
But here we want to perform the actual installation, so we need a destination image. Let’s create one:
$ qemu-img create -f qcow2 steamos.qcow2 64G
Installing SteamOS
Now that we have all files we can start the virtual machine:
$ qemu-system-x86_64 -enable-kvm -smp cores=4 -m 8G \
    -device usb-ehci -device usb-tablet \
    -device intel-hda -device hda-duplex \
    -device VGA,xres=1280,yres=800 \
    -drive if=pflash,format=raw,readonly=on,file=/usr/share/ovmf/OVMF.fd \
    -drive if=virtio,file=steamdeck-recovery-4.img,driver=raw \
    -device nvme,drive=drive0,serial=badbeef \
    -drive if=none,id=drive0,file=steamos.qcow2
Note that we’re emulating an NVMe drive for steamos.qcow2 because that’s what the installer script expects.
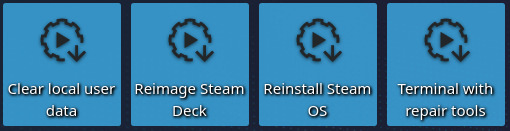
Once the system has booted we’ll see a KDE Plasma session with a few tools on the desktop. If we select “Wipe Device & Install SteamOS” (or “Reimage Steam Deck” in older images) and click “Proceed” on the confirmation dialog then SteamOS will be installed on the destination drive. This process should not take a long time.
Now, once the operation finishes a new confirmation dialog will ask if we want to reboot the Steam Deck. If we are using the SteamOS 3.7 recovery image or a more recent one then we are done. We can shut down the virtual machine and skip the rest of this section. This is because once we boot the OS it will detect that it’s running inside a VM and will go straight to Desktop Mode.
If we are using an older recovery image then we have to choose “Cancel”. We cannot use the new image yet because it would try to boot into Gaming Mode, which won’t work, so we need to change the default desktop session.
SteamOS comes with a helper script that allows us to enter a chroot after automatically mounting all SteamOS partitions, so let’s open a Konsole and make the Plasma session the default one in both partition sets(*):
$ cd /dev

$ sudo steamos-chroot --disk nvme0n1 --partset A --no-overlay
# steamos-readonly disable
# echo '[Autologin]' > /etc/sddm.conf.d/zz-steamos-autologin.conf
# echo 'Session=plasma.desktop' >> /etc/sddm.conf.d/zz-steamos-autologin.conf
# steamos-readonly enable
# exit

$ sudo steamos-chroot --disk nvme0n1 --partset B --no-overlay
# steamos-readonly disable
# echo '[Autologin]' > /etc/sddm.conf.d/zz-steamos-autologin.conf
# echo 'Session=plasma.desktop' >> /etc/sddm.conf.d/zz-steamos-autologin.conf
# steamos-readonly enable
# exit
After this we can shut down the virtual machine. Our new SteamOS drive is ready to be used. We can discard the recovery image now if we want.
(*) Note: in older recovery images the --no-overlay option is not supported. We use cd /dev in this example because some versions of steamos-chroot don’t work well with absolute paths.
Booting SteamOS and first steps
To boot SteamOS we can use a QEMU line similar to the one used during the installation. This time we’re not emulating an NVMe drive because it’s no longer necessary.
$ cp /usr/share/OVMF/OVMF_VARS.fd .
$ qemu-system-x86_64 -enable-kvm -smp cores=4 -m 8G \
   -device usb-ehci -device usb-tablet \
   -device intel-hda -device hda-duplex \
   -device VGA,xres=1280,yres=800 \
   -drive if=pflash,format=raw,readonly=on,file=/usr/share/ovmf/OVMF.fd \
   -drive if=pflash,format=raw,file=OVMF_VARS.fd \
   -drive if=virtio,file=steamos.qcow2 \
   -device virtio-net-pci,netdev=net0 \
   -netdev user,id=net0,hostfwd=tcp::2222-:22
(the last two lines redirect tcp port 2222 to port 22 of the guest to be able to SSH into the VM. If you don’t want to do that you can omit them)
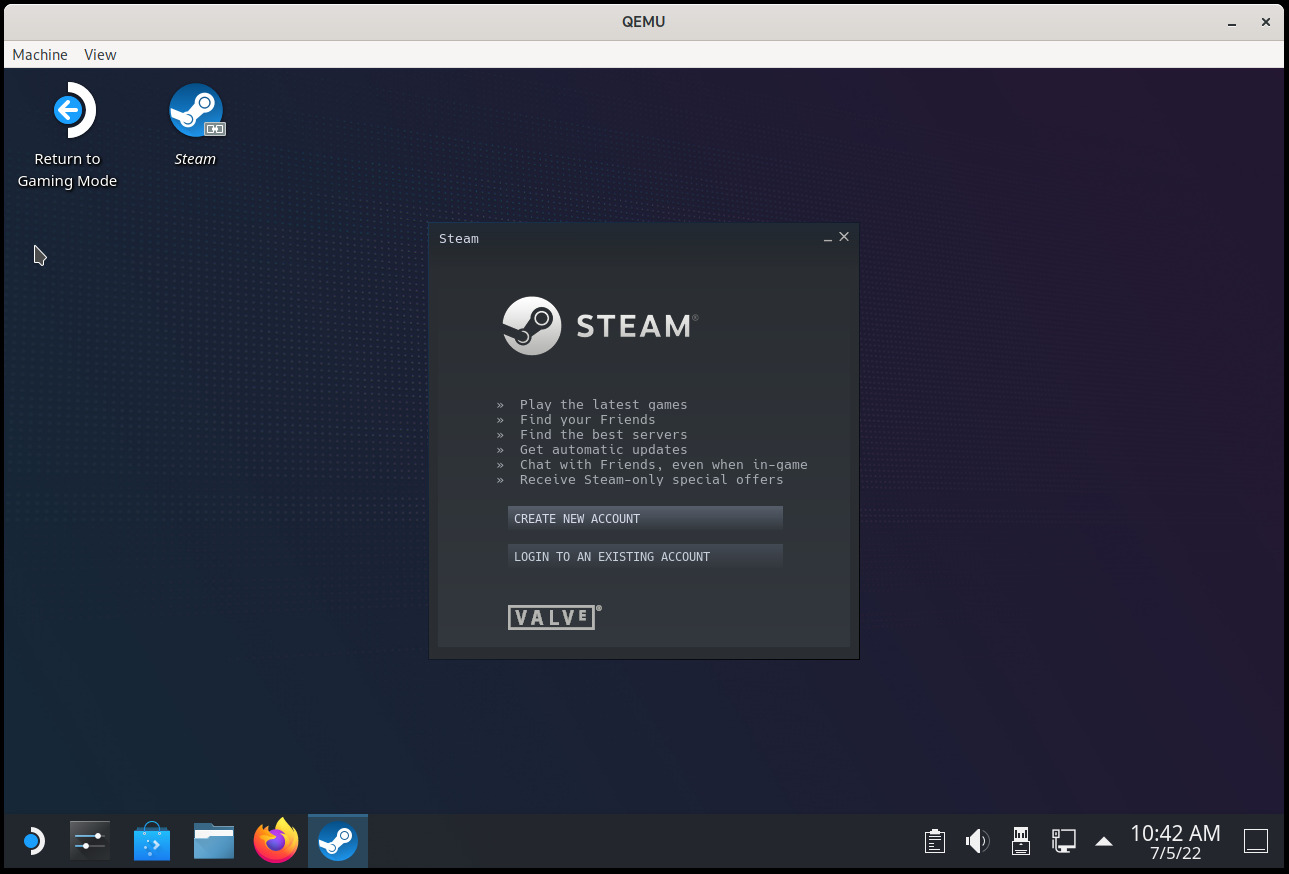
If everything went fine, you should see KDE Plasma again, this time with a desktop icon to launch Steam and another one to “Return to Gaming Mode” (which we should not use because it won’t work). See the screenshot that opens this post.
Congratulations, you’re running SteamOS now. Here are some things that you probably want to do:
- (optional) Change the keyboard layout in the system settings (the default one is US English)
- Set the password for the
deckuser: run ‘passwd‘ on a terminal - Enable / start the SSH server: ‘
sudo systemctl enable sshd‘ and/or ‘sudo systemctl start sshd‘. - SSH into the machine: ‘
ssh -p 2222 deck@localhost‘
Updating the OS to the latest version
The Steam Deck recovery image doesn’t install the most recent version of SteamOS, so now we should probably do a software update.
- First of all ensure that you’re giving enought RAM to the VM (in my examples I run QEMU with
-m 8G). The OS update might fail if you use less. - (optional) Change the OS branch if you want to try the beta release: ‘
sudo steamos-select-branch beta‘ (ormain, if you want the bleeding edge) - Check the currently installed version in
/etc/os-release(see theBUILD_IDvariable) - Check the available version: ‘
steamos-update check‘ - Download and install the software update: ‘
steamos-update‘
Note: if the last step fails after reaching 100% with a post-install handler error then go to Connections in the system settings, rename Wired Connection 1 to something else (anything, the name doesn’t matter), click Apply and run steamos-update again. This works around a bug in the update process. Recent images fix this and this workaround is not necessary with them.
If we updated to SteamOS 3.7 or a more recent version then we are done and we can restart the system. With earlier versions, and as explained in the previous section, before rebooting we should ensure that the new update boots into the Plasma session, otherwise it won’t work:
$ sudo steamos-chroot --partset other
# steamos-readonly disable
# echo '[Autologin]' > /etc/sddm.conf.d/zz-steamos-autologin.conf
# echo 'Session=plasma.desktop' >> /etc/sddm.conf.d/zz-steamos-autologin.conf
# steamos-readonly enable
# exit
After this we can restart the system.
If everything went fine we should be running the latest SteamOS release. Enjoy!
Reporting bugs
SteamOS is under active development. If you find problems or want to request improvements please go to the SteamOS community tracker.
Edit 06 Jul 2022: Small fixes, mention how to install the OS without using NVMe.
Edit 04 Apr 2024: add –no-overlay to the steamos-chroot command line. This is required in recent recovery images.
Edit 28 Jul 2025: Update instructions for the SteamOS 3.7.7 (20250521.10) recovery image.
Hello , thanks for your post. Is there a minumum CPU requierement ? (like SSE4.1 or AVX2)
My (old) laptop don’t support that, and except these log on serial, nothing append on main screen…. (Installing SteamOS)
—–8<—–8<—–8<—–8<—–8<—–8<—–8<—
BdsDxe: failed to load Boot0002 "UEFI QEMU NVMe Ctrl badbeef 1" from PciRoot(0x0)/Pci(0x6,0x0)/NVMe(0x1,00-00-00-00-00-00-00-00): Not Found
BdsDxe: loading Boot0003 "UEFI Misc Device" from PciRoot(0x0)/Pci(0x7,0x0)
BdsDxe: starting Boot0003 "UEFI Misc Device" from PciRoot(0x0)/Pci(0x7,0x0)
—–8<—–8<—–8<—–8<—–8<—–8<—–8<—
Those are normal messages. You should be able to boot the installer with just this:
$ qemu-system-x86_64 -enable-kvm -m 4G -drive if=virtio,file=steamdeck-recovery-4.img,driver=raw -bios OVMF.fd
After the messages that you pasted the screen should turn black and some seconds later you should see the Steam Deck logo.
Now, you mention SSE4.1 which was introduced in 2007 … does your computer have enough RAM for this? What versions of QEMU and OVMF are you using?
I’m using an up-to-date Fedora 36
edk2-ovmf-20220526git16779ede2d36-3.fc36.noarch
qemu-kvm-6.2.0-12.fc36.x86_64
and my laptop is an i5-2540M with 12Go (include support for sse4_1/2 but no AVX….)
Here log with latest cmd line
—–8<—–8<—–8<—–8<—–8<—–8<—–8
—–8<—–8<—–8<—–8<—–8<—–8<—–8<—
I will try on a more recent HW !
…sorry, cannot edit….
UEFI Interactive Shell v2.2
EDK II
UEFI v2.70 (EDK II, 0x00010000)
Mapping table
FS0: Alias(s):HD1b:;BLK2:
PciRoot(0x0)/Pci(0x4,0x0)/HD(1,GPT,11A09FE3-098A-4948-A60F-92C268AF463B,0x22,0x1FFDE)
FS1: Alias(s):HD1c:;BLK3:
PciRoot(0x0)/Pci(0x4,0x0)/HD(2,GPT,CD10524C-D8B5-41AD-B21E-3A2558992CCC,0x20000,0x40000)
BLK0: Alias(s):
PciRoot(0x0)/Pci(0x1,0x1)/Ata(0x0)
BLK1: Alias(s):
PciRoot(0x0)/Pci(0x4,0x0)
BLK4: Alias(s):
PciRoot(0x0)/Pci(0x4,0x0)/HD(3,GPT,3E6E8320-4968-41F7-AD12-AB1E83A3C318,0xA0000,0xA00000)
BLK5: Alias(s):
PciRoot(0x0)/Pci(0x4,0x0)/HD(4,GPT,95C2BD7D-B829-488B-A797-21D2D160C65F,0xAA0000,0x80000)
BLK6: Alias(s):
PciRoot(0x0)/Pci(0x4,0x0)/HD(5,GPT,C292AB5B-C340-413D-8DF2-06A3414FA78D,0xB20000,0x34C9E7)
Press ESC in 1 seconds to skip startup.nsh or any other key to continue.
Shell>
I would actually try with a different version of OVMF.
Get this one for example: https://archive.archlinux.org/packages/e/edk2-ovmf/edk2-ovmf-202205-1-any.pkg.tar.zst
And use the file /usr/share/edk2-ovmf/x64/OVMF.fd from that tarball
Just check with your link, extracted in my rootfs, but not better….
Exactly same log like previous…. I will check on another recent machine, and keep your in touch. Maybe “Qemu” from Fedora make wrong…. Which distro are you using?
As promised, some feedback:
Fedora 36: old & recent HW, Still not able to have something working… (w/o other OVMF….)
Ubuntu 20.04: it just work as expected !
My previous post which go into UEFI shell was due to corrupted image…
Hi!
Thank you so much for this tutorial!
I have managed to make it work perfectly by running qemu-system-x86_64 from the command-line. Unfortunately could not create a VM under virt-manager GUI that works. It looks like there is no way to create a VM by providing qemu cmdline args as it has to be configured by an xml file.
Maybe it’s a long shot but I thought I should ask; do you happen to know the virsh or XML configurations which are equivalent to the qemu cmdline args you provided? I am having trouble with the network port forward (which is not really required) but specially with the video settings.
Thank you.
Kindest regards.
Sorry I’m not too familiar with virt-manager, but you just need to emulate a normal x86_64 PC, the only special thing is that it has to boot using UEFI.
use
doh tag automangle
use qemu:commandline
hi
thank you for this toturial
i noticed that in this toturial we have to edit `/etc/sddm.conf.d/zz-steamos-autologin.conf` for every update, cause every update will erase rootfs. but after installation, i found that `/etc` is mounted as a overlayfs, which consists of a lowerdir in root mount the rootfs and upperdir in `/var` mount another partition which will not be erased during update. so if we put the `sddm.conf.d/zz-steamos-autologin.conf` file to each upperdir `/var/lib/overlays/etc/upper/` of two partsets A and B instead of `/etc`, we don’t have to care about this file anymore.
i tested it once, and it survive the update, i didn’t do more test, the update is a suffer on my network.
i think this may be helpful so leave the comment here.
and thanks for this toturial again.
Super helpful, thanks for posting these instructions! Works well on Windows, on a Ryzen 5600X, replacing “-enable-kvm” with “-accel whpx,kernel-irqchip=off” (just make sure to enable virtualization in bios, and in “turn windows features on or off” select “Windows Hypervisor Platform”
Pingback: Adding software to the Steam Deck with systemd-sysext | The world won't listen
Hi, thanks for posting this. Following your instructions (except using qcow2 raw on zfs) I get steam-os installed but when it boots it stops at steamdeck login: (rotated 90 degrees) and stops. Any ideas on what I’m doing wrong?
Disregard, was raw fs. Tried again following instructions to the letter and it worked perfect. Thanks.
Here’s the libvirt xml for virt-manager. I can’t do code blocks here. It already has the boot order correct. You just need to create the qcow2 file as described or with virt-manager. To work with virt-manager (at least on Ubuntu or distro with AppArmor) you’ll also need to add this to /etc/apparmor.d/abstractions/libvirt-qemu:
/var/lib/libvirt/images/steamos.qcow2 rwk,
then systemctl restart apparmor.service
Here’s the XML file:
archlinux
25ba81c6-dc70-4022-a85f-ba55d4a899a9
16777216
16777216
4
hvm
/usr/share/OVMF/OVMF_CODE_4M.fd
/var/lib/libvirt/qemu/nvram/archlinux_VARS.fd
destroy
restart
destroy
/usr/bin/qemu-system-x86_64
/dev/urandom
Sorry, the formatting got all messed up. Here it is: https://gist.github.com/stevenlafl/08c1a827e14e7fbe80fe673207fa5832
Hello,
I am French and I use google translate, can you be tolerant with me, my bad English and the translation.
I followed this tutorial, I manage to make steamdeck os work,
but I still have two questions:
– is it possible to run this virtual machine in Machine (Gnome Boxes) or in Virtualbox, if so, how?
– is it possible to run this virtual machine in proxmox, if so, how?
yes you can laugh, there are not two questions, there are four, I apologize
Hello, I suppose it’s possible but I haven’t tried with any of those.
You just need to emulate a normal PC that boots using UEFI, you don’t need anything special.
I believe the method you’re using is the only one that works. I tried launching this image in VirtualBox, and either it doesn’t work, or I don’t know how to do it. But maybe that’s not what you’re referring to.
I don’t use VirtualBox so I cannot really say what’s wrong, sorry.
Here’s a procedure for getting the SteamOS recovery image to boot in Virtual Machine Manager (virt-manager) on Ubuntu 22:
1. Create new VM
2. Select Manual Install
3. Select Arch Linux as the OS type
4. Select “Customize before installation”
5. In “Overview” select UEFI instead of BIOS in the “Hypervisor” section
6. Add a disk pointing at the SteamOS recovery image (e.g. steamdeck-recovery-4.img)
7. Select the recovery disk as the only bootable disk in the “Boot Options” pane
8. Press “Start installation”
9. UEFI will fail to boot and you’ll get a “Shell>” prompt. Type “exit”.
10. In the BIOS menu, go to “Device Manager”, “Secure Boot configuration” and disable secure boot
11. Return to the BIOS home menu (ESC, ESC) and choose Reset.
12. Ta da!
You can now follow the rest of this guide, but note that any hard disk you’ve attached will *not* be NVME, since Libvirt does not support it. You can solve this by editing the SteamOS recovery installer (as mentioned in this post) or by adding custom Qemu command-line arguments in a “” in the XML of your VM spec.
Enjoy.
You can achieve the same thing through the command line with, e.g.
qemu-img create -f qcow2 steamos.qcow2 64G
virt-install –name ‘steamos-test’ –osinfo archlinux –memory 8192 –boot uefi,loader_secure=no –disk steamdeck-recovery-4.img –disk steamos.qcow2
Note that “loader_secure=no” does define the correct XML, but on my Ubuntu 22 with Libvirt 8.0.0, secure boot was still enabled the first time the machine booted, so follow my steps 10 and 11 above.
In this case, the steamos.qcow2 image will appear as /dev/vdb and you need to edit DISK in ~/tools/repair_device.sh in the recovery image to point to that, and edit DISK_SUFFIX to the empty string.
How do I do this via Termux on an Android?
I’m not sure that I understand the question, do you want to run a SteamOS VM from Termux using QEMU? I never tried that.
Your solution is not working on Apple Silicon
For everyone trying this on Fedora. I made the SteamOS VM work on Fedora after it running flawlessly on Debian for many months. The OVMF packages by Fedora seem to be built inherintly differently. The binary OVMF packages on Fedora 37 and Fedora 41 do not seem to work. The VM seems to get stuck as soon at the exact moment where the systemd bootup logs should show. The OVMF packages imported from Debian 12 or sid seem to be working absolutely fine though.
Grabbing OVMF package from Debian Sid using Podman is easy. But remember, that Fedora needs security flags to be set
“`
podman run –name debian-sid -it –rm debian:sid
apt update && apt install ovmf
“`
Different Terminal
“`
podman cp debian-sid:/usr/share/OVMF/ /var/opt/ovmf-debian
chcon -t svirt_image_t /var/opt/ovmf-debian/OVMF_CODE_4M.fd
“`
Add this exact section as the EFI section.
“`
hvm
/var/opt/ovmf-debian/OVMF_CODE_4M.fd
/var/lib/libvirt/qemu/nvram/whatever_your_vm_is_called_VARS.fd
“`
After that it worked exactly as expected. As I was used to on Debian 12.
Unfortunately the XML section seems to got garbled:
hvm
/var/opt/ovmf-debian/OVMF_CODE_4M.fd
/var/lib/libvirt/qemu/nvram/whatever_your_vm_is_called_VARS.fd
OK. XML pasting does not seem to work at all.
Maybe this screenshot helps: https://imgur.com/a/nIrv2Ij
Finally, a guide that works! Unfortunately, I accidentally skipped the most important part the first few times, even though it’s even boldfaced, quoted below:
“Now, once the operation finishes a new confirmation dialog will ask if we want to reboot the Steam Deck, but here we have to choose “Cancel”. We cannot use the new image yet because it would try to boot into Gaming Mode, which won’t work, so we need to change the default desktop session.”