18
Jan 23

Deprecating old stuff

Chromium 109 (released January 10, 2023) has dropped support for xdg_shell_unstable_v6, one of Wayland shell protocols.

For years, the Chromium’s Wayland backend was aware of two versions of the XDG shell interface. There were two parallel implementations of the client part, similar like twins. In certain parts, the only difference was names of functions. Wayland has a naming convention that requires these names to start with the name of the interface they work with, so where one implementation would call xdg_toplevel_resize(), the other one would call zxdg_toplevel_v6_resize().

The shell is a now standard Wayland protocol extension that describes semantics for the “windows”. It does so by assigning “roles” to the Wayland surfaces, and by providing means to set relative positions of these surfaces. That altogether makes it possible to build tree-like hierarchies of windows, which is absolutely necessary to render a window that has a menu with submenus.

The XDG shell protocol was introduced in Wayland protocols a long time ago. The definition file mentions 2008, but I was unable to track its history back that far. The Git repository where these files are hosted these days was created in October 2015, and the earlier history is not preserved. (Maybe the older repository still exists somewhere?)

Back in 2015, the XDG shell interface was termed “unstable”. Wayland waives backwards compatibility for unstable stuff, and requires the versions to be explicitly mentioned in the names of protocols and their definition files. Following that rule, the XDG shell protocol was named xdg_shell_unstable_v5. Soon after the initial migration of the project, the version 6 was introduced, named xdg_shell_unstable_v6. Since then, there are two manifests in the unstable section, xdg-shell-unstable-v5.xml and xdg-shell-unstable-v6.xml. I assume versions prior to 5 were dropped at the migration.

This may be confusing, so let me clarify. Wayland defines several entities to describe stuff. A protocol is a grouping entity: it is the root element of the XML file where it is defined. A protocol may contain a number of interfaces that describe behaviour of objects. The real objects and calls are bound to interfaces, but the header files are generated for the protocol as a whole, so even if the client uses only one interface, it will import the whole protocol.

The XDG shell allows the application to, quoting its description, “create desktop-style surfaces”. A number of desktop environments implemented support for the unstable protocol, providing feedback and proposing improvements. In 2017, the shell protocol was declared stable, and got a new name: xdg_shell. The shell interface was renamed from zxdg_shell_v6 to xdg_wm_base. Since then, the clients had to choose between two protocols, or to support both.

For the stable stuff, the convention is simpler and easier to follow: the changes are assumed to be backwards compatible, so names of interfaces and protocols are fixed and no longer change. The version tracking is built into the protocol definition and uses the self-explanatory version and since attributes. The client can import one protocol and decide at run time which calls are possible and which are not depending on the version exposed by the compositor.

The stable version continued to evolve. Eventually, the unstable version became redundant, and in 2022 major Wayland compositors started to drop support for it. By November in the past year we realised that the code that implemented the unstable shell protocol in Chromium was no longer used by real clients. Of 30 thousand recorded uses of the Wayland backend, only 3 (yeah, just three) used the unstable interface. The time had come to get rid of the legacy, which was more than one thousand lines of code.

Some bits of the support for alternative shell interfaces is preserved, though. A special factory class named ui::ShellObjectFactory is used to hide the implementation details of the shell objects. Before getting rid of the unstable shell implementation, the primary use of the factory was to select the XDG shell interface supported by the host. However, it also made it possible to integrate easily with the alternative shells. For that purpose, mainly for the downstream projects, the factory will remain.
17
Dec 21

Ozone: our way to the big change

Did you know that there is the Ozone layer inside Chromium? Well, Chromium is so huge, it has enough space for anything. Like the real ozone layer on the planet Earth that protects life beneath from harmful cosmic rays, the Ozone layer in Chromium shields the browser from the (sometimes unfriendly) environment. The purpose of Ozone is to hide the actual platform implementation and convert platform-specific entities such as UI events or windows into platform-agnostic ones. Unlike the ozone layer on planet Earth which is above the most of things, Ozone in Chromium is somewhere below almost everything. Heck, many things in computers are upside down.

Ozone is old. Quite a few of its source files are dated 2014, but probably that is the time when parts of the design that already existed somewhere else were re-shaped as the new component that got this name: Ozone. At that time it was used only by ChromeOS—likely to provide some adapters for the variety of base systems that ChromeOS had to integrate with.

Igalia started dealing with Ozone while implementing the native support for Wayland in the desktop Chromium. The full story of the project is so long and complicated that it is hard to find a single source that would cover it all, but if you are interested, take a look at The pathway to Chromium on Wayland by Antonio Gomes and Jeongeun Kim, or at this presentation from BlinkOn 13 by Maksim Sisov and me. Here I will only mention the major milestones.

From compile time to run time

When the work began, the Linux port of Chromium only knew X11 as an implied part of the Linux environment. There was a USE_X11 macro that was defined in Linux builds, and it was used generously to guard Linux-specific logic in hundreds of places throughout the code base. Everything was static, defined at compile time, and not welcoming any change. Our task was to find a way to insert something totally new, and after trying a few approaches, it was agreed that using Ozone for that would be the best choice. After all, its main purpose is hiding the platform, and Wayland fits well the definition of “platform”, so why not?

There was one problem with that. Back then Ozone was also enabled at compile time, and the only configuration it was enabled for was ChromeOS. For the desktop Chromium, it was not even compiled, the source files were not included into the build. To bring Wayland support into Chromium in form of the Ozone platform, we had to refactor the entire Linux implementation to make Ozone the integral part of Chromium, and then to convert the existing Linux implementation into one of Ozone platforms. What is more, we needed to do all that following the standard development process in Chromium: committing our changes to the upstream Chromium repository, keeping tests passing, and introducing as little overhead as possible. What is even more, we had to keep the existing implementation until the Ozone platform is fully functional.

When the plan was set, our partners in the Chromium community said, “even if we do all the job, noone will accept a change that big right away, so we need to be silent and approach the goal in small steps.” So we did, and it was silent until we sent the patch that enabled compilation of Ozone in Linux desktop builds. One of reviewers said then, “I don’t think this is right.” We managed to convince them that it was right.

Long story short, we followed that plan since 2019, and by the end of 2020 we started to feel the coming finale. The new Ozone platform, X11, caught up rapidly with the legacy implementation. In our dev environments, we used Ozone/X11 routinely, and noticed no difference to the legacy mode. To ship Ozone as the new default, the only thing we needed was ensuring that everyone else would not notice the change either.

How could we know that? Chromium has Finch, the built-in facility for doing the A/B testing on the real audience: users of Chrome. It also has another built-in facility for gathering various performance metrics on users’ hosts and aggregating them on the server side. Together they make it possible to compare different configurations. A new feature is first enabled for a small share of users in the developers release channel, then it is extended to a larger share, then the same is repeated in the beta channel, and finally it comes to the stable one. The performance metrics are analysed all the time during the rollout, so if any regressions are found, the experiment will be put on hold or stopped.

So to roll Ozone out gracefully and the controlled way, we had to combine both the legacy and the Ozone paths in the single binary, so that Ozone could be enabled for the end user at run time in the process of A/B testing. The Ozone mode would be the new “feature”, and switching the mode would be possible by setting the so called feature flag. That was also part of the grand plan.

One year ago and today

At the beginning of 2021 we were actively working on completing the feature for A/B testing. We revised all Linux-specific code so that it could be used by both the legacy implementation and the Ozone platform. We fixed and enabled tests. We configured the infrastructure so that the continuous integration would be aware of Ozone. Finally, everything was ready.

The field trial of Ozone with the X11 platform started on April, 30th, and finished by the end of August with success. Since that time, Ozone is the default path for Linux. We started to clean up the code immediately, and by date, the USE_X11 macro is history.

We still keep a few items of USE_X11 displayed in museums, but sooner or later the inventory committee may decide that they have no historical value—and throw them away.

Modularity has always been one of core principles of Linux. From that perspective, migrating Chromium from its monolithic design to Ozone that is naturally modular was the right choice. The new architecture is much easier to extend, both for Chromium itself and for downstream projects. Check this video to see what it takes to implement a minimal Ozone platform—not much!

For more details on where we are now, see another post by my colleague Maksim.

What is next?

These days we are coming to the public release of Wayland, the second Ozone platform for the desktop Chromium. It is not as simple as the demo that I mentioned above—we have been working on it during all these years. Ozone has grown a lot thanks to our work on two real platforms, and gained flexibility that it did not have before. We extended Ozone a lot to make that possible, and hopefully it will now stabilise a bit.

After the Wayland platform is finally released, we expect some support and maintenance work to be coming for a while. Wayland (I mean the compositor here) is itself evolving rapidly, and it has already got a few distinct “flavours” attributed to major Linux desktop environments, which is one more question to modularity and flexibility of Chromium and other applications. We will keep an eye on that—and tell you the news.


23
Nov 21

Drop shadows on Linux, or why standards are good

Since the origins of graphical desktop environments, there were two approaches to styling GUI of an application: using the standard system toolkit versus choosing a custom one.

When a single platform is targeted, choosing the approach is often the matter of aesthetics or some particular features that may be supported in certain toolkits. The additional cost of adopting a custom toolkit may actually be a one-time investment, and if the decision to use it is taken at the right time, the cost may be low. However, when it comes to cross-platform applications, using a cross-platform toolkit is the obvious choice.

GUI toolkits do a good job at rendering the contents of the window, but there is an area where they usually step aside: window decorations. Even if we look at cross-platform toolkits, the best they can do is provide some façade for the standard options available on supported platforms. But what if we want to customise everything?

Let us take a look at some random window in a modern desktop environment.

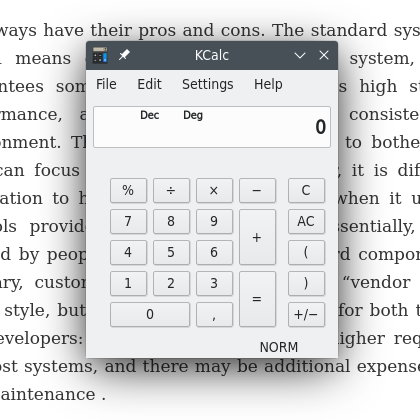
This is KCalc, the standard calculator application built into KDE Plasma desktop environment.

KCalc, the standard application built into KDE Plasma

What if we wanted to replicate that on our own? At first glance, no big deal. Drawing the title bar would not be that difficult, as long as we render everything in the window. The border is easy too, and rounded corners are also feasible if the window manager supports transparency.

But the window also has a drop shadow. We have to render it too, and this is where things become tricky.

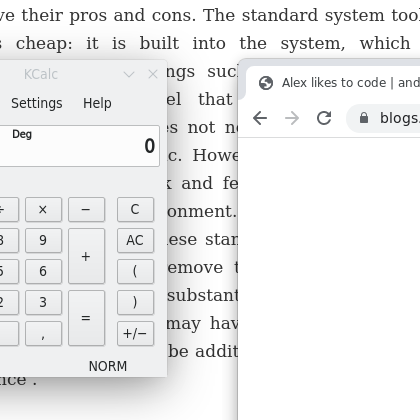
KCalc vs. Chromium.  Drop shadows look quite different.

KCalc vs. Chromium, note how different the shadows are

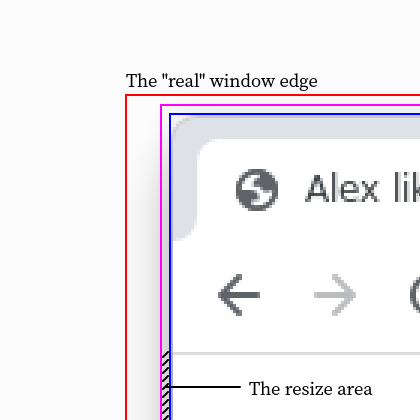
Yes, the drop shadow is essentially just one more area inside the window, we have to render it, and also we have to make things around it work smoothly. The inner strip of the shadow should work as the frame of the window where the user would see the resize mouse pointer (and it should work that way), while the outer part should be totally transparent for the mouse events, but not totally—to the user’s eye.

The outermost rectangle is the edge of the “real” window; the innermost one is the “logical” one. The narrow strip (partially striped) that borders the logical window is the resize area.

Basically, to be able to do what we have just explained, we need two things. The first one is support for transparency in the window manager. The second one is some way to tell the window manager where our “logical” window resides within the “real” one, so that the environment could correctly snap our window to the edge of the screen or to other windows when we drag it there. (The inner part that makes sense as a window to the user is often called “window geometry”.)

On Wayland, transparency is always supported (yay!), and the concept of the window geometry is part of the desktop shell protocol, such as xdg_wm_base. Both requirements are met.

On X11 it is more complicated. First, transparency is not always supported, but let us assume that we have that support, otherwise we cannot have any shadows. The major pain is setting the window geometry, or to say better, the lack (at the moment of writing) of a standard way to do so. There is a _GTK_FRAME_EXTENTS window property that, as its name suggests, was once introduced in GTK. There it seems to be used to define margins at the edges of the window—you may ask, “it seems”? Are you not certain? Well, yes, because that property is not documented. There are a few other posts about this issue on the internet. I would recommend What are _GTK_FRAME_EXTENTS and how does Gnome Window Sizing work? by Erwin and CSD support in KWin by Vlad Zahorodnii.

Currently _GTK_FRAME_EXTENTS is supported by GNOME (naturally) and KDE Plasma (reverse engineered). In other desktop environments (or to say better, in window managers other than Mutter and KWin) setting it may cause weird issues.

Precisely that issue is what happened to Chromium.

In regards to the window decorations, the Linux port of Chromium was a bit backwards for a very long time. It had an old style thick frame with sharp corners and without the drop shadow. Finally, that had been improved, and the modern window decorations were shipped in Chromium version 94. The new implementation used _GTK_FRAME_EXTENTS to define the shadow area.

Soon after that, a bug report came from users of Enlightenment. In that environment things inside the Chromium window went mad, mouse clicks strayed from the actual position of the pointer. The quick investigation (it was really quick thanks to the help of people who reported the problem) showed that the culprit was that very window property. The window manager got confused when the frame extents were set to zeros for a maximised window, instead it expected the property to be reset completely.

Soon after we landed the fix, and people from Enlightenment confirmed that the issue was resolved, another bug report came, this time from Xfce. There, the investigation was a bit longer, but finally we found (thanks to the help of people who reported the problem and to the maintainers of the window manager) that the window manager in that environment actually expects quite the opposite: for the maximised window it wants all zeros, and gets confused if the property is reset completely.

The situation came to a dead end. Two window managers wanted exactly the opposite things. What could be done to resolve the issue? We could easily end up having workarounds for every non-standard window manager, which is one of the most unpleasant situations in software maintenance.

Luckily, the maintainers of Xfwm4 (the window manager in Xfce) suggested fixing the issue from their side, and landed the fix really promptly. So this story has a happy end!

Or rather, the story will have a happy end, because we still had to put in a workaround for Xfwm4 that disables window decorations on that window manager. The workaround is temporary, and we will remove it once Linux distributions that base on Xfwm4 adopt the fix.


04
Dec 20

Django + Postgres + nginx + uWSGI = ❤️

To date, I set up a production web service thrice. (Yeah, I am a full stack dev!)

The first time I did many mistakes. That website still works, I maintain and update it, but now it would be difficult to fix things, I would have to stop the service and have some quite stressful time re-configuring it.

The second time I did it more or less right, but the deployment happened in the corporate network of the company that I no longer work for, so that knowledge is now lost to me.

When I tried to do it the third time, I had to recall and google many things again. Now it works, so it is a good moment to write a note to myself in future.

The plan

Five steps to quick and easy deployment by Alex who likes to code:

  1. Install nginx, uwsgi, python3, and postgres. (no-op)
  2. Set up PostgreSQL.
  3. Check out the Django project and set it up.
  4. Configure uWSGI.
  5. Configure nginx.

Setting up prerequisites is literally one call to the package manager (yes, I assume that we are on Linux). Too easy, I cannot write anything else about that. Other parts are longer.

PostgreSQL

As user postgres, run psql. This will take us into the DBMS console. There, run the following:

CREATE DATABASE db-name;
CREATE USER db-user WITH PASSWORD 'password';
ALTER ROLE db-user SET client_encoding TO 'utf8';
ALTER ROLE db-user SET default_transaction_isolation
    TO 'read committed';
ALTER ROLE db-user SET timezone TO 'UTC';
GRANT ALL PRIVILEGES ON DATABASE db-name TO db-user;

Most commands above are quite self-explanatory. The ALTER ROLE ones are not mandatory but may be useful.

Now exit the DBMS console and proceed to the next part.

Django

This part is the longest, it is in fact the actual deployment of the project, other parts are just… environment.

  1. Switch to the user that will normally do whatever is required regarding the source code, e.g., updating the checkout, editing the code and project configs, etc. Let it be user project.
  2. Check out the project into the common location for websites, like /var/www on Debian. Let it be /var/www/project (we will need it later a few more times).
  3. Create the virtual Python environment (venv); modern versions of Python can do that themselves via python -m venv {directory name}, I like to have it in the venv directory directly within the Django project, so the full path would be /var/www/project/venv.
  4. Activate the venv and install Python requirements. Do not deactivate it for the next few steps.
  5. Edit the project settings. See remarks below for some ideas about this.
  6. Test that the project is configured properly by running manage.py migrate.
  7. Test even more that the project is configured properly by running manage.py runserver. Terminate the server after it starts normally.
  8. Create the Django superuser by running manage.py createsuperuser. We may deactivate the venv now.

Remarks on preparing the project for deployment

The web service always has some site-specific settings, and putting them under the version control would be a pain. I like the idea of moving these settings into the separate file from the very beginning. Create site_settings.py near the standard settings.py, cut and paste whatever is going to differ between hosts, and then add from .site_settings import * into settings.py. Add site_settings.py into .gitignore.

We definitely want SECRET_KEY, DEBUG, and DATABASES to stay in the site config.

uWSGI

As root, create /etc/uwsgi/apps-available/project.ini (the .ini extension is important!) and put this inside:

[uwsgi]
# The root directory of the Django project.
chdir  = /var/www/project
# The Python module within the project that creates
# the application.  It is already there, built into
# every Django project.
module = project.wsgi
# The venv that should be used.
home   = /var/www/project/venv

# Used to connect to the web server.
socket       = /var/www/project/socket
# uWSGI has plugins for different platforms.
# This may require to install something like
# uwsgi-plugin-python3.
plugins      = python37

# Not important :-D but still needed.
master       = true
processes    = 5
vacuum       = true

Create a link to the newly created config to enable the application:

ln -s /etc/uwsgi/apps-available/project.ini \
        /etc/uwsgi/apps-enabled/project.ini

Restart uwsgi and ensure that it runs with no errors.

nginx

As user project, create /var/www/project/project/uwsgi_params and put there this:

uwsgi_param QUERY_STRING $query_string;
uwsgi_param REQUEST_METHOD $request_method;
uwsgi_param CONTENT_TYPE $content_type;
uwsgi_param CONTENT_LENGTH $content_length;
uwsgi_param REQUEST_URI $request_uri;
uwsgi_param PATH_INFO $document_uri;
uwsgi_param DOCUMENT_ROOT $document_root;
uwsgi_param SERVER_PROTOCOL $server_protocol;
uwsgi_param REMOTE_ADDR $remote_addr;
uwsgi_param REMOTE_PORT $remote_port;
uwsgi_param SERVER_ADDR $server_addr;
uwsgi_param SERVER_PORT $server_port;
uwsgi_param SERVER_NAME $server_name;

(This is in fact the standard file that is shipped with the nginx distribution.)

Now switch to root, create /etc/nginx/sites-available/project and put this inside:

server {
    listen      80;
    server_name project.org;
    charset     utf-8;

    location /static/ {
        alias /var/www/project/static/;
    }

    location / {
        \# Connection to uWSGI.
        uwsgi_pass unix:/var/www/project/socket;
        include    /var/www/project/project/uwsgi_params;
    }
}

Create a link to the newly created config to enable the website:

 ln -s /etc/nginx/sites-available/project \
    /etc/nginx/sites-enabled/project

Restart nginx and ensure that it runs without errors.

That is it!

References


13
Nov 20

HiDPI support in Chromium for Wayland

It all started with this bug. The description sounded humble and harmless: the browser ignored some command line flag on Wayland. A screenshot was attached where it was clearly seen that Chromium (version 72 at that time, 2019 spring) did not respect the screen density and looked blurry on a HiDPI screen.

HiDPI literally means small pixels. It is hard to tell now what was the first HiDPI screen, but I assume that their wide recognition came around 2010 with Apple’s Retina displays. Ultra HD had been standardised in 2012, defining the minimum resolution and aspect ratio for what today is known informally as 4K—and 4K screens for laptops have pixels that are small enough to call it HiDPI. This Chromium issue, dated 2012, says that the Linux port lacks support for HiDPI while the Mac version has it already. On the other hand, HiDPI on Windows was tricky even in 2014.

‘That should be easy. Apparently it’s upscaled from low resolution. Wayland allows setting scale for the back buffers, likely you’ll have to add a single call somewhere in the window initialisation’, a colleague said.

Like many stories that begin this way, this turned out to be wrong. It was not so easy. Setting the buffer scale did the right thing indeed, but it was absolutely not enough. It turned out that support for HiDPI screens was entirely missing in our implementation of the Wayland client. On my way to the solution, I have found that scaling support in Wayland is non-trivial and sometimes confusing. Since I finished this work, I have been asked a few times about what happens there, so I thought that writing it all down in a post would be useful.

Background

Modern desktop environments usually allow configuring the scale of the display at global system level. This allows all standard controls and window decorations to be sized proportionally. For applications that use those standard controls, this is a happy end: everything will be scaled automatically. Those which prefer doing everything themselves have to get the current scale from the environment and adjust rendering.  Chromium does exactly that: inside it has a so-called device scale factor. This factor is applied equally to all sizes, locations, and when rendering images and fonts. No code has to bother ever. It works within this scaled coordinate system, known as device independent pixels, or DIP. The device scale factor can take fractional values like 1.5, but, because it is applied at the stage of rendering, the result looks nice. The system scale is used as default device scale factor, and the user can override it using the command line flag named --force-device-scale-factor. However, this is the very flag which did not work in the bug mentioned in the beginning of this story.

Note that for X11 the ‘natural’ scale is still the physical pixels.  Despite having the system-wide scale, the system talks to the application in pixels, not in DIP.  It is the application that is responsible to handle the scale properly. If it does not, it will look perfectly sharp, but its details will be perhaps too small for the naked eye.

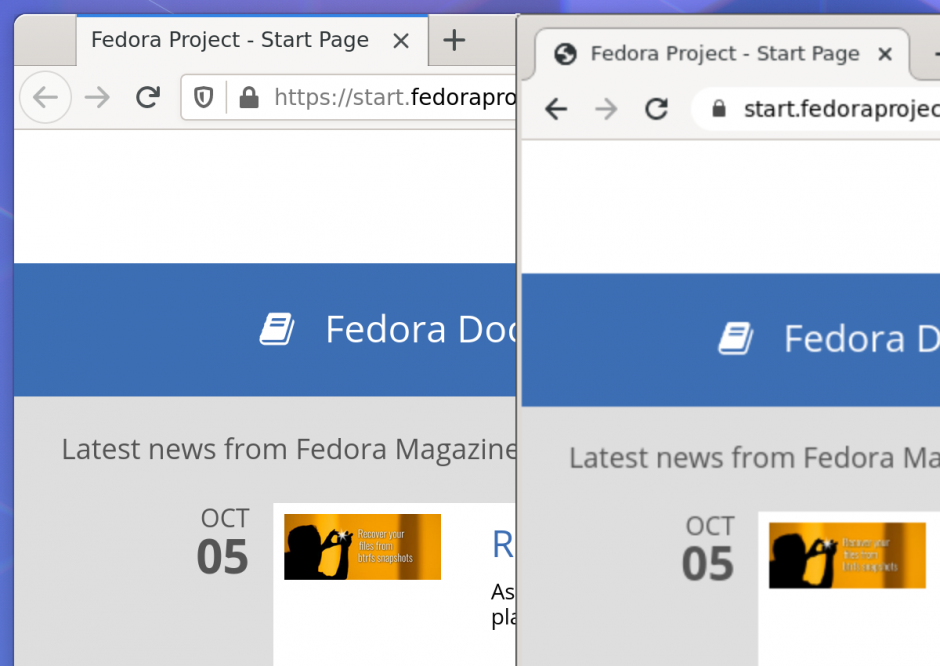
However, Wayland does it a bit differently. The system scale there is respected by the compositor when pasting buffers rendered by clients. So, if some application has no idea about the system scale and renders itself normally, the compositor will upscale it.  This is what originally happened to Chromium: it simply drew itself at 100%, and that image was then stretched by the system compositor. Remember that the Wayland way is giving a buffer to each application and then compositing the screen from those buffers, so this approach of upscaling buffers rendered by applications is natural. The picture below shows what that looks like. The screenshot is taken on a HiDPI display, so in order to see the difference better, you may want to see the full version (click the picture to open).

What Chromium looked like when it did not set its back buffer scale

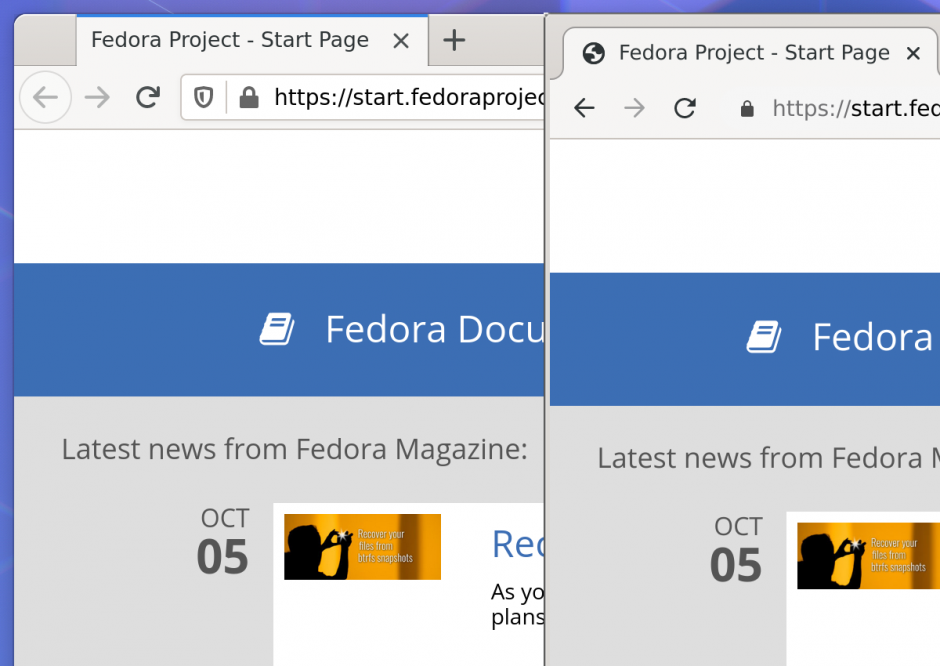
Firefox (left) vs. Chromium (right)

How do Wayland clients support HiDPI then?

Level 1. Basic support

Each physical output device is represented at the Wayland level by an object named output. This object has a special integer property named buffer scale that tells literally how many physical pixels are used to represent the single logical pixel. The application’s back buffer has that property too. If scales do not match, Wayland will simply scale the raster image, thus emulating the ‘normal DPI’ device for the application that is not aware of any buffer scales.

The first thing the window is supposed to do is to check the buffer scale of the output that it currently resides at, and to set the same value to its back buffer scale. This will basically make the application using all available physical pixels: as scales of the buffer and the output are the same, Wayland will not re-scale the image.

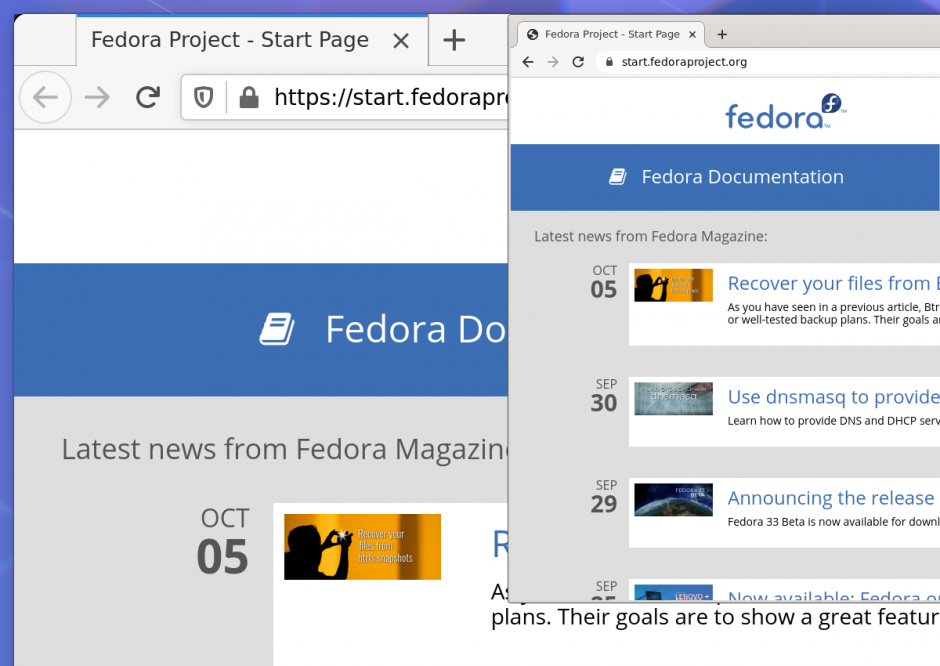
Back buffer scale is set but rendering is not aware of that

Chromium now renders sharp image but all details are half their normal size

The next thing is fixing the rendering so it would scale things to the right size.  Using the output buffer scale as default is a good choice: the result will be ‘normal size’.  For Chromium, this means simply setting the device scale factor to the output buffer scale.

Now Chromium looks right

All set now

The final bit is slightly trickier.  Wayland sends UI events in DIP, but expects the client to send surface bounds in physical pixels. That means that if we implement something like interactive resize of the window, we will also have to do some math to convert the units properly.

This is enough for the basic support.  The application will work well on a modern laptop with 4K display.  But what if more than a single display is connected, and they have different pixel density?

Level 2. Multiple displays

If there are several output devices present in the system, each one may have its own scale. This makes things more complicated, so a few improvements are needed.

First, the window wants to know that it has been moved to another device.  When that happens, the window will ask for the new buffer scale and update itself.

Second, there may be implementation-specific issues. For example, some Wayland servers initially put the new sub-surface (which is used for menus) onto the default output, even if its parent surface has been moved to another output.  This may cause weird changes of their scale during their initialisation.  In Chromium, we just made it so the sub-surface always takes its scale from the parent.

Level 3? Fractional scaling?

Not really. Fractional scaling is basically ‘non-even’ scales like 125%. The entire feature had been somewhat controversial when it had been announced, because of how rendering in Wayland is performed. Here, non-even scale inevitably uses raster operations which make the image blurry. However, all that is transparent to the applications. Nothing new has been introduced at the level of Wayland protocols.

Conclusion

Although this task was not as simple as we thought, in the end it turned out to be not too hard. Check the output scale, set the back buffer scale, scale the rendering, translate pixels to DIP and vice versa in certain points. Pretty straightforward, and if you are trying to do something related, I hope this post helps you.

The issue is that there are many implementations of Wayland servers out there, not all of them are consistent, and some of them have bugs. It is worth testing the solution on a few distinct Linux distributions and looking for discrepancies in behaviour.

Anyway, Chromium with native Wayland support has recently reached beta—and it supports HiDPI! There may be bugs too, but the basic support should work well. Try it, and let us know if something is not right.

Note: the Wayland support is so far experimental. To try it, you would need to launch chrome via the command line with two flags:
--enable-features=UseOzonePlatform
--ozone-platform=wayland


01
Jul 20

Hello world!

I am Alex, working on Chromium since 2013, Igalian since 2019, and chromie for a while now.

Chromie? Yes, that is what Chromium engineers use when referring to themselves. However, I did not know that until I joined Igalia, started contributing to the project more often than I used to before, and joined some chats where chromies communicate. I wish I knew when this cute moniker was born.

So, I have been working on Chromium for quite a few years now. The project is huge, it evolves as the world does, and it tries to lead the web and to be ahead of what people want. We serve the web, but we also shape it and make it better. This mission is exciting and never gets boring.

Throughout my whole career I had been working for companies where blogging about work implied supervision from the management and was generally frowned upon. Software engineers were supposed to write code, not blog posts. Here at Igalia it is all different; we work with open source for the public, and speaking aloud about what we do is part of that work.

This seems to be a perfect opportunity to get back into blogging.