It all started with this bug. The description sounded humble and harmless: the browser ignored some command line flag on Wayland. A screenshot was attached where it was clearly seen that Chromium (version 72 at that time, 2019 spring) did not respect the screen density and looked blurry on a HiDPI screen.
HiDPI literally means small pixels. It is hard to tell now what was the first HiDPI screen, but I assume that their wide recognition came around 2010 with Apple’s Retina displays. Ultra HD had been standardised in 2012, defining the minimum resolution and aspect ratio for what today is known informally as 4K—and 4K screens for laptops have pixels that are small enough to call it HiDPI. This Chromium issue, dated 2012, says that the Linux port lacks support for HiDPI while the Mac version has it already. On the other hand, HiDPI on Windows was tricky even in 2014.
‘That should be easy. Apparently it’s upscaled from low resolution. Wayland allows setting scale for the back buffers, likely you’ll have to add a single call somewhere in the window initialisation’, a colleague said.
Like many stories that begin this way, this turned out to be wrong. It was not so easy. Setting the buffer scale did the right thing indeed, but it was absolutely not enough. It turned out that support for HiDPI screens was entirely missing in our implementation of the Wayland client. On my way to the solution, I have found that scaling support in Wayland is non-trivial and sometimes confusing. Since I finished this work, I have been asked a few times about what happens there, so I thought that writing it all down in a post would be useful.
Background
Modern desktop environments usually allow configuring the scale of the display at global system level. This allows all standard controls and window decorations to be sized proportionally. For applications that use those standard controls, this is a happy end: everything will be scaled automatically. Those which prefer doing everything themselves have to get the current scale from the environment and adjust rendering. Chromium does exactly that: inside it has a so-called device scale factor. This factor is applied equally to all sizes, locations, and when rendering images and fonts. No code has to bother ever. It works within this scaled coordinate system, known as device independent pixels, or DIP. The device scale factor can take fractional values like 1.5, but, because it is applied at the stage of rendering, the result looks nice. The system scale is used as default device scale factor, and the user can override it using the command line flag named --force-device-scale-factor. However, this is the very flag which did not work in the bug mentioned in the beginning of this story.
Note that for X11 the ‘natural’ scale is still the physical pixels. Despite having the system-wide scale, the system talks to the application in pixels, not in DIP. It is the application that is responsible to handle the scale properly. If it does not, it will look perfectly sharp, but its details will be perhaps too small for the naked eye.
However, Wayland does it a bit differently. The system scale there is respected by the compositor when pasting buffers rendered by clients. So, if some application has no idea about the system scale and renders itself normally, the compositor will upscale it. This is what originally happened to Chromium: it simply drew itself at 100%, and that image was then stretched by the system compositor. Remember that the Wayland way is giving a buffer to each application and then compositing the screen from those buffers, so this approach of upscaling buffers rendered by applications is natural. The picture below shows what that looks like. The screenshot is taken on a HiDPI display, so in order to see the difference better, you may want to see the full version (click the picture to open).
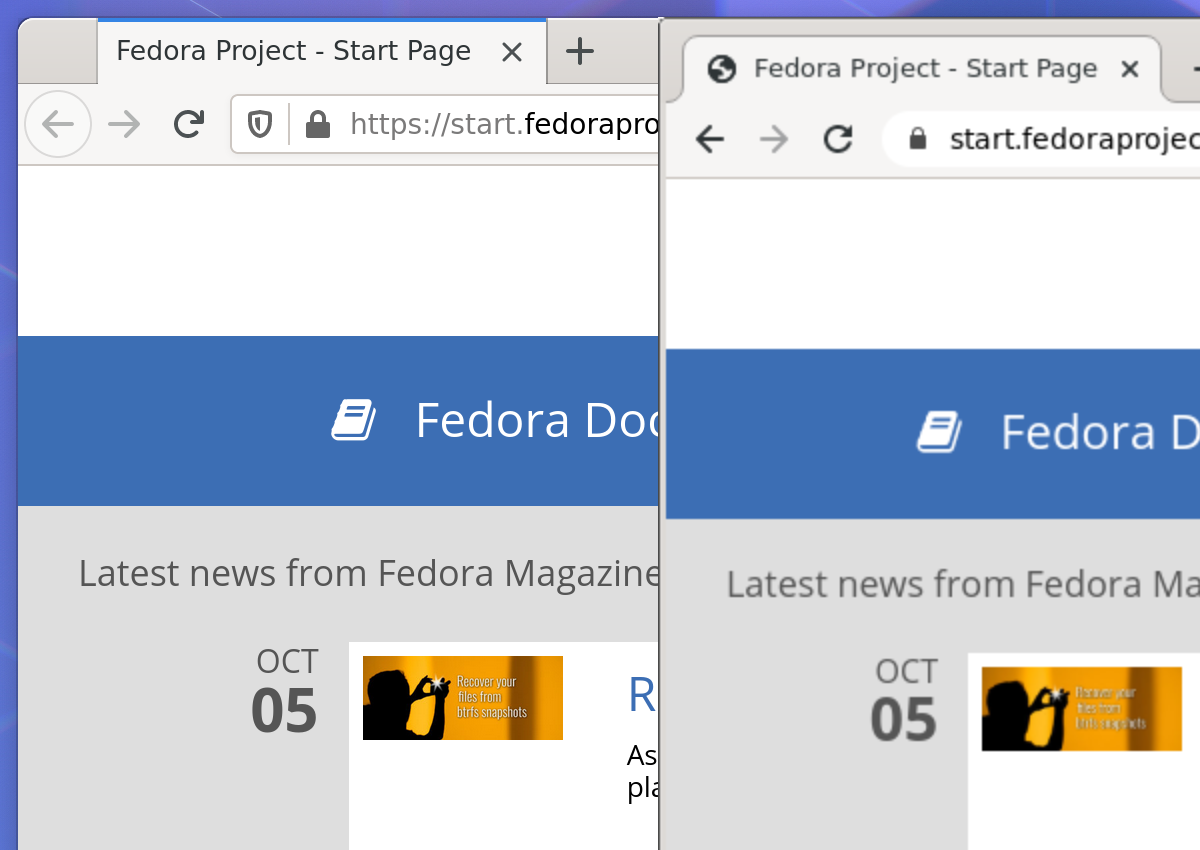
Firefox (left) vs. Chromium (right)
How do Wayland clients support HiDPI then?
Level 1. Basic support
Each physical output device is represented at the Wayland level by an object named output. This object has a special integer property named buffer scale that tells literally how many physical pixels are used to represent the single logical pixel. The application’s back buffer has that property too. If scales do not match, Wayland will simply scale the raster image, thus emulating the ‘normal DPI’ device for the application that is not aware of any buffer scales.
The first thing the window is supposed to do is to check the buffer scale of the output that it currently resides at, and to set the same value to its back buffer scale. This will basically make the application using all available physical pixels: as scales of the buffer and the output are the same, Wayland will not re-scale the image.
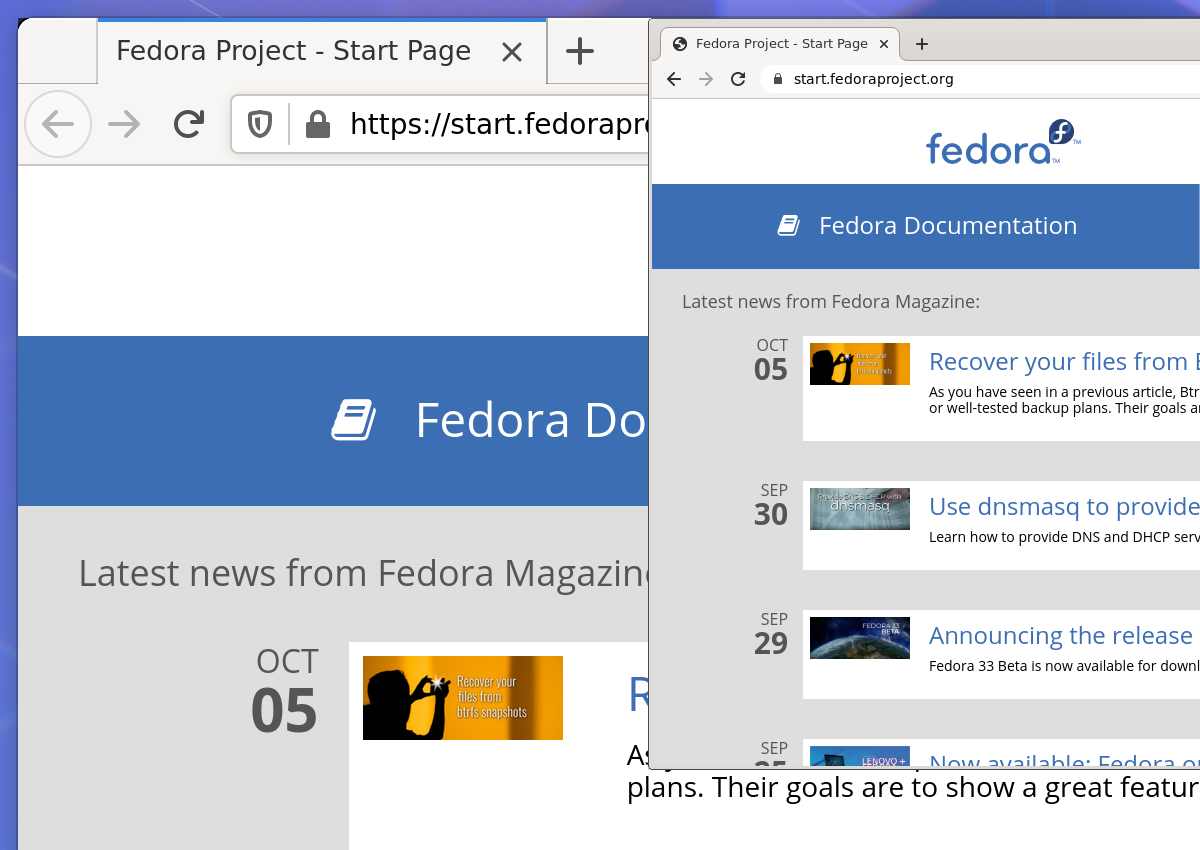
Chromium now renders sharp image but all details are half their normal size
The next thing is fixing the rendering so it would scale things to the right size. Using the output buffer scale as default is a good choice: the result will be ‘normal size’. For Chromium, this means simply setting the device scale factor to the output buffer scale.
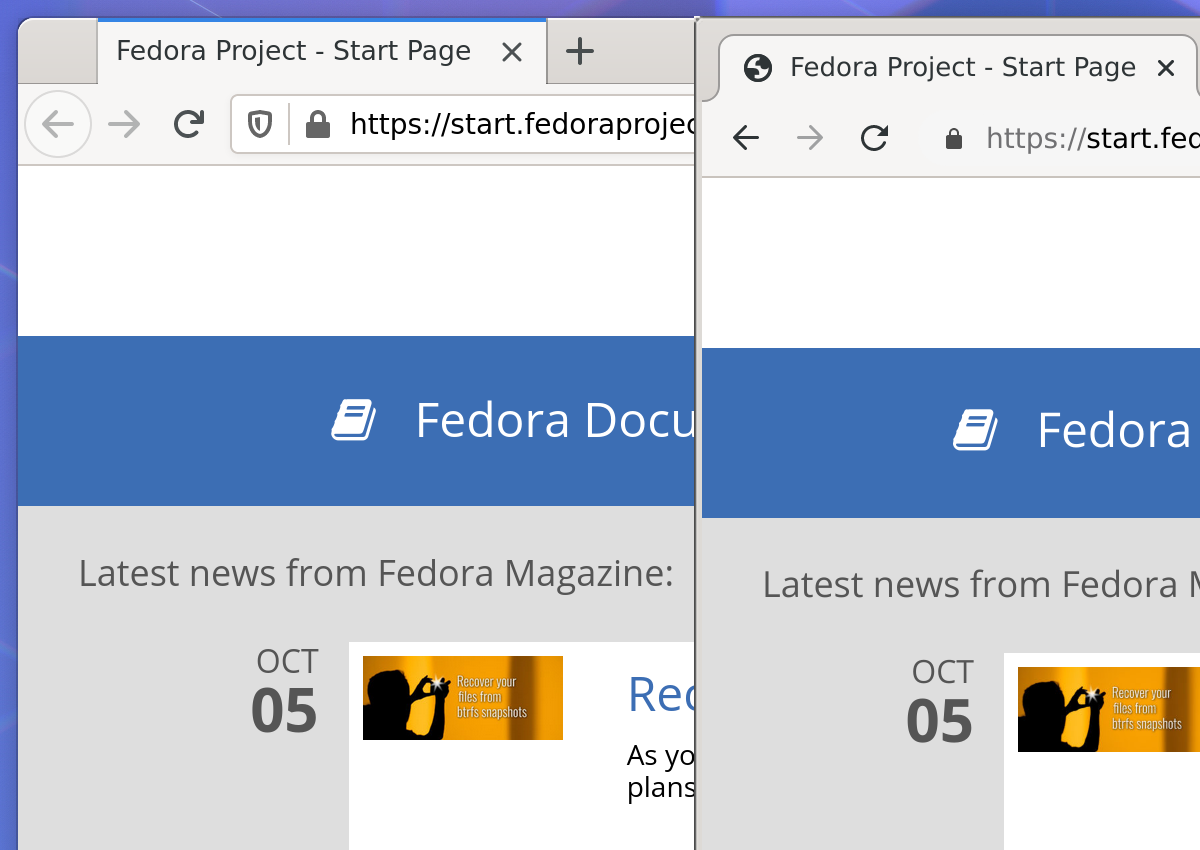
All set now
The final bit is slightly trickier. Wayland sends UI events in DIP, but expects the client to send surface bounds in physical pixels. That means that if we implement something like interactive resize of the window, we will also have to do some math to convert the units properly.
This is enough for the basic support. The application will work well on a modern laptop with 4K display. But what if more than a single display is connected, and they have different pixel density?
Level 2. Multiple displays
If there are several output devices present in the system, each one may have its own scale. This makes things more complicated, so a few improvements are needed.
First, the window wants to know that it has been moved to another device. When that happens, the window will ask for the new buffer scale and update itself.
Second, there may be implementation-specific issues. For example, some Wayland servers initially put the new sub-surface (which is used for menus) onto the default output, even if its parent surface has been moved to another output. This may cause weird changes of their scale during their initialisation. In Chromium, we just made it so the sub-surface always takes its scale from the parent.
Level 3? Fractional scaling?
Not really. Fractional scaling is basically ‘non-even’ scales like 125%. The entire feature had been somewhat controversial when it had been announced, because of how rendering in Wayland is performed. Here, non-even scale inevitably uses raster operations which make the image blurry. However, all that is transparent to the applications. Nothing new has been introduced at the level of Wayland protocols.
Conclusion
Although this task was not as simple as we thought, in the end it turned out to be not too hard. Check the output scale, set the back buffer scale, scale the rendering, translate pixels to DIP and vice versa in certain points. Pretty straightforward, and if you are trying to do something related, I hope this post helps you.
The issue is that there are many implementations of Wayland servers out there, not all of them are consistent, and some of them have bugs. It is worth testing the solution on a few distinct Linux distributions and looking for discrepancies in behaviour.
Anyway, Chromium with native Wayland support has recently reached beta—and it supports HiDPI! There may be bugs too, but the basic support should work well. Try it, and let us know if something is not right.
Note: the Wayland support is so far experimental. To try it, you would need to launch chrome via the command line with two flags:
--enable-features=UseOzonePlatform

--ozone-platform=wayland