Serious Encrypted Media Extensions on GStreamer based WebKit ports

Encrypted Media Extensions (a.k.a. EME) is the W3C standard for encrypted media in the web. This way, media providers such as Hulu, Netflix, HBO, Disney+, Prime Video, etc. can provide their contents with a reasonable amount of confidence that it will make it very complicated for people to “save” their assets without their permission. Why do I use the word “serious” in the title? In WebKit there is already support for Clear Key, which is the W3C EME reference implementation but EME supports more encryption systems, even privative ones (I have my opinion about this, you can ask me privately). No service provider (that I know) supports Clear Key, they usually rely on Widevine, PlayReady or some other.

Three years ago, my colleague Žan Doberšek finished the implementation of what was going to be the shell of WebKit’s modern EME implementation, following latest W3C proposal. We implemented that downstream (at Web Platform for Embedded) as well using Thunder, which includes as a plugin a fork of what was Open Content Decryption Module (a.k.a. OpenCDM). The OpenCDM API changed quite a lot during this journey. It works well and there are millions of set-top-boxes using it currently.

The delta between downstream and the upstream GStreamer based WebKit ports was quite big, testing was difficult and syncing was not always easy, so we decided reverse the situation.

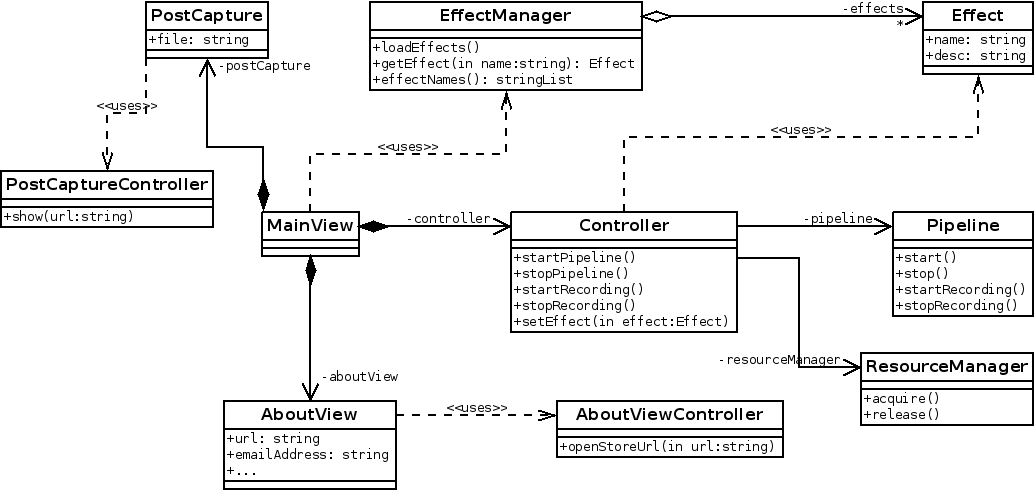
Our first step was done by my colleague Charlie Turner, who made Clear Key work upstream again while adapted some changes the Apple folks had done meanwhile. It was amazing to see Clear Key tests passing again and his work with the CDMProxy related classes was awesome. After having ClearKey working, I had to adapt them a bit to accomodate Thunder. To explain a bit about the WebKit EME architecture, I must say that there are two layers. The first is the crossplatform one, which implements the W3C API (MediaKeys, MediaKeySession, CDM…). These classes rely on the platform ones (CDMPrivate, CDMInstance, CDMInstanceSession) to handle the platform management, message exchange, etc. which would be the second layer. Apple playback system is fully integrated with their DRM system so they don’t need anything else. We do because we need to integrate our own decryptors to defer to Thunder for decryption so in the GStreamer based ports we also need the CDMProxy related classes, which would be CDMProxy, CDMInstanceProxy, CDMInstanceSessionProxy… The last two extend CDMInstance and CDMInstanceSession respectively to be able to deal with the key management, that is abstracted to the KeyHandle and KeyStore.

Once the abstraction is there (let’s remember that the abstranction works both for Clear Key and Thunder), the Thunder implementation is quite simple, just gluing the CDMProxy, CDMInstanceProxy and CDMInstanceSessionProxy classes to the Thunder system and writing a GStreamer decryptor element for it. I might have made a mistake when selecting the files but considering Thunder classes + the GStreamer common decryptor code, cloc says it is just 1198 lines of platform code. I think it is pretty low for what it does. Apart from that, obviously, there are 5760 lines of crossplatform code.

To build and run all this you need to do several things:

  1. Build the dependencies with WEBKIT_JHBUILD=1 JHBUILD_ENABLE_THUNDER="yes" to enable the old fashioned JHBuild build and force it to build the Thunder dependencies. All dependendies are on JHBuild, even Widevine is referenced but to download it you need the proper credentials as it is closed source.
  2. Pass --thunder when calling build-webkit.sh.
  3. Run MiniBrowser with WEBKIT_GST_EME_RANK_PRIORITY="Thunder" and pass parameters --enable-mediasource=TRUE --enable-encrypted-media=TRUE --autoplay-policy=allow. The autoplay policy is usually optional but in this case it is necessary for the YouTube TV tests. We need to give the Thunder decryptor a higher priority because of WebM, that does not specify a key system and without it the Clear Key one can be selected and fail. MP4 does not create trouble because the protection system is specified and the caps negotiation does its magic.

As you could have guessed if you have a closer look at the GStreamer JHBuild moduleset, you’ll see that only Widevine is supported. To support more, you only have to make them build in the Thunder ecosystem and add them to CDMFactoryThunder::supportedKeySystems.

When I coded this, all YouTube TV tests for Widevine were green in the desktop. At the moment of writing this post they aren’t because of some problem with the Widevine installation that will be sorted quickly, I hope.

VCR to WebM with GStreamer and hardware encoding

My family had bought many years ago a Panasonic VHS video camera and we had recorded quite a lot of things, holidays, some local shows, etc. I even got paid 5000 pesetas (30€ more than 20 years ago) a couple of times to record weddings in a amateur way. Since my father passed less than a year ago I have wanted to convert those VHS tapes into something that can survive better technologically speaking.

For the job I bought a USB 2.0 dongle and connected it to a VHS VCR through a SCART to RCA cable.

The dongle creates a V4L2 device for video and is detected by Pulseaudio for audio. As I want to see what I am converting live I need to tee both audio and video to the corresponding sinks and the other part would go to to the encoders, muxer and filesink. The command line for that would be:

gst-launch-1.0 matroskamux name=mux ! filesink location=/tmp/test.webm \
v4l2src device=/dev/video2 norm=255 io-mode=mmap ! queue ! vaapipostproc ! tee name=video_t ! \
queue ! vaapivp9enc rate-control=4 bitrate=1536 ! mux.video_0 \
video_t. ! queue ! xvimagesink \
pulsesrc device=alsa_input.usb-MACROSIL_AV_TO_USB2.0-02.analog-stereo ! 'audio/x-raw,rate=48000,channels=2' ! tee name=audio_t ! \
queue ! pulsesink \
audio_t. ! queue ! vorbisenc ! mux.audio_0

As you can see I convert to WebM with VP9 and Vorbis. Something interesting can be passing norm=255 to the v4l2src element so it’s capturing PAL and the rate-control=4 for VBR to the vaapivp9enc element, otherwise it will use cqp as default and file size would end up being huge.

You can see the pipeline, which is beatiful, here:

As you can see, we’re using vaapivp9enc here which is hardware enabled and having this pipeline running in my computer was consuming more or less 20% of CPU with the CPU absolutely relaxed, leaving me the necessary computing power for my daily work. This would not be possible without GStreamer and GStreamer VAAPI plugins, which is what happens with other solutions whose instructions you can find online.

If for some reason you can’t find vaapivp9enc in Debian, you should know there are a couple of packages for the intel drivers and that the one you should install is intel-media-va-driver. Thanks go to my colleague at Igalia Víctor Jáquez, who maintains gstreamer-vaapi and helped me solving this problem.

My workflow for this was converting all tapes into WebM and then cutting them in the different relevant pieces with PiTiVi running GStreamer Editing Services both co-maintained by my colleague at Igalia, Thibault Saunier.

WebRTC in WebKit/WPE

For some time I worked at Igalia to enable WebRTC on WebKitForWayland or WPE for the Raspberry Pi 2.

The goal was to have the WebKit WebRTC tests working for a demo. My fellow Igalian Alex was working on the platform itself in WebKit and assisting with some tuning for the Pi on WebKit but the main work needed to be done in OpenWebRTC.

My other fellow Igalian Phil had begun a branch to work on this that was half way with some workarounds. My first task was getting into combat/workaround mode and make OpenWebRTC work with compressed streams from gst-rpicamsrc. OpenWebRTC supported only raw video streams and that Raspberry Pi Cam module GStreamer element provides only H264 encoded ones. I moved some encoders and parsers around, some caps modifications, removed some elements that didn’t work on the Pi and made it work eventually. You can see the result at:

<

video style=”max-width: 100%;” src=”/xrcalvar/files/2016/10/201607-webrtc.mp4″ controls poster=”/xrcalvar/files/2016/10/webrtc-poster.png”>

To make this work by yourselves you needed a custom branch of Buildroot where you could build with the proper plugins enabled also selected the appropriate branches in WPE and OpenWebRTC.

Unfortunately the work was far from being finished so I continued the effort to try to make the arch changes in OpenWebRTC have production quality and that meant do some tasks step by step:

  • Rework the video orientation code: The workaround deactivated it as so far it was being done in GStreamer. In the case of rpicamsrc that can be done by the hardware itself so I cooked a GStreamer interface to enable rotation the same way it was done for the [gl]videoflip elements. The idea would be deprecate the original ones and use the new interface. These landed both in videoflip and glvideoflip. Of course I also implemented it on gst-rpicamsrc here and here and eventually in OpenWebRTC sources.
  • Rework video flip: Once OpenWebRTC sources got orientation support, I could rework the flip both for local and remote feeds.
  • Add gl{down|up}load elements back: There were some issues with the gl elements to upload and download textures, which we had removed. I readded them again.
  • Reworked bins linking: In OpenWebRTC there are some bins that are created to perform some tasks and depending on different circumstances you add or not some elements. I reworked the way those elements are linked so that we don’t have to take into account all the use cases to link them. Now this is easier as the elements are linked as they are the added to the bin.
  • Reworked the renderer_disabled: As in the case for orientation, some elements such as gst-rpicamsrc are able to change color and balance so I added support for that to avoid having that done by GStreamer elements if not necessary. In this case the proper interfaces were already there in GStreamer.
  • Moved the decoding/parsing from the source to the renderer: Before our changes the source was parsing/decoding the remote feeds, local sources were not decoded, just raw was supported. Our workarounds made the local sources decode too but this was not working for all cases. So why decoding at the sources when GStreamer has caps and you can just chain all that to the renderers? So I did eventually, I moved the parsing/decoding to the renderers. This took fixing all the caps negotiation from sources to renderers. Unfortunatelly I think I broke audio on the way, but surely nothing difficult to fix.

This is still a work in progress and now I am changing tasks and handing this over back to my fellow Igalians Phil, who I am sure will do an awesome job together with Alex.

And again, thanks to Igalia for letting me work on this and to Metrological that is sponsoring this work.

Über latest Media Source Extensions improvements in WebKit with GStreamer

In this post I am going to talk about the implementation of the Media Source Extensions (known as MSE) in the WebKit ports that use GStreamer. These ports are WebKitGTK+, WebKitEFL and WebKitForWayland, though only the latter has the latest work-in-progress implementation. Of course we hope to upstream WebKitForWayland soon and with it, this backend for MSE and the one for EME.

My colleague Enrique at Igalia wrote a post about this about a week ago. I recommend you read it before continuing with mine to understand the general picture and the some of the issues that I managed to fix on that implementation. Come on, go and read it, I’ll wait.

One of the challenges here is something a bit unnatural in the GStreamer world. We have to process the stream information and then make some metadata available to the JavaScript app before playing instead of just pushing everything to a playing pipeline and being happy. For this we created the AppendPipeline, which processes the data and extracts that information and keeps it under control for the playback later.

The idea of the our AppendPipeline is to put a data stream into it and get it processed at the other side. It has an appsrc, a demuxer (qtdemux currently) and an appsink to pick up the processed data. Something tricky of the spec is that when you append data into the SourceBuffer, that operation has to block it and prevent with errors any other append operation while the current is ongoing, and when it finishes, signal it. Our main issue with this is that the the appends can contain any amount of data from headers and buffers to only headers or just partial headers. Basically, the information can be partial.

First I’ll present again Enrique’s AppendPipeline internal state diagram:

First let me explain the easiest case, which is headers and buffers being appended. As soon as the process is triggered, we move from Not started to Ongoing, then as the headers are processed we get the pads at the demuxer and begin to receive buffers, which makes us move to Sampling. Then we have to detect that the operation has ended and move to Last sample and then again to Not started. If we have received only headers we will not move to Sampling cause we will not receive any buffers but we still have to detect this situation and be able to move to Data starve and then again to Not started.

Our first approach was using two different timeouts, one to detect that we should move from Ongoing to Data starve if we did not receive any buffer and another to move from Sampling to Last sample if we stopped receiving buffers. This solution worked but it was a bit racy and we tried to find a less error prone solution.

We tried then to use custom downstream events injected from the source and at the moment they were received at the sink we could move from Sampling to Last sample or if only headers were injected, the pads were created and we could move from Ongoing to Data starve. It took some time and several iterations to fine tune this but we managed to solve almost all cases but one, which was receiving only partial headers and no buffers.

If the demuxer received partial headers and no buffers it stalled and we were not receiving any pads or any event at the output so we could not tell when the append operation had ended. Tim-Philipp gave me the idea of using the need-data signal on the source that would be fired when the demuxer ran out of useful data. I realized then that the events were not needed anymore and that we could handle all with that signal.

The need-signal is fired sometimes when the pipeline is linked and also when the the demuxer finishes processing data, regardless the stream contains partial headers, complete headers or headers and buffers. It works perfectly once we are able to disregard that first signal we receive sometimes. To solve that we just ensure that at least one buffer left the appsrc with a pad probe so if we receive the signal before any buffer was detected at the probe, it shall be disregarded to consider that the append has finished. Otherwise, if we have seen already a buffer at the probe we can consider already than any need-data signal means that the processing has ended and we can tell the JavaScript app that the append process has ended.

Both need-data signal and probe information come in GStreamer internal threads so we could use mutexes to overcome any race conditions. We thought though that deferring the operations to the main thread through the pipeline bus was a better idea that would create less issues with race conditions or deadlocks.

To finish I prefer to give some good news about performance. We use mainly the YouTube conformance tests to ensure our implementation works and I can proudly say that these changes reduced the time of execution in half!

That’s all folks!

Painting video with GStreamer and Qt/QML or Gtk+ with overlay

As part of my work at Igalia I had to work with video and GStreamer for some years. I always used Gtk+ for that so when I needed to do things with Qt and QML, things were different. In my projects I always used pure GStreamer code instead of the Qt bindings for GStreamer because at the moment those bindings were not ready or reliable.

I know two ways of painting video:

  • Overlay way, with a window id and so on
  • Texture streaming

I might write later about texture streaming, but I will focus now on overlay.

Painting

The first way means that you need from your graphical toolkit a window id. That window id is asked by the video sink element in a very special moment and you need to provide it in that moment if you have not provided it before. For example, if you are using playbin2 and you already know the sink you want to use, just instantiate your sink and set the window id at that moment with gst_x_overlay_set_window_handle and set the sink to the playbin2 element by setting the video-sink property.

If you are not using playbin2 and for example you are using GStreamer Editing Services, you cannot use a property because currently there is no one and need to use a more complicated method. I already reported the bug with its patches and hope that they apply them as soon as possible to improve compatibility with playbin2 because the way it is now is a bit inconsistent with the rest of GStreamer code base.

Both Qt and Gtk have now client side windows, which means that your program window has only one X window and it is the toolkit that decides which widget is receiving the events. The main consequence is that if we just set the window id, GStreamer will use the whole window and will paint the video over the rest of our widgets (it does not matter if QML/Qt or Gtk+) and you’ll get very ugly effects. To solve that, you need to set the render rectangle, which are the coordinates (relative to the X whole X window) where you want to paint your video. You need to do that just after setting the window id with gst_x_overlay_set_render_rectangle.

If you do not set your window handle and your render rectangle before the pipeline begins to move, it will ask you about that with the prepare-xwindow-id GstMessage, but this message can happen inside the GStreamer threads and it cannot wait until the main loop runs, it needs the information at that very moment, so you need to connect to the synchronous bus handle. GStreamer has a good example at the GstXOverlay documentation about how to do that. To use the callback in C++, you need to declare a static method and pass this as user data parameter, then you can behave almost as having a normal object method. This is the most common solution used in the GNOME world and fits perfectly with the Qt framework too.

The code to get the window id and render rectangle in Gtk+ would be something like:

GdkWindow *gdk_window;
gdk_window = gtk_widget_get_window(your_widget);
/* as sink you can use GST_MESSAGE_SRC() if you are waiting
    for the prepare-xwindow-id message */
gst_x_overlay_set_xwindow_id(GST_X_OVERLAY(your_sink),
                             GDK_WINDOW_XID(gdk_window));
/* do your maths about your coordinates */
gst_x_overlay_set_window_handle(GST_X_OVERLAY(sink),
                                x, y, width, height);

In Qt, if you are using common widgets, you could use something like:

WId winId = QApplication::activeWindow()->effectiveWinId();
gst_x_overlay_set_xwindow_id(GST_X_OVERLAY(your_sink),
                             winId);
/* do your maths about your coordinates */
gst_x_overlay_set_window_handle(GST_X_OVERLAY(sink),
                                x, y, width, height);

If you are using a QGraphicsScene you would do something like:

/* to get the view you could do something like this
    (if you have only one or will to mess things up):
QGraphicsView *view = your_scene.views[0];
*/
gst_x_overlay_set_xwindow_id(GST_X_OVERLAY(your_sink),
                             view->viewport()->effectiveWinId());
/* do your maths about your coordinates */
gst_x_overlay_set_window_handle(GST_X_OVERLAY(sink),
                                x, y, width, height);

If you are using QML, you would have a very similar approach to the last snippet, because as you should have a QDeclarativeItem, it has a scene() that you can use, to have something like QGraphicsView *view = scene().views[0]; (of course, assuming that you have only one view, which is the most common case).

Overlaying stuff

Some times it is nice do put your controls on top of the video by covering part of the image. It would be like having the video as the background of a canvas where you draw some other widgets. Some GStreamer elements give you the possibility of doing a trick to do this, which is using a colorkey for your background and painting whatever you want on top of that as long as it does not include that colorkey. Some elements like xvimagesink or omapxvsink (used in the Nokia N9 and N950) have the colorkey property that you can read and set. If you are not planning to overlay anything, you can forget about this, but if you do, you need set a color key to the sink and use that color to paint the background of your widget and a good moment is also when setting the window handle:

g_object_set(sink, "autopaint-colorkey", FALSE,
             "colorkey", 0x080810, NULL);

Why do I unset the colorkey autopainting? Because I do not want GStreamer to mess my widget painting.

And more important: Why did I use 0x080810? Because it is a dark color, close to black, but it is not black. Pure black can be dangerous as it is commonly used in themes when painting widgets so you would be getting ugly artifacts. Some people recommend magenta (0xFF00FF) as it is supposedly a color that does not exist in nature (citation needed). I would not do it for several reasons:

  • You will need to synchronize your painting very well to avoid seeing the colorkey
  • If you respect aspect ratio you will see it for sure, because you (or the sink if it is automatic) paint the backgound and the sink draws the image by leaving some empty space.
  • It does not behave well with blendings, as you blend from your widget color to the background, which is the colorkey

Advice: do not mess with colorkey and omapxvsink. Though it is supposed to be writable, it is not and it always uses 0x080810.

Aspect ratio

There are two kind of people:

  • The ones that want to use all the pixels of their monitor/TVs and like damaging their brain with distorted images.
  • The ones that like to see a correctly dimensioned image with some bars giving you a better impression of what was recorded.

As you can guess I belong to the second group.

There are some sinks that do that automatically for you by setting the force-aspect-ratio property, like ximagesink and xvimagesink but there are other that does not and omapxvsink is an example. It is not a big problem but forces you to work a bit more when you select the render rectangle. For that you need to know the video size, which you cannot know until the pipeline is running, which forces to to hook to the GST_MESSAGE_ASYNC_DONE, or in the case of playbin2, you already have the video size when getting the prepare-xwindow-id message. An example to get the video size would be:

GstPad *pad;
GstCaps *caps;
GstStructure *structure;
int width, height;

pad = GST_BASE_SINK_PAD(sink);
caps = GST_PAD_CAPS(pad);
g_return_if_fail(caps && gst_caps_is_fixed(caps));

structure = gst_caps_get_structure(caps, 0);
gst_structure_get_int(structure, "width", &width);
gst_structure_get_int(structure, "height", &height);

/* some videos define a pixel aspect ratio, meaning that the
   video pixel could be like 2x1 copared to a squared pixed
   and we need to correct this */
if (gst_structure_has_field(structure, "pixel-aspect-ratio")) {
    int par_n, par_d;
    gst_structure_get_fraction(structure, "pixel-aspect-ratio",
                               &par_n, &par_d);
    width = width * par_n / par_d;
}

/* trick: some sinks perform better with multiple of 2 */
width &= ~1;
height &= ~1;

Aura

As my colleague Víctor at Igalia has said before in his post, Aura was released to the Nokia Store. Miguel, Víctor and I are quite happy with the result achieved with this app, which intention was to be kind of a port of the Cheese application of the GNOME platform to be used in the N9 or N950 Nokia phones.

The apps allows you to use both cameras (front and principal) to record videos, applying a lot of funny effects (a subset of the GNOME Video Effects) and changing them during the recording. Being Nokia a Finnish company, we decided to name the app after a Finnish Cheese to both honor the GNOME Cheese application and Finland 😉

You can download the app from the Nokia Store where we already got more than 6000 downloads and 100 reviews with a quite good average rating.

You have an example recorded by me with my own phone using the Historical effect and uploaded to Youtube:

And you have even already other videos uploaded to Youtube talking about how Aura works. This one is from a brazilian guy (obrigado!) for FaixaMobi and shows more effects:

Of course, being it free sofware you can also compile it yourself with the code at GitHub and do not be afraid of contributing! The technologies we used were the camerabin element of GStreamer and Qt/QML for the interface where we have the following components:

Aura components UML diagram

  • Main view (aura.qml) with the main interface
  • Controller, which is a mixed QML/C++ object allowing to control the pipeline.
  • Pipeline is a C++ object used by the controller to encapsulate the GStreamer code.
  • PostCapture is also a mixed QML/C++ object that opens the gallery application to show the recorded video and gives you the oportunity of sharing it, deleting it and so on. It uses a C++ controller loaded as a singleton to the context to do some stuff that can only be done in C++. Of course, you can open Gallery yourself and the videos will show up there.
  • EffectManager is a C++ class to load and manage the Effects, which is another C++ class defining how the effect must be applied.
  • Effects (Effects.qml) is a QML component to show the different effects, both software and hardware that Aura can apply. It uses the EffectManager (through the context) to load them and the Controller to apply them.
  • About view (AboutView.qml) is a rework of something done by my colleage Simón Pena and adapted to be used in Aura (Kudos!). It also uses a small AboutViewController to open a Nokia Store URL with the application instead of the browser.
  • ResourceManager is a C++ class used by the Controller to request the proper permissions to record the video.

Being taken to Azkaban for use of very dark GStreamer magic

I was writing some tests for a project at Igalia and I need to mock the convert-frame playbin2 element action. The code to invoke it is something like this:

GstElement *pipeline = /* get pipeline */;
GstCaps *caps = /* create caps to adapt the conversion */;
GstBuffer *buffer = NULL;
g_signal_emit_by_name (pipeline, "convert-frame", caps, &buffer);

When you are writing tests, what you want to do is testing just your code and not to depend on something external, so in this case the idea would be providing a fake implementation for that GStreamer element action.

The way you can do this kind of things is providing the symbol in your code so that the linker when doing its job does not look any further and uses that instead of the one in the external library, so the natural solution coming to your mind would be rewriting g_signal_emit_by_name. The problem with this is that though you are not using it in your code, it is too general, so it is not a good idea.

I thought I could replace the convert-frame action in the playbin2 class, so I wrote this code:

typedef struct
{
  GstPipelineClass parent_class;
  void (*about_to_finish) (gpointer playbin);
  void (*video_changed) (gpointer playbin);
  void (*audio_changed) (gpointer playbin);
  void (*text_changed) (gpointer playbin);
  void (*video_tags_changed) (gpointer playbin, gint stream);
  void (*audio_tags_changed) (gpointer playbin, gint stream);
  void (*text_tags_changed) (gpointer playbin, gint stream);
  GstTagList *(*get_video_tags) (gpointer playbin, gint stream);
  GstTagList *(*get_audio_tags) (gpointer playbin, gint stream);
  GstTagList *(*get_text_tags) (gpointer playbin, gint stream);
  GstBuffer *(*convert_frame) (gpointer playbin, GstCaps * caps);
  GstPad *(*get_video_pad) (gpointer playbin, gint stream);
  GstPad *(*get_audio_pad) (gpointer playbin, gint stream);
  GstPad *(*get_text_pad) (gpointer playbin, gint stream);
} GstPlayBinClass;

static gpointer
gst_play_bin_convert_frame (G_GNUC_UNUSED gpointer playbin,
                            G_GNUC_UNUSED gpointer caps)
{
    GstBuffer *buffer;

    /* Create my own GstBuffer with the data I need */

    return buffer;
}

void
simulator_gst_reset(GstElement *new_pipeline, GstBus *new_bus)
{
    /* ... */

    GstPlayBinClass *klass =
        G_TYPE_INSTANCE_GET_CLASS(new_pipeline, GST_PLAY_BIN_TYPE,
                                  GstPlayBinClass);
    klass->convert_frame = (gpointer) gst_play_bin_convert_frame;

    /* ... */
}

First I declared the GstPlayBinClass copying it from the GStreamer code. I didn’t change any parameters order, just replaced some pointers with gpointer as we don’t need them. This way you don’t break the ABI. Then you can declare your own element action code and finally you get the Class, assign the method and voilà!.

As I said, the solution is far from being the best, but if you know a better way, drop me a comment.