CSS Grid Layout and positioned items
As part of the work done by Igalia in the CSS Grid Layout implementation on Chromium/Blink and Safari/WebKit, we’ve been implementing the support for positioned items. Yeah, absolute positioning inside a grid. 😅
Probably the first idea is that come to your mind is that you don’t want to use positioned grid items, but maybe in some use cases it can be needed. The idea of this post is to explain how they work inside a grid container as they have some particularities.
Actually there’s not such a big difference compared to regular grid items.
When the grid container is the containing block
of the positioned items
(e.g. using position: relative; on the grid container)
they’re placed almost the same than regular grid items.
But, there’re a few differences:
- Positioned items don't stretch by default.
They don't use the implicit grid.They don't create implicit tracks.- They don't occupy cells regarding auto-placement feature.
autohas a special meaning when referring lines.
Let’s explain with more detail each of these features.
Positioned items shrink to fit #
We’re used to regular items that stretch by default to fill their area. However, that’s not the case for positioned items, similar to what a positioned regular block does, they shrink to fit.
This is pretty easy to get, but a simple example will make it crystal clear:
<div style="display: grid; position: relative;
            grid-template-columns: 300px 200px; grid-template-rows: 200px 100px;">
    <div style="grid-column: 1 / 3; grid-row: 1 / 3;"></div>
    <div style="position: absolute; grid-column: 1 / 3; grid-row: 1 / 3;"></div>
</div>
In this example we’ve a simple 2x2 grid. Both the regular item and the positioned one are placed with the same rules taking the whole grid. This defines the area for those items, which takes the 1st & 2nd rows and 1st & 2nd columns.
 Positioned items shrink to fit
The regular item stretches by default both horizontally and vertically, so it takes the whole size of the grid area. However, the positioned item shrink to fit and adapts its size to the contents.
For the examples in the next points I’m ignoring this difference,
as I want to show the area that each positioned item takes.
To get the same result than in the pictures,
you’d need to set 100% width and height on the positioned items.
Positioned items and implicit grid #
Positioned items don’t participate in the layout of the grid, neither they affect how items are placed.
You can place a regular item outside the explicit grid,
and the grid will create the required tracks to accommodate the item.
However, in the case of positioned items,
you cannot even refer to lines in the implicit grid,
they'll be treated as
they cannot create implicit tracks as they don't participate
in the layout of the grid.auto.
Which means that you
cannot place a positioned item in the implicit grid.
Let’s use an example to understand this better:
<div style="display: grid; position: relative;
            grid-template-columns: 200px 100px; grid-template-rows: 100px 100px;
            grid-auto-columns: 100px; grid-auto-rows: 100px;
            width: 300px; height: 200px;">
    <div style="position: absolute; grid-area: 4 / 4;"></div>
</div>
The example defines a 2x2 grid,
but the positioned item is using grid-area: 4 / 4;
so it tries to goes to the 4th row and 4th column.
However the positioned items cannot create those implicit tracks.
So it’s positioned like if it has auto,
which in this case will take the whole explicit grid.
auto has a special meaning in positioned items,
it’ll be properly explained later.
 Positioned items do not create implicit tracks
Imagine another example where regular items create implicit tracks:
<div style="display: grid; position: relative;
            grid-template-columns: 200px 100px; grid-template-rows: 100px 100px;
            grid-auto-columns: 100px; grid-auto-rows: 100px;
            width: 500px; height: 400px;">
    <div style="grid-area: 1 / 4;"></div>
    <div style="grid-area: 4 / 1;"></div>
    <div style="position: absolute; grid-area: 4 / 4;"></div>
</div>
In this case, the regular items will be creating the implicit tracks, making a 4x4 grid in total. Now the positioned item can be placed on the 4th row and 4th column, even if those columns are on the implicit grid.
 Positioned items can be placed on the implicit grid
As you can see this part of the post has been modified, thanks to
@fantasaifor notifying me about the mistake.
Positioned items and placement algorithm #
Again the positioned items do not affect the position of other items, as they don’t participate in the placement algorithm.
So, if you’ve a positioned item and you’re using auto-placement for some regular items, it’s expected that the positioned one overlaps the other. The positioned items are completely ignored during auto-placement.
Just showing a simple example to show this behavior:
<div style="display: grid; position: relative;
            grid-template-columns: 300px 300px; grid-template-rows: 200px 200px;">
    <div style="grid-column: auto; grid-row: auto;"></div>
    <div style="grid-column: auto; grid-row: auto;"></div>
    <div style="grid-column: auto; grid-row: auto;"></div>
    <div style="position: absolute;
                grid-column: 2 / 3; grid-row: 1 / 2;"></div>
</div>
Here we’ve again a 2x2 grid, with 3 auto-placed regular items, and 1 absolutely positioned item. As you can see the positioned item is placed on the 1st row and 2nd column, but there’s an auto-placed item in that cell too, which is below the positioned one. This shows that the grid container doesn’t care about positioned items and it just ignores them when it has to place regular items.
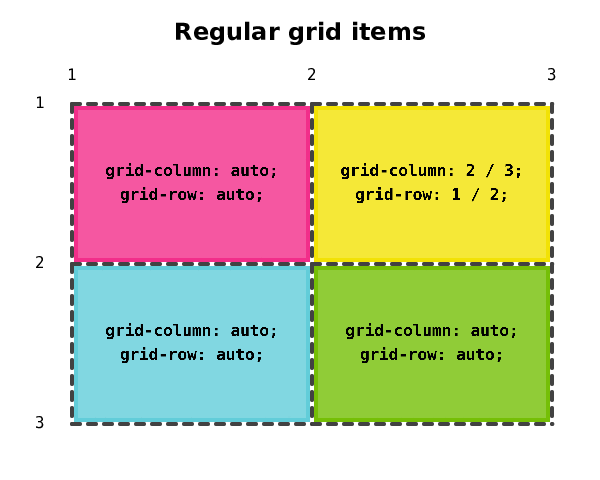 Positioned items and placement algorithm
If all the children were not positioned, the last one would be placed in the given position (1st row and 2nd column), and the rest of them (auto-placed) will take the other cells, without overlapping.
Positioned items and auto lines #
This is probably the biggest difference compared to regular grid items.
If you don’t specify a line, it’s considered that you’re using auto,
but auto is not resolved as span 1 like in regular items.
For positioned items auto is resolved to the padding edge.
The specification introduces the concepts of the lines 0 and -0,
despite how weird it can sound, it actually makes sense.
The auto lines would be referencing to those 0 and -0 lines,
that represent the padding edges of the grid container.
Again let’s use a few examples to explain this:
<div style="display: grid; position: relative;
            grid-template-columns: 300px 200px; grid-template-rows: 200px 200px;
            padding: 50px 100px; width: 500px; height: 400px;">
    <div style="position: absolute;
                grid-column: 1 / auto; grid-row: 2 / auto;"></div>
</div>
Here we have a 2x2 grid container, which has some padding.
The positioned item will be placed in the 2nd row and 1st column,
but its area will take up to the padding edges
(as the end line is auto in both axis).
 Positioned items and
 auto lines
We could even place positioned grid items on the padding itself.
For example using “grid-column: auto / 1;”
the item would be on the left padding.
 Positioned items using
 auto lines to be placed on the left padding
Of course if the grid is wider and we’ve some free space on the content box, the items will take that space too. For example:
<div style="display: grid; position: relative;
            grid-template-columns: 300px 200px; grid-template-rows: 200px 200px;
            padding: 50px 100px; width: 600px; height: 400px;">
    <div style="position: absolute;
                grid-column: 3 / auto; grid-row: 2 / 3;"></div>
</div>
Here the grid columns are 500px, but the grid container has 600px width.
This means that we’ve 100px of free space in the grid content box.
As you can see in the example, that space will be also used when
the positioned items extend up to the padding edges.
 Positioned items taking free space and right padding
Offsets #
Of course you can use offsets to place your positioned items
(left, right, top and bottom properties).
These offsets will apply inside the grid area defined for the positioned items, following the rules explained above.
Let’s use another example:
<div style="display: grid; position: relative;
            grid-template-columns: 300px 200px; grid-template-rows: 200px 200px;
            padding: 50px 100px; width: 500px; height: 400px;">
    <div style="position: absolute;
                grid-column: 1 / auto; grid-row: 2 / auto;
                left: 90px; right: 70px; top: 80px; bottom: 60px;"></div>
</div>
Again a 2x2 grid container with some padding. The positioned item have some offsets which are applied inside its grid area.
 Positioned items and offets
Wrap-up #
I’m not completely sure about how important is the support of positioned elements for web authors using Grid Layout. You’ll be the ones that have to tell if you really find use cases that need this. I hope this post helps to understand it better and make your minds about real-life scenarios where this might be useful.
The good news is that you can test this already in the most recent versions of some major browsers: Chrome Canary, Safari Technology Preview and Firefox. We hope that the 3 implementations are interoperable, but please let us know if you find any issue.
There’s one last thing missing: alignment support for positioned items. This hasn’t been implemented yet in any of the browsers, but the behavior will be pretty similar to the one you can already use with regular grid items. Hopefully, we’ll have time to add support for this in the coming months.
Last but not least, thanks to Bloomberg for supporting Igalia in the CSS Grid Layout implementation on Blink and WebKit.
- Previous: Short 2
- Next: Short 2016-05-27