GeoClue and Meego: QtMobility

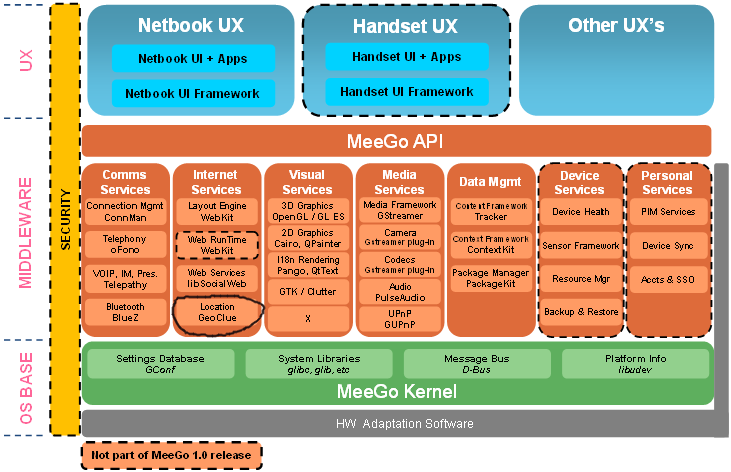
As you probably know, GeoClue is part of the Meego architecture as the Geolocation component. However, current plans are using the QtMobility API for UI applications and defining GeoClue as one of the available backends.

The QtMobility software implements a set of APIs to ease the development of UI software focused on mobile devices. It provides some interesting features and tools for a great variety of mobile oriented development areas:

  • Contacts
  • Bearer (Network Management)
  • Location
  • Messaging
  • Multimedia
  • Sensors
  • Service Framework
  • System Information

All those software pieces are a kind of abstraction to expose easy and comprehensive API’s to be used in the UI application developments. In regard to Geolocation, lets describe in detail the Location component.

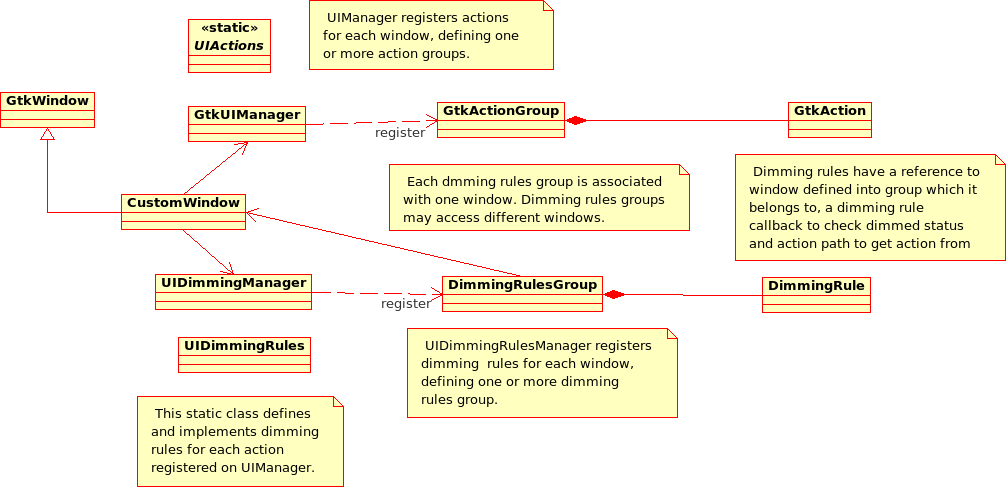
It was recently announced the first public implementation of a GeoClue based backend for the QtMobility Location API. The starting point to implement the GeoClue backend, as described in the QtMobility documentation, is the QGeoPositionInfoSource abstract class.  The implementation of this abstract class using GeoClue seems not too hard, however, the current GeoClue architecture has some limitations to fulfill the QtMobility specifications:

  • The QtGeoPositionInfo class, defined for storing the Geolocation data retrieved by the selected backend (GeoClue in this case) manages together global location, direction and velocity.
  • The GeoClue API has separated methods and classes for location, address and velocity. Independent signals are emitted whenever such parameters are changed.
  • The GeoClue Velocity interface is not implemented in the GeoClue Master provider.
  • Even though is not too hard to implement the abstract methods of the QGeoPositionInfoSource class, the start/stop updating methods are not very efficient in regard to battery and memory consumption. There is not easy or direct way to remove one provider when is not used.

As part of the Igalia’s plans on Meego, I’ve been working in the implementation of such GeoClue based backend for the Meego QtMobility framework. Now that part of my work has been already done, it’s time to share efforts and contribute to the public repository with some patches and performance reports I’ve got during the last months. Some work is still needed before releasing my work, but I hope I will be able to send something in the following weeks, so stay tunned.

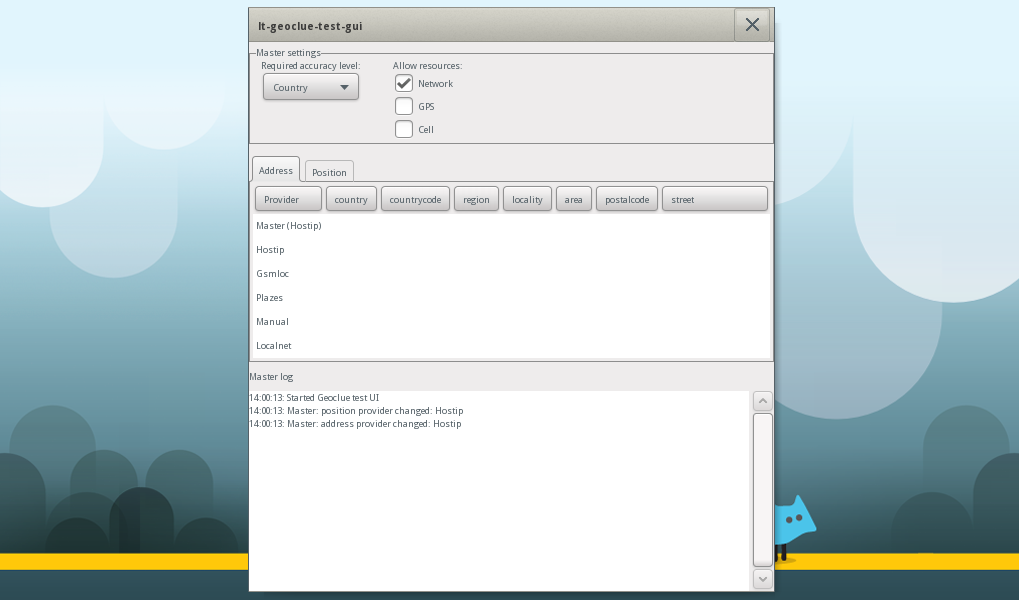
Even though the code is not ready for being public, I could show a snapshots of the test application I implemented for the Meego Handset platform using the Meego Touch framework:

GeoClue test application for Meego Handset

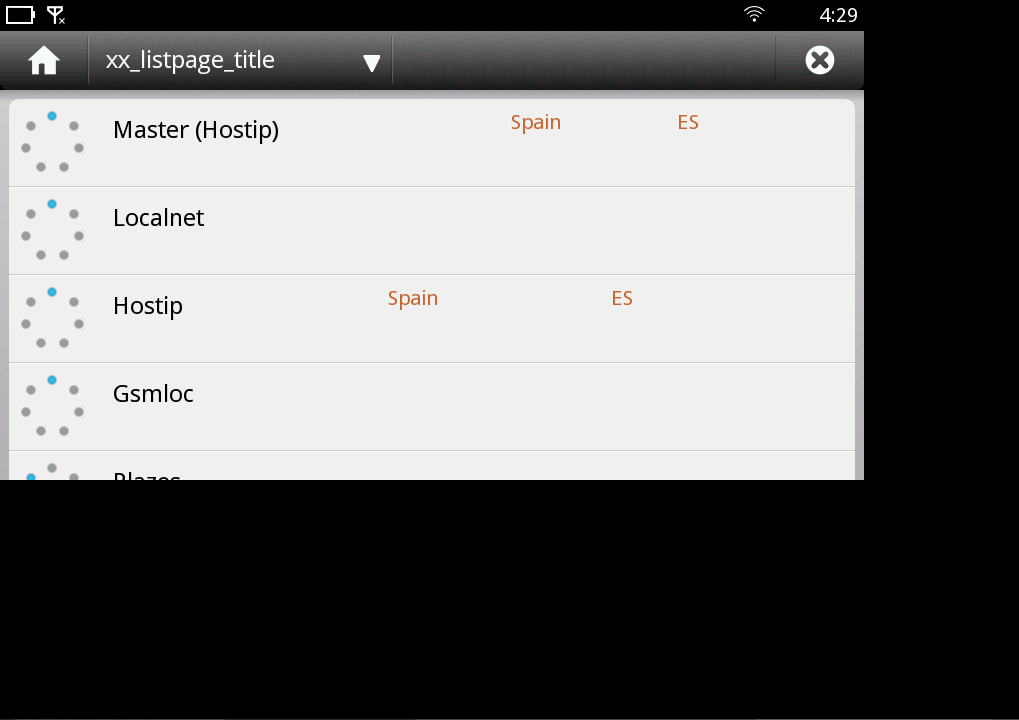
The purpose of this application would be monitoring the DBus communication between the different location providers, creating some performance tests and evaluating the impact on a Mobile platform.

194412

QGeoPositionInfo Class Reference

GeoClue and Meego: Connman support

As promised, GeoClue now supports Connman as the connectivity manager module for acquiring network based location data.This step has been essential to complete the integration of GeoClue in the Meego architecture.

Check the patch if you want to know the details.

Thanks to Bastian Nocera for reviewing and pushing the commit, which is now part of the master branch of GeoCLue. Let see if it passes the appropriated tests before becoming part of some official release.

Network based positioning is one of the advantages of using GeoClue as Location provider. That’s obvious for Desktop implementations, where GPS and Cell Id based methods are not the most common use cases. On the other hand, Mobile environments could also get benefits from network based positioning, assisting the GPS based methods for improving the fix acquiring process; perhaps indicating where the closest satellite network is or showing a less accuracy location while the GPS fix is being established.

Finally, I would like to remark that my work is part of the Igalia’s bet for the Meego platform. I think the GeoClue project will be an important technology to invest in the future, since it’s relevant also for GNOME and Desktop technologies. In fact, GeoClue is also the Ubuntu’ s default Geolocation component.

GeoClue and Meego

As most of you probably know, GeoClue is the default component of the Meego architecture for supporting Geolocation services.

GeoClue on Meego

The geoclue packages are installed by default in both, Netbook and Handset Meego SDK environments. I’ve been playing a bit with the Meego simulator and GeoClue seems to be perfectly configured and the examples can be executed without any problem.

But here are the bad news 🙂 Some work is needed to adapt the GeoCLue Connectivity module to the Meego connection manager component: connman.

I think I’m going to spend some time figuring out how much work is required and trying to propose some feasible approach. Another interesting task I’ve got in my mind is to implement some Meego specific examples for GeoClue using the Meego Touch framework.

Creating camera software with GDigicam

After the release of the GDigicam project some months ago we have received some requests about creating documentation and examples of how to use the GDigicam component for handling specific camera devices. I’ve eventually got time to commit, truth being told,  a very preliminary code which pretends to be the first full GDigicam example, showing some of the most important features of this piece of software and how to interact with the GStreamer GstCamerabin component.

First of all, for those who still don’t know what GDigicam actually is, i would like to briefly introduce it. GDigicam is a framework for handling camera related low level software inspired in the OpenMax standard. GDigicam provides a complete API for implementing a set of functionalities very useful when building camera UI software:

  • ViewFinder
  • Flash Modes
  • Scene Modes
  • Resolution and Aspect Ratio
  • Autofocus
  • White Balance
  • Quality
  • Zoom
  • Video and Photo Capture

The GDigicam component is intended to ease the setup and handle the software components which actually control and implement the video and photography features, and in addition, hiding the technologies used in such lower layers.

The first implementation of the abstract API exposed by GDigicam is based on the GStreamer toolkit, using the GstCamerabin component. You can check it out from the git repository:

  • git clone git:gitorious.org/fremantle-gdigicam/gdigicam.git

The stable branch is totally focused on the MAEMO platform, so if you have plans to work on any different platform you will have to use the master branch. The new example added is only available at the unstable branch, since the GstCamerabin component is slightly different in MAEMO. Hopefully, I’ll be able to merge this example to the stable branch soon, but it will require some important design changes that could take some time.

When I was implementing the new GDigicam example I realized other possibilities to be built on top of the GDigicam component. I think a benchmarking tool could fit perfectly on the purpose of showing how to use GDigicam, but it also provides an interesting tool for the community, to be able to compare and analyze different kind of camera hardware and software platforms.

Here you are a video briefly showing this tool, being run in the MAEMO platform and using the N900 hardware. The UI interface is very simple, and perhaps a little rudimentary; user experience is not the key at this stage. In the video you can see how to configure the camera settings (flash, scene mode, resolution, quality and so on). After the configuration stage, you can enable or disable your own benchmarking set of tests. You can implement your own tests, grouping them in your own way and execute all of them in a row. In the video you can see the execution of the Set1 – Test1: Capture still images in a row (default is 5 iterations).

There are lots of additional features, like a full verbose log of whats going on, performance metrics, comparison and analysis of different HW used for benchmarking. Of course you can forget about testing and building your own Camera for your device.

Besides, the GDigicam component could provide other interesting features, very useful for implementing camera UI applications:

  • Video/Audio resource policies.
  • Metadata management.
  • Geolocation.

What could we do with Clutter ?

These last months i’ve been working with Clutter project as part our GNOME R&D project. Firstly, for who don’t know what Clutter project exactly is, i would like to briefly introduce you this technology.The Clutter project has created an open source software library for creating fast, visually rich and animated graphical user interfaces. Clutter uses OpenGL (and optionally OpenGL ES for use on Mobile and embedded platforms) for rendering but with an API which hides the underlying GL complexity from the developer. The Clutter API is intended to be easy to use, efficient and flexible.

Basically, Clutter provides a Canvas for drawing complex graphics and effects. This Canvas could be inserted inside a Gtk context, using the Clutter-Gtk library.

The second part of my post will be focused on my work during last R&D project iteration and what were my thoughts about this new and promising technology; there were several discussions in the gtk-devel list about the new GTK 3.0 evolution and what would be the role of Clutter project.

The best way to understand a technology, after read carefully all related documentation, is to implement a proof of concept. For that purpose, i’ve chosen the YouTube  client applications domain to develop new UI concepts, in order to test the powerful of Clutter as toolkit.

The first thing i’ve realized when i read the Clutter project documentation is that Clutter is not actually a toolkit, as it’s mentioned in Clutter project web page. With my understanding of the toolkit concept, it should be a set of tools for implementing user interfaces. However, user interfaces are not only graphical elements, but window management, theming support, advanced graphical components, translation support, applets and icons management, shortcuts, toolbars and menus or similar ways of activating user actions, … In that sense, Clutter lacks of several important features required to be considered as UI toolkit. I think that, at least at this moment, Clutter could be just considered as a graphical engine or scene graph tool. This point was also mentioned by some people inside gtk developers community who are considering the approach of using Clutter as scene graph concept for the next GTK 3.0.

When finally i began to develop my test application i had assumed that it actually wont be a functional YouTube client application, just an user interface proof of concept. Who knows what will happen in future, but for this project i’ ve focused the development in just one use case: querying for videos and show the results.  For implementing the communication with YouTube web services i’ve found a very interesting implementation of YouTube GData API: libgdata and libgdata-google.These libraries, also used inside evolution-data-server as static libraries, are also provided as independent libraries, at least, in Ubuntu hardy. These libraries, implemented using a GLib GObject approach, provide Client access to google POA through SOAP interface.

During the implementation of this YouTube client application i’ve implemented several UI for showing YouTube top_rated query results. The first approach was obviously a GtkTreeView view.

screenshot-youtube-test.png                               screenshot-clutter-ui.png

The first and simpler clutter approach would be to show results in a square grid. I have to say that the square grid its also possible to implement in Gtk, although Clutter provides more fancy effects.

After this first UI proposals, and after understanding better advanced operations with Clutter, i tried to define new ways of showing information, always thinking about how to improve the end user experience.

screenshot-clutter-ui2.png          screenshot-clutter-ui2-1.png          screenshot-clutter-ui3.png

The most interesting questions i’ve made to myself at this point have not been about Clutter technology capabilities, but what new UI concepts we want to achieve. I think there are several graphic technologies today providing new ways of drawing user interfaces, the important point is to define precisely how to present information and services to end users in a more intuitive way.

New feature for GtkUIManager class

I’ve been working for several months in the development of the Modest email client. It was a very interesting work, using gtk deeply trying to improve some internal features of the Gtk UI Manager system.

Modest has lots of strict rules about dimming toolbar icons, menu options, action widgets, …. Most applications don’t have a well designed system to manage this kind of events and that behaviour is shared between several files and classes; sometimes these dimming rules are implemented several times, which causes many runtime errors as well as some problems to extend classes and use cases logic.

During my work in Modest I designed a system to manage dimming logic in Gtk applications. This design is based on GtkUIManager system and tries to solve the same problem: centralize and simplify UI events on a GtkWindow. The following UML diagram shows an example of this system:

UIDimmingManager class diagram

Implementation details

The next step should be adding this logic to the Gtk core in order to be part of the GtkUIManager system. It will not be very hard to add this behaviour to that class, because UIDimmingManager pattern has the same structure than the Gtk UIManager.

The classes involved in this design and responsibilities are described as follow:

  • UIDimmingManager
    • This class stores and handles UI Dimming Rules Groups . Each rules group has a string name, which will be used inside the manager to execute a specific group. This rules group is stored internally in a hash map; however, a different data structure could be used for that purpose.
    • The API of this class exports two different methods to execute rules:
      • ui_dimming_manager_process_dimming_rules: execute all rules groups.
      • ui_dimming_manager_process_dimming_rules_group: execute a specific rules group.
  • DimmingRulesGroup
    • Stores and handles a dimming rules group.
    • It could also manage two different types of dimming rules:
      • Common dimming rules: This kind of rules are defined for GtkUIManager items, so they have to be defined previously inside the UIManager structure.
      • Widget dimming rules: These rules can be applied to any widget.
    • Each dimming rule could have a notification dialog in order to inform the user why some item is dimmed. This notification system is enabled or disabled for all rules defined in a single group.
  • DimingRule
    • This class actually implements dimming rules behaviour.
    • It should receive three parameters at creation time:
      • Window: a GtkWindow or CustomWindow instance to apply dimming rule.
      • Callback: callback function for checking dimming behaviour.
      • Action path: the path to locate UIAction element, registered in UIManager.
        • This parameter is optional, because for widget dimming rules is not required.
  • UIDimmingRules
    • This element was defined as a plain file, with a list of operations to be used as dimming rules callback.
    • Its similar to the common file used in UIManager stock items implementation for defining actions for each item.

Once you have defined your UIManager structure, with your xml file for defining stock items and UI actions, you only have to define your dimming data structure, very similar to UIManager
structure:

/* Menu Dimming rules entries */
static const DimmingEntry menu_dimming_entries [] = {

/* Email Menu */
{ "/MenuBar/Menu1/Menu1Submenu1/Menu1Submenu1Item1", G_CALLBACK(ui_dimming_rules_on_rule1) },
{ "/MenuBar/Menu1/Menu1Submenu1/Menu1Submenu1Item2", G_CALLBACK(ui_dimming_rules_on_rule1) },
{ "/MenuBar/Menu1/Menu1Item3", G_CALLBACK(ui_dimming_rules_on_rule1) },
{ "/MenuBar/Menu1/Menu1Item4", G_CALLBACK(ui_dimming_rules_on_rule1) },
{ "/MenuBar/Menu1/Menu1Item5", G_CALLBACK(ui_dimming_rules_on_rule1) },
{ "/MenuBar/Menu1/Menu1Item6", G_CALLBACK(ui_dimming_rules_on_rule1) },

{ "/MenuBar/Menu2/Menu2Submenu1/Menu2Submenu1Item1", G_CALLBACK(ui_dimming_rules_on_rule1) },
{ "/MenuBar/Menu2/Menu2Submenu1/Menu2Submenu1Item2", G_CALLBACK(ui_dimming_rules_on_rule1) },
{ "/MenuBar/Menu2/Menu2Item3", G_CALLBACK(ui_dimming_rules_on_rule1) },
{ "/MenuBar/Menu2/Menu2Item4", G_CALLBACK(ui_dimming_rules_on_rule1) },
{ "/MenuBar/Menu2/Menu2Item5", G_CALLBACK(ui_dimming_rules_on_rule1) },
{ "/MenuBar/Menu2/Menu2Item6", G_CALLBACK(ui_dimming_rules_on_rule1) },

{ "/MenuBar/Menu3/Menu3Submenu1/Menu3Submenu1Item1", G_CALLBACK(ui_dimming_rules_on_rule1) },
{ "/MenuBar/Menu3/Menu3Submenu1/Menu3Submenu1Item2", G_CALLBACK(ui_dimming_rules_on_rule1) },
{ "/MenuBar/Menu3/Menu3Item3", G_CALLBACK(ui_dimming_rules_on_rule1) },
{ "/MenuBar/Menu3/Menu3Item4", G_CALLBACK(ui_dimming_rules_on_rule1) },
{ "/MenuBar/Menu3/Menu3Item5", G_CALLBACK(ui_dimming_rules_on_rule1) },
{ "/MenuBar/Menu3/Menu3Item6", G_CALLBACK(ui_dimming_rules_on_rule1) }
};

Using Xephyr on debian sarge

To test graphical applications on Scratchbox you have several X server to export display (VNC, Xephyr, …) However, i conclude Xephyr is the best option because its very light and fast. I know the most of developers use testing or experimental version of Debian; however, sometimes is not possible to update your machine due several reasons: important legacy services which require Sarge, too much stress to lose time on it :), too much busy system administrator, …

In case you want to develop using Scratchbox and Debian Sarge, you should know there is no available version of Xephyr (a very common problem). However, software developers community is great and they always think in all these things to make our life easier. I found a precompiled version of Xephyr, with required static libraries to run it independently of installed Sarge libraries:

http://www.c3sl.ufpr.br/multiterminal/howtos/howto-xephyr-en.htm

The steps to install and run Xephyr on Sarge are very simple:

  1. Download the Xephyr binary here
  2. Extract it into your work directory (pwd).
  3. Export LD_LIBRARY_PATH environment variable to add Xephyr library path:
    • export LD_LIBRARY_PATH=pwd/Xephyr/lib/
  4. Execute Xephyr with the following options:
    • ./bin/Xephyr :2 -host-cursor -screen 800x480x16 -dpi 96 -ac

Obviously, you could add pwd/bin to your PATH environment variable.

Working an learning about Maemo

This year i have been working quite a lot on Maemo platform to develop some GNOME applications into a cross-compile architecture. It’s being a very interesting experience, especially be part of GMAE and Maemo developer community and try to provide my experience in some projects.

This kind of development its oriented to mobile devices, which requires a different kind of applications and development strategy. As most of you know, mobile devices frequently needs some kind of external device to store data, cause internal memory is very expensive and therefore limited.

Scratchbox (www.scratchbox.org) its a cross-compiling environment to develop applications oriented to mobile devices. However, its very difficult int this environment to develop functionalities which requires access to this kind of external memory devices.

I found a simple way to emulate external memory devices using, for instance, a common usb key, to catch gnome-vfs events and handle them as it were emitted from an external memory card. From GNomeVFS point of view, these devices are managed in a similar way, so you cant test your uses cases in your PC.

  • Install mount in sbox.
apt-get install mount
  • Edit /etc/fstab file on sbox
    none      /proc         proc   defaults       0 0
    /dev/sdb  /media/memory   vfat   user,noauto    0 0
  • From host, set ownerships and permissions to sbox mount and umount commands
chown root:root /scratchbox/users/jfernandez/targets/i386-2007-07-26/bin/mount
chmod 4755 /scratchbox/users/jfernandez/targets/i386-2007-07-26/bin/mount
chown root:root /scratchbox/users/jfernandez/targets/i386-2007-07-26/bin/umount
chmod 4755 /scratchbox/users/jfernandez/targets/i386-2007-07-26/bin/umount
  • Insert your USB key
  • Mount your virtual file system
mount /media/memory

Now, gnome-vfs monitor could detect mount and umount events of your USB, emulating insertion of an external memory device.