When Grilo met Phonon

You probably know Grilo. It’s a GLib based framework created to ease the task of searching media to application developers. A couple of weeks ago I checked its code a bit and I really liked its plugin based design, and how easy to use it was. And I wanted to test it, of course 🙂

Some of my colleagues had already created some examples with Grilo, like Iago adding it to Totem or José creating a clutter based player. I wanted to do something different, and as I live between the Qt and the Gnome world, I decided to develop a Qt based Grilo application that used Phonon to play the media found by Grilo. If you are interested in the full source, you can clone my public repository at Igalia (http://git.igalia.com/user/magomez/qtgrilo.git).

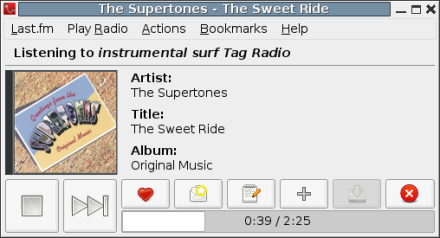
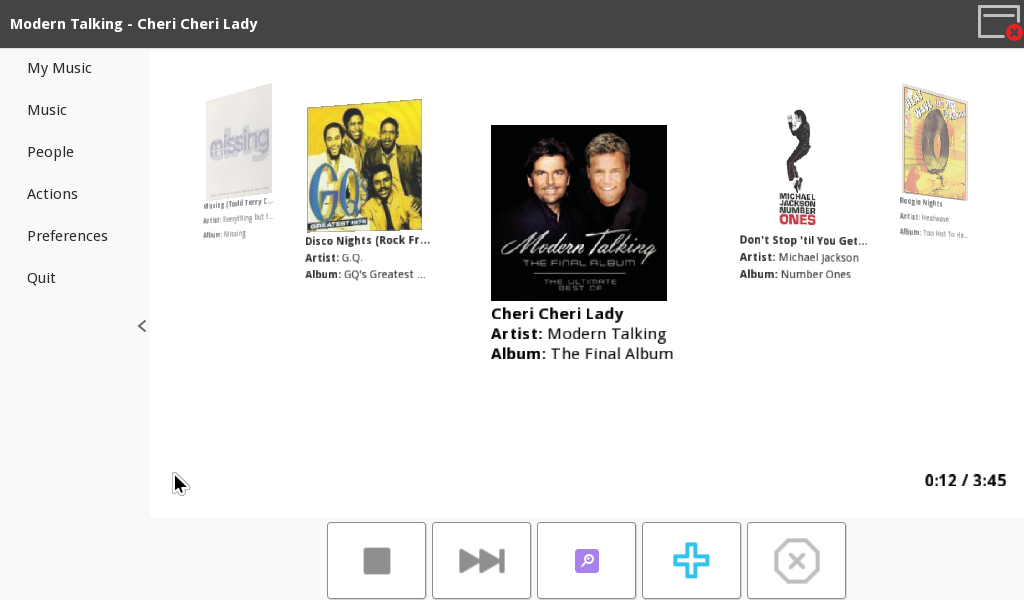
So, step one: create the UI. I got a bit of inspiration from the grilo-test-ui program available with the Grilo sources, and this was the result:

You can choose the plugin to use from the combobox on the top. When a plugin is selected, the operations supported by the plugin are indicated. In the image, the Youtube plugin supports searching, browsing and metadata operations.
The bottom-left list shows the available media. It can be the result of a search, query or browse operation. Double clicking on a list item will browse it if it’s a container or show its metadata if it’s a media file. If the selected media contains an URL field, it will be played by pressing the Show button.

Step two: connect Grilo and the UI. This is really simple. Just add the plugins configuration to the plugin registry (for example the youtube one):

config = grl_config_new ("grl-youtube", NULL);
grl_config_set_api_key (config, YOUTUBE_KEY);
grl_plugin_registry_add_config (registry, config);

Then ask the registry about the available sources and add them to the plugins combo so the user can select one:

GrlMediaPlugin **sources;

sources = grl_plugin_registry_get_sources(registry,
                                          FALSE);

int i = 0;
while (sources[i]) {
    pluginCombo->
        addItem(grl_metadata_source_get_name(GRL_METADATA_SOURCE(sources[i])),
                qVariantFromValue(sources[i]));
    i++;
}
g_free(sources);

Be careful here, as in order to store non Qt typed pointers in QVariants, you need to declare them first, so Qt knows about those types. In this code, I defined the 2 types I stored into QVariants:

Q_DECLARE_METATYPE(GrlMediaPlugin*)
Q_DECLARE_METATYPE(GrlMedia*)

And that’s it.

Then, when the user selects a source, ask for its supported operations. If browsing is supported, do it to fill the browser list with the root folder contents:

GrlSupportedOps ops;
ops = grl_metadata_source_supported_operations(GRL_METADATA_SOURCE(currentPlugin));

if (ops & GRL_OP_SEARCH) {
        opsString += "  SEARCH";
        searchButton->setEnabled(true);
} else {
        searchButton->setEnabled(false);
}
if (ops & GRL_OP_QUERY) {
        opsString += "  QUERY";
        queryButton->setEnabled(true);
} else {
        queryButton->setEnabled(false);
}
if (ops & GRL_OP_BROWSE) {
        opsString += QString("  BROWSE");
        browseButton->setEnabled(true);
        browse();
} else {
        browseButton->setEnabled(false);
}
if (ops & GRL_OP_METADATA) {
        opsString += "  METADATA";
} else {
}

operationsLabel->setText(opsString);

Step three: implement the browse, search and query operations. Again, this is a simple process once you understand how Grilo works, and the implementation of the three operations is quite similar. Basically, you need to call grl_media_source_search/query/browse. Besides some flags and parameters for the search, you indicate the string to search/query or the container to browse, and the callback operation. This callback is called whenever a result arrives, and inside you must decide whether to launch a new search/query/browse to get the next chunk of results. Of course, besides this, I’ve added the obtained media to the browser list, so the user can interact with it.

As I explained in my last post, a class method can be used as a GObject signal callback, so this is what I did here as well. When callback method is called, it receives the class instance as the user_data parameter, so from inside the class method I can call the instance method I need. As an example, these are the 3 functions that implement the search operation: search() is the one called to start the operation, searchFinishedCB is the result callback, and searchMethod is the instance methos that adds the result to the browser and launches the search again if needed.

void TestWindow::search()
{
        cancelCurrentOperation();
        clearBrowser();

        string = g_strdup(searchEdit->text().toLatin1());
        currentOpId = grl_media_source_search(GRL_MEDIA_SOURCE(currentPlugin),
                                              string,
                                              grl_metadata_key_list_new(GRL_METADATA_KEY_ID,
                                                                        GRL_METADATA_KEY_TITLE,
                                                                        GRL_METADATA_KEY_CHILDCOUNT,
                                                                        NULL),
                                              0,
                                              BROWSE_CHUNK_SIZE,
                                              (GrlMetadataResolutionFlags)BROWSE_FLAGS,
                                              searchFinishedCB,
                                              this);

}

void TestWindow::searchFinishedCB(GrlMediaSource *source,
                                  guint search_id,
                                  GrlMedia *media,
                                  guint remaining,
                                  gpointer user_data,
                                  const GError *error)
{
        if (!error && media) {
                TestWindow *win = (TestWindow*)user_data;
                win->searchFinished(search_id, media, remaining);
        }

}
void TestWindow::searchFinished(guint search_id,
                                GrlMedia *media,
                                guint remaining)
{
        QString name(grl_media_get_title(media));
        QStandardItem *item = new QStandardItem();
        if (GRL_IS_MEDIA_BOX(media)) {
                QFont font;
                font.setBold(true);
                item->setFont(font);
                gint children = grl_media_box_get_childcount(GRL_MEDIA_BOX(media));
                if (children == GRL_METADATA_KEY_CHILDCOUNT_UNKNOWN) {
                        name += QString(" (?)");
                } else {
                        name += QString(" (%1)").arg(children);
                }
        }
        item->setText(name);
        item->setData(qVariantFromValue(media));
        item->setEditable(false);
        browseModel->appendRow(item);
        operationResults++;

        if (remaining == 0) {
                operationOffset += operationResults;
                if (operationResults >= BROWSE_CHUNK_SIZE &&
                    operationOffset < BROWSE_MAX_COUNT) {
                        operationResults = 0;
                        /* relaunch search */
                        currentOpId = 
                                grl_media_source_search(GRL_MEDIA_SOURCE(currentPlugin),
                                                        string,
                                                        grl_metadata_key_list_new(GRL_METADATA_KEY_ID,
                                                                                  GRL_METADATA_KEY_TITLE,
                                                                                  GRL_METADATA_KEY_CHILDCOUNT,
                                                                                  NULL),
                                                        operationOffset,
                                                        BROWSE_CHUNK_SIZE,
                                                        (GrlMetadataResolutionFlags)BROWSE_FLAGS,
                                                        searchFinishedCB,
                                                        this);
                }
        }
}

After implementing the search, query and browse operations, I implemented the metadata operation as well. So when the user selects and element in the browser, its metadata is retrieved and shown. Its implementation is quite similar to the browse/query/search operations as well, but it doesn’t need to be relaunched as them.

So, the next and final step was playing the media. I started with videos and audio, as using Phonon it was really easy:

void TestWindow::playVideo()
{
        Phonon::VideoWidget *videoWidget = new Phonon::VideoWidget();
        videoWidget->setAttribute(Qt::WA_DeleteOnClose);

        Phonon::MediaObject *mediaObject = new Phonon::MediaObject(videoWidget);
        mediaObject->setCurrentSource(Phonon::MediaSource(QUrl(QString::fromUtf8(grl_media_get_url(currentMedia)))));
        Phonon::AudioOutput *audioOutput = new Phonon::AudioOutput(Phonon::VideoCategory, videoWidget);
        Phonon::createPath(mediaObject, audioOutput);
        Phonon::createPath(mediaObject, videoWidget);
        videoWidget->show();
        mediaObject->play();
}

void TestWindow::playAudio()
{
        QMessageBox msgBox;
        msgBox.setText(QString("Playing %1").arg(grl_media_get_title(currentMedia)));

        Phonon::MediaObject *mediaObject = new Phonon::MediaObject(&msgBox);
        mediaObject->setCurrentSource(Phonon::MediaSource(QUrl(QString::fromUtf8(grl_media_get_url(currentMedia)))));
        Phonon::AudioOutput *audioOutput = new Phonon::AudioOutput(Phonon::MusicCategory, &msgBox);
        createPath(mediaObject, audioOutput);
        mediaObject->play();
        msgBox.exec();
}

Understanding how Phonon works is quite easy when you have learned to use GStreamer first, as the concepts are almost the same (despite Phonon is far easier to use). Basically you need to create a MediaObject and tell it where to get the data. Then create an AudioOutput for the audio, a VideoWidget for the video, connect them and then set the playing state. I was a bit short of time to implement a more featured player, but I wanted to provide a way to stop the playback once started, so it’s stopped when the output window (if it’s a video) or the dialog with the title (if it’s an audio file) are closed.

And finally, the image files. Opening them when they were local files is trivial. But when they are remote ones, you need to download them first. In order to do so, you to use a QNetworkAccessManager, which is the class in charge of the network access. Just use its get() to make a request, and it will notify with a signal when the data has arrived, as you can see in the code:

netManager = new QNetworkAccessManager(this);
connect(netManager, SIGNAL(finished(QNetworkReply*)),
                this, SLOT(netRequestFinished(QNetworkReply*)));

...

void TestWindow::playImage()
{
        QUrl url(QString::fromUtf8(grl_media_get_url(currentMedia)));

        if (url.scheme() == "file") {
                QScrollArea *area= new QScrollArea();
                area->setAttribute(Qt::WA_DeleteOnClose);
                QLabel *label = new QLabel();
                label->setPixmap(QPixmap(url.path()));
                area->setWidget(label);
                area->show();
        } else {
                netManager->get(QNetworkRequest(url));
        }
}

...

void TestWindow::netRequestFinished(QNetworkReply *reply)
{
        QScrollArea *area= new QScrollArea();
        area->setAttribute(Qt::WA_DeleteOnClose);
        QLabel *label = new QLabel();
        QPixmap pix;
        pix.loadFromData(reply->readAll());
        label->setPixmap(pix);
        area->setWidget(label);
        area->show();
        reply->deleteLater();
}

And that’s all… well, almost all… for some reason I haven’t found yet, opening youtube videos is not working, despite I’ve checked the URLs and the videos work if they are atored in the computer… I might be a bug with Phonon but I haven’t found it yet…

As you can see, using Grilo is really easy… even if you decide to mix it with Qt! 🙂

A camera using GDigicam and Qt

You may (or not 😉 ) know that GDigicam is an open source library used in Maemo 5 as a middleware betweeen the camera application and the GStreamer stuff. The goal of the library is to ease the development of camera style applications by hiding the low level stuff to the UI developers, and it allows different GStreamer pipelines to be used in the lower layers to achieve the camera funcionality. Currently the camerabin plugin is the fully supported one, and it’s also the one being used for the N900 camera.

I had the chance to collaborate in the development of the GDigicam library time ago, and it’s currently maintained by some of my colleagues at Igalia. One of them asked me some days ago about the possibility of using GDigicam together with Qt to develop a camera application. You know how this works… that seed was enough to awake my curiosity, so I started working on it 🙂

Some tests later, I’ve developed an experiment integrating both things. A Qt application that uses GDigicam to display a viewfinder in a Qt window, and to get pictures and show a preview of them. I must confess that I got really surprised because it was a really simple task. You can clone my personal repository (http://git.igalia.com/user/magomez/qtcamera.git) if you want to check the code. These are the steps I followed and the tricky parts of the code 🙂

First, extend the QWidget to create a CamWindow widget. In the CamWindow constructor, create the GDigicamManager, the GStreamer camerabin plugin, the GDigicamDescriptor and fill the bin capabilities (this is done in the setupCamerabin method). Connect the callbacks to the GDigicam desired signals and set the initial configuration. In the example, I used CamWindow’s static methods as callbacks of the GDigicam signals. This is fine as long as you don’t need the CamWindow instance. If you need it, then you’ll have to set it as the callback user_data parameter when connecting the signal (as in the preview signal case).

void CamWindow::setupGDigicam()
{
    GstElement *bin;
    GDigicamDescriptor *descriptor = NULL;

    /* create the GDigicamManager */
    manager = g_digicam_manager_new();
    colorkey = 0;

    /* create the bin */
    bin = g_digicam_camerabin_element_new ("v4l2camsrc",
                                           "dspmp4venc",
                                           "hantromp4mux",
                                           "pulsesrc",
                                           "nokiaaacenc",
                                           "jpegenc",
                                           NULL,
                                           "xvimagesink",
                                           &colorkey);

    /* create and fill the descriptor*/
    descriptor = g_digicam_camerabin_descriptor_new (bin);
    descriptor->max_zoom_macro_enabled = 6;
    descriptor->max_zoom_macro_disabled = 6;
    descriptor->max_digital_zoom = 6;


..... more descriptor capabilities stuff....


    /* set the bin and the descriptor to the manager */
    g_digicam_manager_set_gstreamer_bin (manager,
                                         bin,
                                         descriptor,
                                         NULL);

    /* connect to the manager's signals */
    g_signal_connect (manager, "pict-done",
                     (GCallback) captureDone,
                      NULL);
    g_signal_connect (manager, "capture-start",
                     (GCallback) captureStart,
                      NULL);
    g_signal_connect (manager, "capture-end",
                     (GCallback) captureEnd,
                      NULL);
    g_signal_connect (manager, "image-preview",
                     (GCallback) imagePreview,
                      this);

    /* set initial configuration */
    setOperationMode(G_DIGICAM_MODE_STILL);
    setResolution(G_DIGICAM_RESOLUTION_HIGH,
                  G_DIGICAM_ASPECTRATIO_16X9);
    setFlashMode(G_DIGICAM_FLASHMODE_AUTO);
    enablePreview(true);
}

I’ve created some private members in CamWindow to encapsulate the GDigicam function calls. They are used for initialization and also called through the options in the window menu (change resolution, play/stop bin) and when clicking the capture button. This is the one to set the resolution for example:

void CamWindow::setResolution(GDigicamResolution res,
                              GDigicamAspectratio ar)
{
    GDigicamCamerabinAspectRatioResolutionHelper *helper = NULL;

    helper = g_slice_new (GDigicamCamerabinAspectRatioResolutionHelper);
    helper->resolution = res;
    helper->aspect_ratio = ar;

    g_digicam_manager_set_aspect_ratio_resolution (manager,
                                                   helper->aspect_ratio,
                                                   helper->resolution,
                                                   NULL,
                                                   helper);

    g_slice_free (GDigicamCamerabinAspectRatioResolutionHelper, helper);
}

One of the capabilities of the camerabin is that through the use of a colorkey, it allows blending UI components over the video stream. To make this work, the background of the window where the video is put must be filled wit the colorley color (this color is provided when creating the camerabin element). This is why this is done in the paintEvent method of the window:

void CamWindow::paintEvent (QPaintEvent *)
{
    QPainter painter(this);
    QBrush brush;

    QColor color((colorkey & 0x00ff0000) >> 16,
                 (colorkey & 0x0000ff00) >> 8,
                  colorkey & 0x000000ff);

    painter.save();
    painter.fillRect(0, 0, width(), height(), color);
    painter.restore ();
}

This done, by calling g_digicam_manager_play_bin() and g_digicam_manager_stop_bin(), you can control the viewfinder running on the window. The g_digicam_manager_play_bin() function received the XWindow id of the widget, which is obtained through the winId() member of QWidget.

Finally, when the pipeline is running, by calling g_digicam_camerabin_get_still_picture(), you can capture a picture. When doing so, besides the picture being stored in the provided path, the manager will emit (if preview is active) a signal containing a preview of the captured picture. In order to show this preview, I connected the imagePreview member of CamWindow to the preview signal. Inside this method, the GdkPixbuf received is turned into a QImage and then a QPixmap that is shown in a new window:

void CamWindow::imagePreview(GDigicamManager *manager,
                             GdkPixbuf *preview,
                             gpointer data)
{
    QLabel *label = new QLabel();
    label->setAttribute(Qt::WA_DeleteOnClose);
    label->setWindowFlags(label->windowFlags() | Qt::Window);

    QImage image(gdk_pixbuf_get_pixels(preview),
                 gdk_pixbuf_get_width(preview),
                 gdk_pixbuf_get_height(preview),
                 gdk_pixbuf_get_rowstride(preview),
                 QImage::Format_RGB888);

   QPixmap pixmap(QPixmap::fromImage(image));
                  label->setPixmap(pixmap);
                  label->show();
}

If you get the code and run the example in an N900, you will see a window with a capture button. Go to the menu, select play and the viewfinder will show up (and capture button will be over it!). You can change the resolution of the picture through the menu, and press the capture button to get a picture, and see the preview of the capture in a new window. For the moment, those are the features I’ve implemented in the example.

It’s quite simple, isn’t it? 🙂

Vagalume dressed for the Moblin party

Something I’ve been playing with that I’ve not mentioned before was my experiments adapting Vagalume to the Moblin look and feel.

As you know, Moblin’s UI is (should I say was???) Clutter based, with lots of fancy transitions. Also, it uses fullscreen windows in a one-window-per-desktop approach, and there aren’t dropdown menus neither dialogs.

And as you also know, Vagalume has a non fullscreen Gtk+ based window. And it uses dropdown menus and dialogs.

So, this needed a bit of love 🙂

I started by adding some fancy effects to the UI by using Clutter. I did some modifications to the Vagalume controller so I could get more than one cover at a time and put them into a GtkClutterEmbed, with a rotation effect when switching from a song to the next one. I shouldn’t say it, but the result was quite cool 😛 :

And then started with the menu. I removed all the dropdown stuff and replaced it a side panel. This panel can stay hidden or shown.

When some of the options in the panel is clicked, is expanded, hiding the cover list widget, and showing the different suboptions, as you can see in the image:

And finally, I added to the cover list widget the capability to show error messages, so no dialogs were needed to do it, and put the window in fullscreen mode. I think the result integrates pretty well, don’y you think? 😉

I uploaded the package to the Intel AppStore so it is (or should be at some point) available. But if you want to play a bit, you can clone my repo at the Igalia (http://git.igalia.com/user/magomez/vagalume-moblin.git) and check the moblin branch.

Hope you like it! 🙂

About G’s, Q’s and M’s

During last years, I’ve been collaborating in the development of the 5th version of Maemo. As you already know, almost everything in this version has been created using GNOME technologies, so these were my tools to help with the development.

But some time ago, Nokia announced that they have changed their mind, and that the new upcoming Maemo6 will be Qt powered. And a bit after that, this new Meego initiative was announced, as the fusion of Maemo and Moblin to create the “ultimate mobile technology that will rule them all”. Well, I must say that these movements attracted my curiosity, so I decided to rescue my Qt knowledge and give a look to what’s really being done in/with Qt inside Maemo. Of course, having some knowledge about the Maemo5 environment and being the proud owner of a N900 made me start with the “what can be done with Qt in Maemo5?” question.

You may (or may not) know that Qt4 is already in your N900 if you have installed the Nokia released updates. It’s the 4.5 version. Nothing new under the sun. But the most interesting stuff is not there, but in the beta 4.6 version that lives in the extras-devel repository (how to enable it?). A lot of work has been and is being doing there to (among other things) ease the development of Qt applications and to be able to use the Maemo5 Hildon widgets from it. You can find more information about it here and here.

So, what’s the cool stuff? For the lazy ones, who don’t want to read all the documentation, these are the main ones regarding app development:

Ok, there are a lot of resources available. Great!. But… are they useful? Are they usable? Can we do cool software with them? The best way to test that is by using them, of course, so a while ago I started to develop an old idea I got for my N900 and… well, I guess that’s a story for another post… 😉