Now that we have a quite complete implementation of CSS Grid Layout specification it’s time to take care of performance analysis and optimizations. In this essay, which is the first of a series of posts about performance, I’ll first introduce briefly how to use Blink (Chrome) and WebKit (Safari) performance analysis tools, some of the most interesting cases I’ve seen during my work on the implementation of this spec and, finally, a basic case to compare Flexbox and Grid layout models, which I’d like to evolve and analyze further in the coming months.
Performance analysis tools
Both WebKit and Blink projects provide several useful and easy to use scrips (python) to run a set of test cases and take different measurements and early analysis. They were written before the fork, that’s why related documentation can be found at WebKit’s track, but both engines still uses them, for the time being.
Tools/Scripts/run-perf-tests
Tools/Scripts/webkitpy/performance_tests/
There are a wide set of performance tests under PerformanceTest folder, at Blink’s/WebKit’s root directory, but even though both engines share a substantial number of tests, there are some differences.
(blink’s root directory) $ ls PerformanceTests/
Bindings BlinkGC Canvas CSS DOM Dromaeo Events inspector Layout Mutation OWNERS Parser resources ShadowDOM Skipped SunSpider SVG XMLHttpRequest XSSAuditor
Chromium project has introduced a new performance tool, called Telemetry, which in addition of running the above mentioned tests, it’s designed to execute more complex cases like running specific PageSets or doing benchmarking to compare results with a preset recording (WebPageRelay). It’s also possible to send patches to performance try bots, directly from gclient or git (depot_tools) command line. There are quite much information available in the following links:
Regarding profiling tools, it’s possible both in Webkit and Blink to use the –profiler option when running the performance tests so we can collect profiling data. However, while WebKit recommends perf for linux, Google’s Blink engine provides some alternatives.
CSS Grid Layout performance tests and current status
While implementing a new browser feature is not easy to measure performance while code evolves so much and quickly and, what it’s worst, be aware of regressions introduced by new logic. When the feature’s syntax changes or there are missing or incomplete functionality, it’s not always possible to establish a well defined baseline for performance. It’s also a though decision to determine which use cases we might care about; obviously the faster the better, but adding performance optimizations usually complicates code, it may affect its robustness and it could lead to unexpected, and even worst, hard to find bugs.
At the time of this writing, we had 3 basic performance tests:
- auto-grid-lots-of-data.html – 100 x 20 auto-sized grid (no stretch).
- fixed-grid-lots-of-data.html – 100 x 20 fixed-sized grid (no stretch).
- fixed-grid-lots-of-stretched-data.html – 100 x 20 fixed-sized grid (stretch)
Why we have selected those uses cases to measure and keep track of performance regression ? First of all, note that auto-sizing one of the most expensive branches inside the grid track sizing algorithm, so we are really interested on both, improving it and keeping track of regressions on this code path.
body { display: grid; grid-template-rows: repeat(100, auto); grid-template-columns: repeat(20, auto); } .gridItem { height: 200px; width: 200px; } |
On the other hand, fixed-sized is the easiest/fastest path of the algorithm, so besides the importance of avoiding regressions (when possible), it’s also a good case to compare with auto-sized.
body { display: grid; grid-template-rows: repeat(100, 200px); grid-template-columns: repeat(20, 200px); } .gridItem { height: 200px; width: 200px; } |
Finally, a stretching use cases was added because it’s the default alignment value for grid items and the two test cases already described use fixed size items, hence no stretch (even though items fill the whole grid cell area). Given that I implemented CSS Box Alignment support for grid I was conscious of how expensive the stretching logic is, so I considered it an important use case to analyze and optimize as much as possible. Actually, I’ve already introduced several optimizations because the early implementation was quite slow, around 40% slower than using any other basic alignment (start, end, center). We will talk more about this later when we analyze a case to compare Flexbox and Grid performance in layout.
body { display: grid; grid-template-rows: repeat(100, 200px); grid-template-columns: repeat(20, 200px); } .gridItem { height: auto; width: auto; } |
The basic HTML body of these 3 tests is quite simple because we want to analyze performance of very specific parts of the Grid Layout logic, in order to detect regressions in sensible code paths. We’d like to have eventually some real use cases to analyze and create many more performance tests, but chrome performance platform it’s definitively not the place to do so. The following graphs show performance evolution during 2015 for the 3 tests we have defined so far.
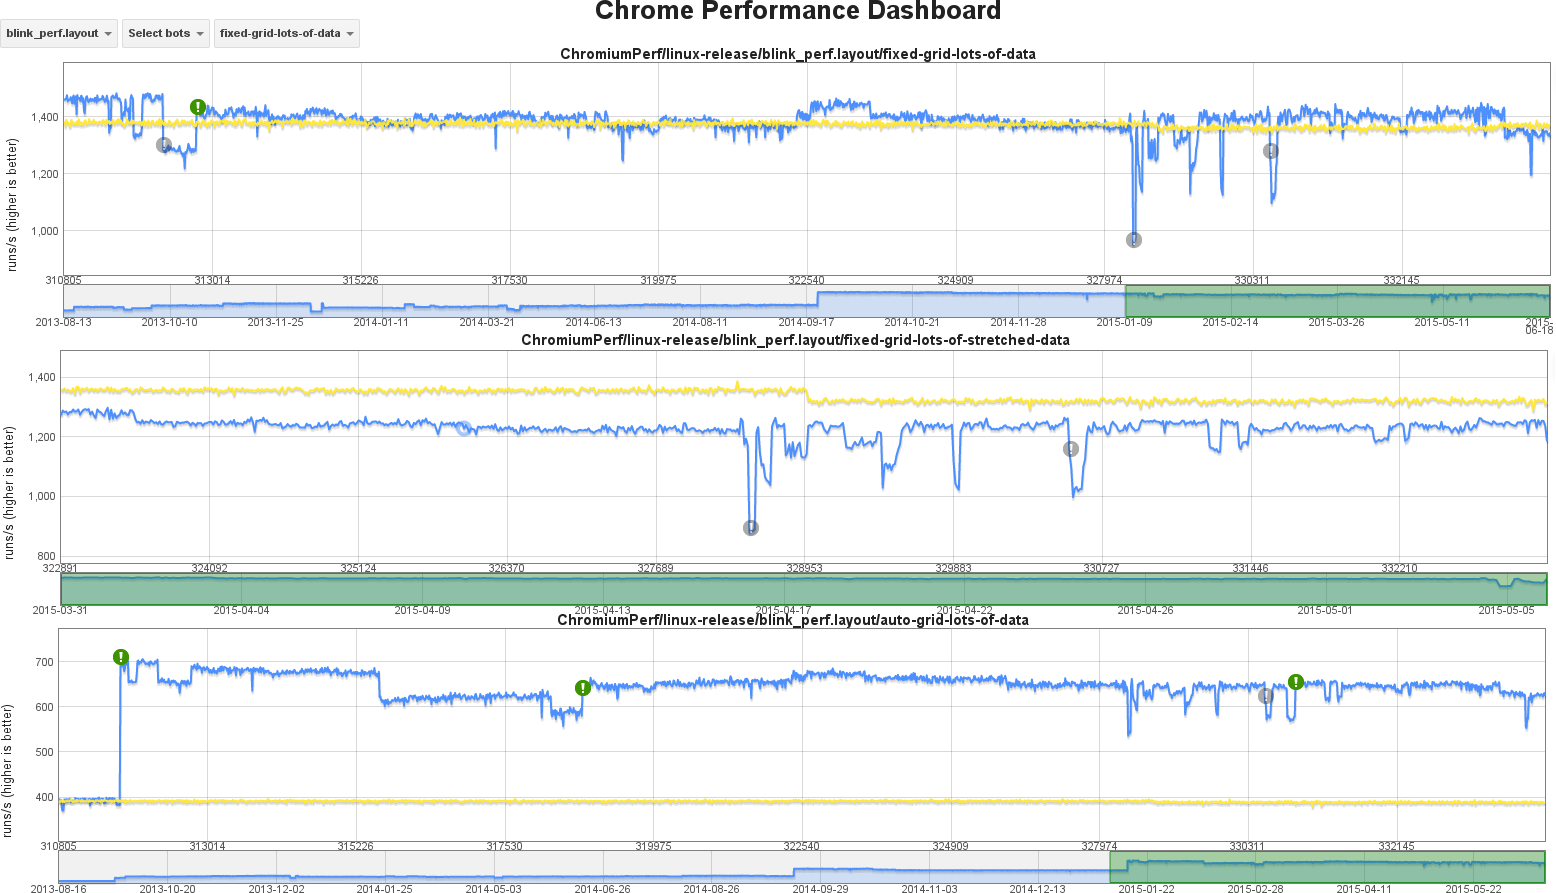
Note that yellow trace shows data taken from a reference build, so we can discount temporary glitches on the machine running the performance tests of target build, which are shown in the blue trace; this reference trace is also useful to detect invalid regression alerts.
Why performance is so different for these cases ?
The 3 tests we have for Grid Layout use runs/second values as a way to measure performance; this is the preferred method for both WebKit and Blink engines because we can detect regressions with relatively small tests. It’s possible, though, to do other kind of measurements. Looking at the graphs above we can extract the following data:
- auto-sized grid: around 650 runs/sec
- fixed-sized grid: around 1400 runs/sec
- fixed-sized stretched grid: around 1250 runs/sec
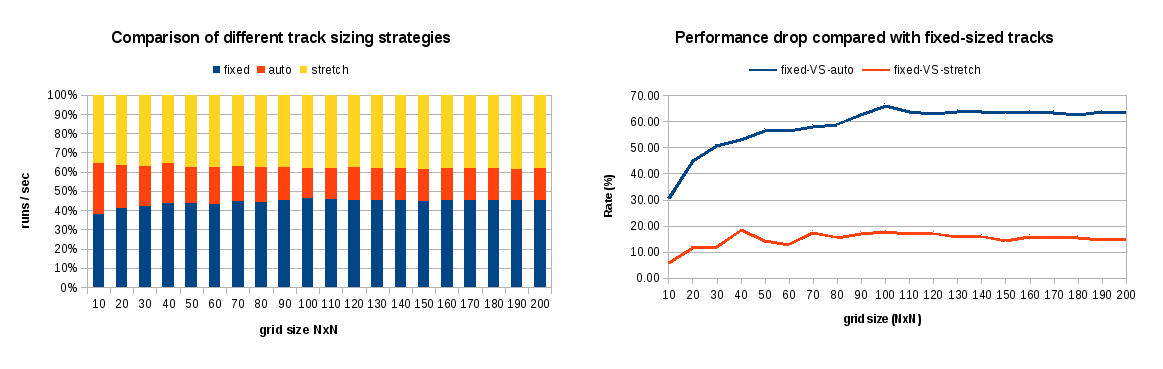
Before analyzing possible causes of performance drop for each case, I’ve defined some additional tests to stress even more these 3 cases, so we can realize how grid size affect to the obtained results. I defined 20 tests for these cases, each one with different grid items; from 10×10 up to 200×200 grids. I run those tests in my own laptop, so let’s take the absolute numbers of each case with a grain of salt; although differences between each of these 3 scenarios should be coherent. The table below shows some numeric results of this experiment.
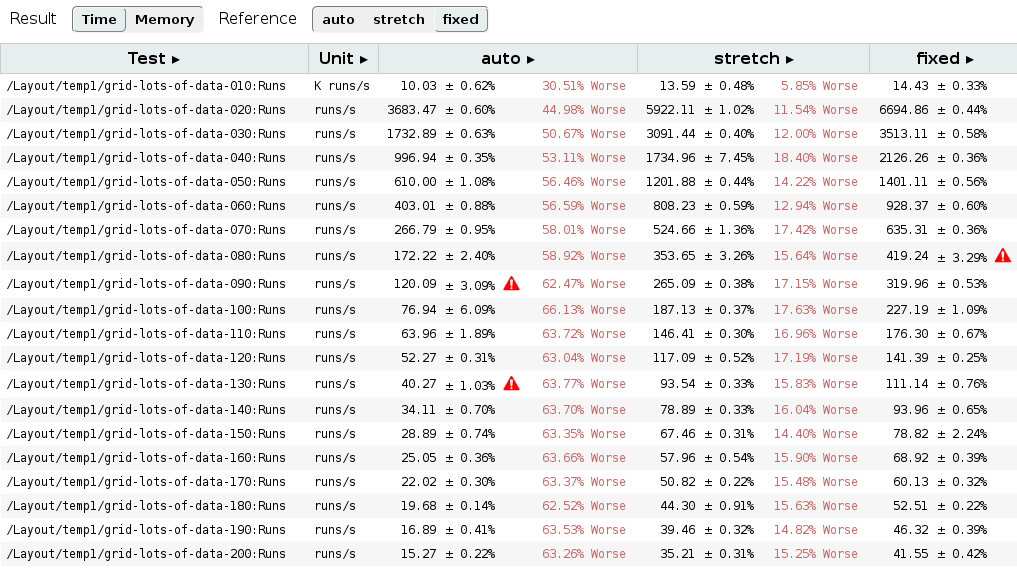
First of all, recall that these 3 tests produce the same web visualization, consisting of grids with NxN items of 100px each one. The only difference is the grid layout strategy used to produce such result: auto-sizing, fixed-sizing and stretching. So now, focusing on previous table’s data we can evaluate the cost, in terms of layout performance, of using auto-sized tracks for defining the grid (which may be the only solution for certain cases). Performance drop is even growing with the number of grid items, but we can conclude that it’s stabilized around 60%. On the other hand stretching is also slower but, unlike auto-sized, in this case performance drop does not show a high dependency of grid size, more or less constant around 15%.
Impact of auto-sized tracks in layout performance
Basically, the track sizing algorithm can be described in the following 4 steps:
- 1- Initialize per Grid track variables.
- 2- Resolve content-based TrackSizingFunctions.
- 3- Grow all Grid tracks in GridTracks from their baseSize up to their growthLimit value until freeSpace is exhausted.
- 4- Grow all Grid tracks having a fraction as the MaxTrackSizingFunction.
These steps will be executed twice, first cycle for determining column tracks’s size and another cycle to set row tracks’s size which it may depend on grid’s width. When using just fixed-sized tracks in the very simple case we are testing, the only computation required to determine grid’s size is completing step 1 and determining free available space based on the specified fixed-size values of each track.
// 1. Initialize per Grid track variables. for (size_t i = 0; i < tracks.size(); ++i) { GridTrack& track = tracks[i]; GridTrackSize trackSize = gridTrackSize(direction, i); const GridLength& minTrackBreadth = trackSize.minTrackBreadth(); const GridLength& maxTrackBreadth = trackSize.maxTrackBreadth(); track.setBaseSize(computeUsedBreadthOfMinLength(direction, minTrackBreadth)); track.setGrowthLimit(computeUsedBreadthOfMaxLength(direction, maxTrackBreadth, track.baseSize())); if (trackSize.isContentSized()) sizingData.contentSizedTracksIndex.append(i); if (trackSize.maxTrackBreadth().isFlex()) flexibleSizedTracksIndex.append(i); } for (const auto& track: tracks) { freeSpace -= track.baseSize(); } |
Focusing now on the auto-sized scenario, we will have the overhead of resolving content-sized functions for all the grid items.
// 2. Resolve content-based TrackSizingFunctions. if (!sizingData.contentSizedTracksIndex.isEmpty()) resolveContentBasedTrackSizingFunctions(direction, sizingData); |
I didn’t add source code of resolveContentBasedTrackSizingFunctions because it’s quite complex, but basically it implies a cost proportional to the number of grid tracks (minimum of 2x), in order to determine minContent and maxContent values for each grid item. It might imply additional computation overhead when using spanning items; it would require to sort them based on their spanning value and iterate over them again to resolve their content-sized functions.
Some issues may be interesting to analyze in the future:
- How much each content-sized track costs ?
- What is the impact on performance of using flexible-sized tracks ? Would it be the worst case scenario ? Considering it will require to follow the four steps of track sizing algorithm, it likely will.
- Which are the performance implications of using spanning items ?
Why stretching is so performance drain ?
This is an interesting issue, given that stretch is the default value for both Grid and Flexbox items. Actually, it’s the root cause of why Grid beats Flexbox in terms of layout performance for the cases when stretch alignment is used. As I’ll explain later, Flexbox doesn’t have the optimizations I’ve implemented for Grid Layout.
Stretching logic takes place during the grid container layout operations, after all tracks have their size precisely determined and we have properly computed all grid track’s positions relatively to the grid container. It happens before the alignment logic is executed because stretching may imply changing some grid item’s size, hence they will be marked for layout (if they wasn’t already).
Obviously, stretching only takes place when the corresponding Self Alignment properties (align-self, justify-self) have either auto or stretch as value, but there are other conditions that must be fulfilled to trigger this operation:
- box’s computed width/height (as appropriate to the axis) is auto.
- neither of its margins (in the appropriate axis) are auto
- still respecting the constraints imposed by min-height/min-width/max-height/max-width
In that scenario, stretching logic implies the following operations:
LayoutUnit stretchedLogicalHeight = availableAlignmentSpaceForChildBeforeStretching(gridAreaBreadthForChild, child); LayoutUnit desiredLogicalHeight = child.constrainLogicalHeightByMinMax(stretchedLogicalHeight, -1); bool childNeedsRelayout = desiredLogicalHeight != child.logicalHeight(); if (childNeedsRelayout || !child.hasOverrideLogicalContentHeight()) child.setOverrideLogicalContentHeight(desiredLogicalHeight - child.borderAndPaddingLogicalHeight()); if (childNeedsRelayout) { child.setLogicalHeight(0); child.setNeedsLayout(); } LayoutUnit LayoutGrid::availableAlignmentSpaceForChildBeforeStretching(LayoutUnit gridAreaBreadthForChild, const LayoutBox& child) const { LayoutUnit childMarginLogicalHeight = marginLogicalHeightForChild(child); // Because we want to avoid multiple layouts, stretching logic might be performed before // children are laid out, so we can't use the child cached values. Hence, we need to // compute margins in order to determine the available height before stretching. if (childMarginLogicalHeight == 0) childMarginLogicalHeight = computeMarginLogicalHeightForChild(child); return gridAreaBreadthForChild - childMarginLogicalHeight; } |
In addition to the extra layout required for changing grid item’s size, computing the available space for stretching adds an additional overhead, overall if we have to compute grid item’s margins because some layout operations are still incomplete.
Given that grid container relies on generic block’s layout operations to determine the stretched width, this specific logic is only executed for determining the stretched height. Hence performance drop is alleviated, compared with the auto-sized tracks scenario.
Grid VS Flexbox layout performance
One of the main goals of CSS Grid Layout specification is to complement Flexbox layout model for 2 dimensions. It’s expectable that creating grid designs with Flexbox will be more inefficient than using a layout model specifically designed for these cases, not only regarding CSS syntax, but also regarding layout performance.
However, I think it’s interesting to measure Grid Layout performance in 1-dimensional cases, usually managed using Flexbox, so we can have comparable scenarios to evaluate both models. In this post I’ll start with such cases, using a very simple one in this occasion. I’d like to get more complex examples in future posts, the ones more usual in Flexbox based designs.
So, let’s consider the following simple test case:
<div class="className"> <div class="i1">Item 1</div> <div class="i2">Lorem ipsum dolor sit amet, consectetur adipiscing elit, sed do eiusmod tempor incididunt ut labore et dolore magna aliqua.</div> <div class="i3">Item 3 longer</div> </div> |
I evaluated the simple HTML example above with both Flexbox and Grid layouts to measure performance. I used a CPU profiler to figure out where the bottlenecks are for each model, trying to explain where differences came from. So, I defined 2 CSS classes for each layout model, as follows:
.flex { background-color: silver; display: flex; height: 100px; align-items: start; } .grid { background-color: silver; display: grid; grid-template-columns: 100px 1fr auto; grid-template-rows: 100px; align-items: start; justify-items: start; } .i1 { background-color: cyan; flex-basis: 100px; } .i2 { background-color: magenta; flex: 1; } .i3 { background-color: yellow; } |
Given that there is not concept of row in Flexbox, I evaluated performance of 100 up to 2000 grid or flex containers, creating 20 tests to be run inside the chrome performance framework, described at the beginning of this post. You can check out resources and a script to generate them at our github examples repo.
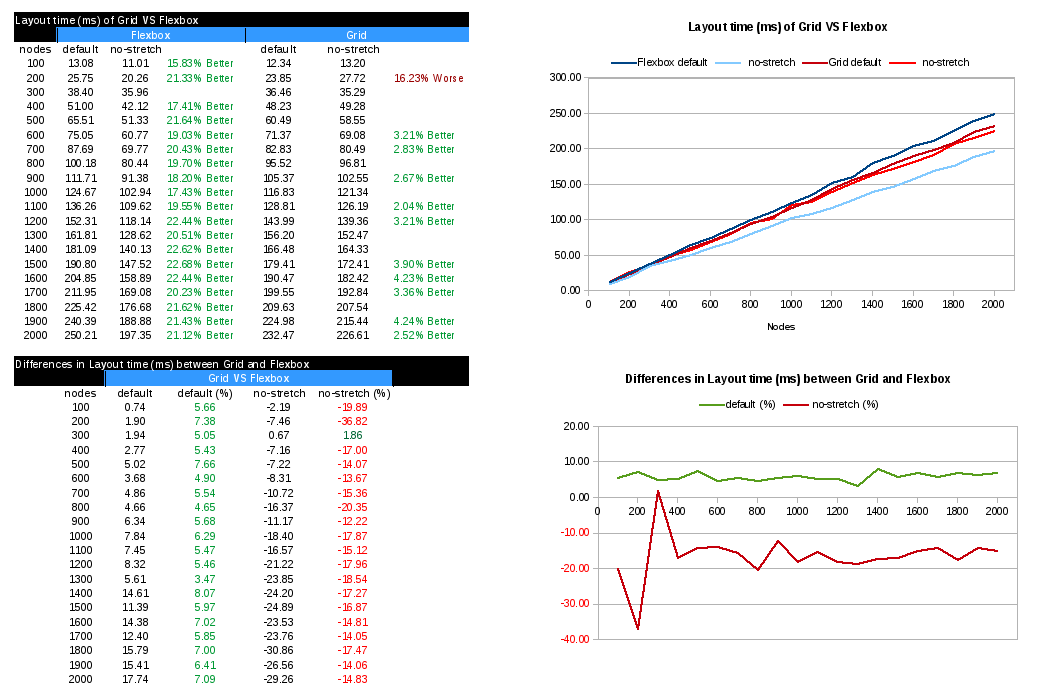
When comparing both layout models targeting layout times, we see clearly that Grid Layout beats Flexbox using the default values for CSS properties controlling layout itself and alignment, which is stretch for these containers. As it was explained before, the stretching logic adds an important computation overhead, which as we can see now in the numeric table above, has more weight for Flexbox than Grid.
Looking at the plot about differences in layout time, we see that for the default case, Grid performance improvement is stabilized around 7%. However, when we avoid the stretching logic, for instance by using any other alignment value, layout performance it’s considerable worse than Flexbox, for this test case, around 15% slower. This is something sensible, as this test case is the idea for Flexbox, while a bit artificial for Grid; using a single Grid with N rows improves performance considerably, getting much better numbers than Flexbox, but we will see these cases in future analysis.
Grid layout better results for the default case (stretch) are explained because I implemented several optimizations for Grid. Probably Flexbox should do the same, as it’s the default value and it could affect many sites using this layout model in their designs.
Thanks to Bloomberg for sponsoring this work, as part of the efforts that Igalia has been doing all these years pursuing a better and more open web.