Category Archives: Igalia-Chromium

Articles related to Chromium

Chrome iOS Browser on Blink

At the beginning of this year, Apple allowed third-party browser engines, such as Gecko and Blink, to be used on iOS and iPadOS. The Chromium community has been developing Chrome iOS based on Blink as an experimental project. This post provides an overview of the project and examines its progress during the first half of 2024.

Structure of Chrome iOS (w/blink)

First, let’s look at the overall structure of Chrome iOS. This simple diagram illustrates the structure of Chrome iOS.

The UI components are placed in the //ios/chrome directory, which functions similarly to the //chrome layer in other implementations. The //ios/web layer also provides APIs for its initialization, content navigation, presenting UI callbacks, saving or restoring navigation sessions and browser data, and more. The //ios/web/public defines the public APIs, while various other directories within //ios/web implement them. The implementation of these public APIs invokes WebKit APIs to provide the necessary functionalities.

For Chrome iOS based on Blink, the developers decided to reuse the existing iOS Chrome UI implementation last year. Thus, one of the main developments of Chrome iOS based on Blink happened in the //ios/web/content directory which is the rectangle filled by a green color, created to implement the public APIs using Blink. As you can see in the below diagram, they added the content directory to //ios/web directory and implemented the public APIs using Blink’s content APIs. Notably, they’ve introduced a ContentWebState as a prototype implementation of WebState to replace the class in //ios/web/content/web_state. However, as shown in the diagram, the directory currently only includes in five components: web_state, navigation, UI, init, and js_messaging. Therefore, more components need to be implemented for Chrome iOS on Blink.

Igalia Contributions

Igalia has been contributing to this project since the project was made public by the community. We’ve worked mainly on UI related components e.g. file and color chooser, context menu, select list popup and integration with Chrome IOS UI. The pictures below are the screen captures of the chooser implementations that we contributed.


We also helped with the features of multimedia such as the video screen capture, hardware encoding/decoding, and audio recording.

We’ve worked on a few testing frameworks (e.g. unit tests, browser and web tests). Also, we’ve filtered out unsupported tests and failed tests. Specifically, we’ve implemented the infrastructure to run the web tests on the simulator. For your information, the test coverage of the web test on iOS Blink was about 72.2% and the pass ratio among the working tests was 91.83% at the beginning of this year. Then we’ve been maintaining the bot for Chrome iOS on Blink to keep the build and testing because keeping build and running tests are crucial for Blink to bring up to Chrome iOS.

Besides we supported the remote debugging with DevTools on Blink for iOS. Now developers are able to remotely use DevTools in a host machine (e.g. Mac) and inspect Chrome or Content Shell for development.

Moreover, we’ve worked on graphics stuff related to compositing and rendering. For instance, we supported the metal on ANGLE as well as fixed bugs in the graphics layers.

You can find the detailed contributions patch list here.

The major changes for H1 2024

Now, let’s review the major changes during the first half of this year. Firstly, the minimum iOS SDK version was bumped up to 17.4 which supports the BrowserEngineKit library. And the [browser/unit] tests began to run on the ios-blink bot with the 17.4 SDK.

By reusing the existing iOS Chrome UI, ContentWebState was introduced as a prototype implementation of WebState. During H1 2024, new methods were added further or previously empty methods were implemented. For example, GetVirtualKeyboardHeight, OnVisibilityChanged, DidFinishLoad, DidFailLoad methods were implemented.

BrowserEngineKit APIs that were announced by Apple to support third-party browser engines on iOS and iPadOS have been applied to JIT, GPU, network, and content process creation.

As mentioned above, Igalia implemented a color chooser, a file chooser, and a context menu during the period.

Lastly, the package size was reduced by removing duplicated resources.

Remaining Tasks

We’ve briefly looked at the current status of the project so far, but many functionalities still need to be supported. For example, regarding UI features, functionalities such as printing preview, download, text selection, request desktop site, zoom text, translate, find in page, and touch events are not yet implemented or are not functioning correctly
Moreover, there are numerous failing or skipped tests in unit tests, browser tests, and web tests. Ensuring that these tests are enabled and passing the test should also be a key focus moving forward.

Conclusion

The Blink-based port of Chrome iOS is a large and laborious project. Igalia has made significant contributions to this project and while it is still in an early stage, more features, infrastructure and tools need to be ported to Blink. Anyhow, we believe that we are on the right track for eventually replacing WebKit by Blink on Chromium related products for iOS.

Web Platform Test and Chromium

I’ve been working on tasks related to web platform tests since last year. In this blog post, I’ll introduce what web platform tests are and how the Chromium project incorporates these tests into its development process.

1. Introduction

The web-platform-tests project serves as a cross-browser test suite for the Web platform stack. By crafting tests that can run seamlessly across all browsers, browser projects gain assurance that their software aligns with other implementations. This confidence extends to future implementations, ensuring compatibility. Consequently, web authors and developers can trust the Web platform to fulfill its promise of seamless functionality across browsers and devices, eliminating the need for additional layers of abstraction to address gaps introduced by specification editors and implementors.

For your information, the Web Platform Test Community operates a dashboard that tracks the pass ratio of tests across major web browsers. The chart below displays the number of failing tests in major browsers over time, with Chrome showing the lowest failure rate.

[Caption] Test failures graph on major browsers
And, the below chart shows the interoperability of the web platform technology for 2023 among major browsers. The interoperability has been improving.

[Caption] Interoperability among the major browsers 2023

2. Test Suite Design

The majority of the test suite is made up of HTML pages that are designed to be loaded in a browser. These pages may either generate results programmatically or provide a set of steps for executing the test and obtaining the outcome. Overall, the tests are concise, cross-platform, and self-contained, making them easy to run in any browser.

2.1 Test Layout

Most primary directories within the repository are dedicated to tests associated with specific web standards. For W3C specifications, these directories typically use the short name of the spec, which is the name used for snapshot publications under the /TR/ path. For WHATWG specifications, the directories are usually named after the spec’s subdomain, omitting “.spec.whatwg.org” from the URL. Other specifications follow a logical naming convention.

The css/ directory contains test suites specifically designed for the CSS Working Group specifications.

Within each specification-specific directory, tests are organized in one of two common ways: a flat structure, sometimes used for shorter specifications, or a nested structure, where each subdirectory corresponds to the ID of a heading within the specification. The nested structure, which provides implicit metadata about the tested section of the specification based on its location in the filesystem, is preferred for larger specifications.

For example, tests related to “The History interface” in HTML can be found in html/browsers/history/the-history-interface/.

Many directories also include a file named META.yml, which may define properties such as:
  • spec: a link to the specification covered by the tests in the directory
  • suggested_reviewers: a list of GitHub usernames for individuals who are notified when pull requests modify files in the directory
Various resources that tests rely on are stored in common directories, including images, fonts, media, and general resources.

2.2 Test Types

Tests in this project employ various approaches to validate expected behavior, with classifications based on how expectations are expressed:

  1. Rendering Tests:
    • Reftests: Compare the graphical rendering of two (or more) web pages, asserting equality in their display (e.g., A.html and B.html must render identically). This can be done manually by users switching between tabs/windows or through automated scripts.
    • Visual Tests: Evaluate a page’s appearance, with results determined either by human observation or by comparing it with a saved screenshot specific to the user agent and platform.
  2. JavaScript Interface Tests (testharness.js tests):
    • Ensure that JavaScript interfaces behave as expected. Named after the JavaScript harness used to execute them.
  3. WebDriver Browser Automation Protocol Tests (wdspec tests):
    • Written in Python, these tests validate the WebDriver browser automation protocol.
  4. Manual Tests rely on a human to run them and determine their result.

3. Web Platform Test in Chromium

The Chromium project conducts web tests utilized by Blink to assess various components, encompassing, but not limited to, layout and rendering. Generally, these web tests entail loading pages in a test renderer (content_shell) and comparing the rendered output or JavaScript output with an expected output file. The Web Tests include “Web platform tests”(WPT) located at web_tests/external/wpt. Other directories are for Chrome-specific tests only. In the web_tests/external/wpt, there are around 50,000 web platform tests currently.

3.1 Web Tests in the Chromium development process

Every patch must pass all tests before it can be merged into the main source tree. In Gerrit, trybots execute a wide array of tests, including the Web Test, to ensure this. We can initiate these trybots with a specific patch, and each trybot will then run the scheduled tests using that patch.

[Caption] Trybots in Gerrit
For example, the linux-rel trybot runs the web tests in the blink_web_tests step as below,

[Caption] blink_web_tests in the linux-rel trybot

3.2 Internal sequence for running the Web Test in Chromium

Let’s take a look at how Chromium internally runs the web tests simply. Basically, there are 2 major components to run the web tests in Chromium. One is run_web_tests.py acting as a server. The other one is content_shell acting as a client that loads a passed test and returns the result. The input and output of content_shell are assumed to follow the run_web_tests protocol through pipes that connect stdin and stdout of run_web_tests.py and content_shell as below,

[Caption] Sequence how to execute a test between run_web_test.py and content_shell

4. In conclusion

We just explored what Web Tests are and how Chromium runs these tests for web platform testing. Web platform tests play a crucial role in ensuring interoperability among various web browsers and platforms. In the following blog post, I will share how did I support and implement to run of web tests on iOS for the Blink port.

References

WebGPU Conformance Test Suite

WebGPU Introduction

WebGPU is a new Web API that exposes modern computer graphics capabilities, specifically Direct3D 12, Metal, and Vulkan, for performing rendering and computation operations on a GPU. This goal is similar to the WebGL family of APIs, but WebGPU enables access to more advanced features of GPUs. Whereas WebGL is mostly for drawing images but can be repurposed (with great effort) for other kinds of computations, WebGPU provides first-class support for performing general computations on the GPU.  In other words, the WebGPU API is the successor to the WebGL and WebGL2 graphics APIs for the Web. It provides modern features such as “GPU compute” as well as lower overhead access to GPU hardware and better, more predictable performance. The below picture shows the WebGPU architecture diagram simply.[1]

WebGPU CTS

There is currently a CTS (Conformance Test Suites) that tests the behaviors defined by the WebGPU specification. The CTS has been written in TypeScript and developed in GitHub, and the CTS can be run with a sort of ‘adapter layer’ to work under other test infrastructures like WPT and Telemetry. At this point, there are around 1,400 tests that check the validation and operation of WebGPU implementations. There is a site to run the WebGPU CTS. If you go to the URL below with a browser that enables the WebGPU feature, you can run the CTS on your browser. https://gpuweb.github.io/cts/standalone/?runnow=0&worker=0&debug=0&q=webgpu:

Contribution

The WebGPU CTS has progressed in GitHub. If you want to contribute to the CTS project, you can start by taking a look at the issues that have been filed. Please follow the sequence below:
  1. Set up the CTS developing environment.
  2. Add to or edit the test plan in the CTS project site.
  3. Implement the test.
  4. Upload the test and request a review.

Organization

The CTS is largely composed of four categories – API, Shader, IDL, and Web Platform. First, the API category tests full coverage of the Javascript API surface of WebGPU. The Shader category tests the full coverage of the shaders that can be passed to WebGPU. The IDL category checks that the WebGPU IDL is correctly implemented. Lastly, the Web Platform category tests WebPlatform-specific interactions.

Example

This is a simple test for checking writeBuffer function validation. Basically, a general test consists of three blocks like description, parameters, and function body.
  • desc: Describes what it tests and summarize how it tests that functionality.
  • params: Defines parameters with a list of objects to be tested. Each such instance of the test is a “case”
  • fn: Implementation body of the test.

Parameterization

Let’s take a look at the parameterization a bit deeper. The CTS provides helpers like params() and others for creating large Cartesian products of test parameters. These generate “test cases” further subdivided into “test subcases”. Thanks to the parameterization support, we can test with more varied input values.

Contributors

The WebGPU CTS has been developed by several contributors. Google (let’s assume that chromium.org is Google) has been writing most of the test cases. After that, Intel, gmail.com, and Igalia have contributed to the CTS tests.
This table shows the commit count of the main contributors, classified by email accounts. As you can see in the table, Google and Intel are the main contributors to the WebGPU CTS. Igalia has also participated in the CTS project since June 2022, and has written test cases for checking the validity of the texture format and copy functionality as well as the operation of the index format and the depth/stencil state.

The next steps

The Chromium WebGPU team announced their plan via an intent-to-ship posted to blink-dev recently. The Origin Trial for WebGPU expires starting in M110 and they aim to ship the WebGPU feature to Chromium in M113.

References

[1] https://developer.chrome.com/en/docs/web-platform/webgpu/

MPArch(Multiple Page Architecture) project in Chromium

This article is written by referring to the Multiple Page Architecture document.

Motivation

According to the Google Chromium team, some years ago it turned out that the BFCache(Back/Forward cache), Portals, Guest Views, and Prerender faced the same fundamental problem of having to support multiple pages in the same tab, but were implemented with different architecture models. BFCache and pending deletion documents were implemented with a Single-WebContents model. On the other hand, Portals and Guest Views were implemented with a Multiple-WebContents model. After extensive discussions between the Chrome Security Architecture team, the BFCache team, the Blink Architecture team, the Portals team, and others, they concluded that BFCache and Portals should converge to a single shared architecture. This is crucial to minimize the complexity of writing browser features on top of and within and minimize the maintenance cost across the codebase.
Multiple Page Architecture [1]
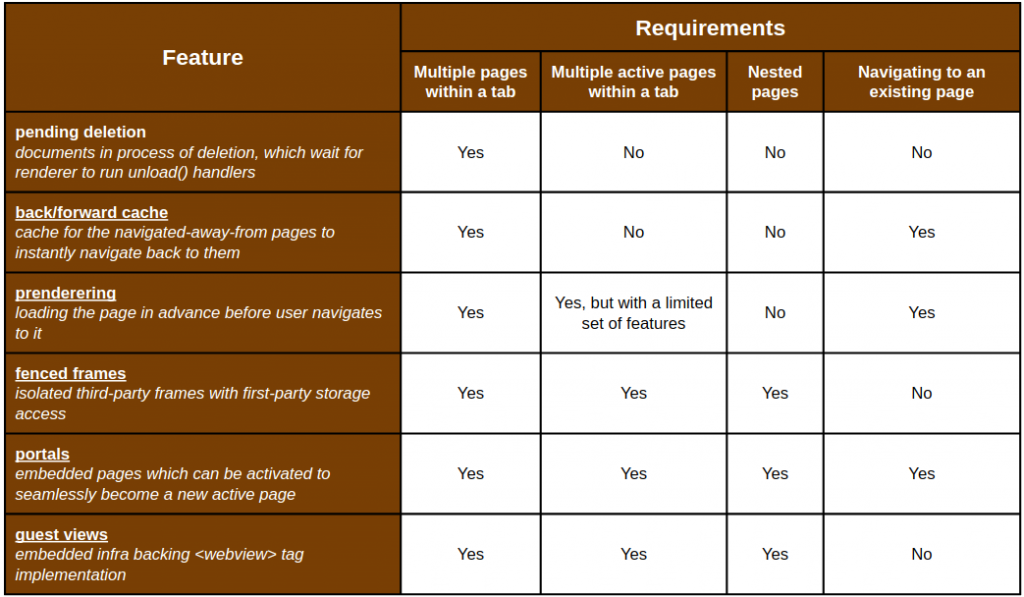
In addition to BFCache and Portals, Prerendering, FencedFrames, GuestViews, and Pending deletion frames were facing the same problem: how to support multiple pages in a given tab. The below table shows each feature’s requirements.
Multiple Page Architecture [1]
If the Chrome team didn’t invest in the architecture, as you can see in the table, the six use cases need to solve the same problems individually, which will lead to browser features having to deal with multiple incoherent cases, then they were supposed that it will greatly increase the complexity across the codebase.

Goal

The goal of multiple-page architecture is to enable projects including BFCache, Portals, Prerendering, and FencedFrames to minimize the complexity exposed to the browser features. Specifically, Multiple Page Architecture is to
  • Enable one WebContents to host multiple(active/inactive, visible/invisible) pages
  • Allow navigating WebContents to an existing page
Multiple Page Architecture [1]
For instance, when a page moves to BFCache, the ownership of the page is transferred from the main frame tree to BFCache. When a portal is activated, the ownership of the page is transferred to the main frame tree. This requires clearly splitting the tab and page / main-document concepts. This is closely related to and greatly benefits from Site Isolation’s effort to split page and document concepts.

Design Overview

Let’s take a look at a high-level design briefly. To apply the MPArch to Chromium, we have to change the core navigation and existing features. First, we need to make the core navigation provide the ability to host multiple pages in the same WebContents, allow one page to embed another, and allow WebContents to navigate to existing pages.

In particular, this includes,
  • Allow multiple FrameTrees to be created in the given WebContents in addition to the existing main one
  • Add a new navigation type, which navigates a given FrameTree to an existing page. (For example, BFCache will use it for history navigation restoring the page from the cache. Prerendering will use it to instantly navigate to a prerendered page.)
  • Modify RenderFrameHost to avoid knowing its current FrameTreeNode/FrameTree to allow the main RenderFrameHost to be transferred between different FrameTreeNodes.
And also, we need to fix existing features relying on the now-invalid assumptions like one tab only having one page at any given moment. The MPArch team evolves //content/public APIs to simplify these fixes and provide guidance and documentation to browser feature developers.

Igalia Participation

As we’ve seen briefly so far, the MPArch project is a significant Chromium architecture change that requires a lot of modification of Chromium overall. The Igalia team began to participate in the prerendering task first in the MPArch project in April 2021. We had mainly worked on the prerendering contents restriction as well as the long tail of fixes for MPArch-related features. After finishing the prerendering and long tail fixes of MPArch-related features, we started to work on the FencedFrame which is a target of the MPArch projects since September 2021. The Igalia team has merged over 550 patches for MPArch since April 2021 so far.

References

[1] Multiple Page Architecture
[2] Multi Page Architecture (BlinkOn 13)
[3] Prerendering
[4] Prerendering contents restriction
[5] Fixing long tail of features for MPArch

The progress of the legacy IPC migration in Chromium

Recall of the legacy IPCs migration

As you might know, Chromium has a multi-process architecture that involves many processes communicating with one another through IPC (Inter-Process Communication). However, traditionally IPC has used an approach which the Chromium project feels are not the best fit for achieving the project’s goals in terms of security, stability, and integration of a large number of components.  Igalia has been working on many aspects of changing this.  One very substantial effort has been in converting from the legacy named pipe IPC implementation to use the Mojo Framework. Mojo itself is approximately 3 times faster than the legacy IPC and involves one-third less context switching. We can remove unnecessary layers like //content/renderer layer to communicate between different processes. Besides we can easily connect interface clients and implementations across arbitrary inter-process boundaries.  Thus, replacing the legacy IPC with Mojo is one of the goals for Onion Soup 2.0 [1] and it’s a prerequisite to further Onion Souping and refactoring. The uses of the legacy IPCs were very spread widely and blocking several high-impact projects including BackForwardCache, Multiple blink isolates, and RenderDocument. There were about 450 legacy IPC in January 2020. Approximately 264 IPCs in //content layer and there were 194 IPCs in the other areas.

The current Progress

Igalia has been working on converting the legacy IPCs to Mojo since 2020 in earnest. We have mainly focused on converting the legacy IPCs in //content during the last year. 293 messages have been migrated and 3 IPC messages remain. 98% has done since August 2019. As IPC messages conversion was almost done in //content layer at the end of March 2021, there are only 3 IPC messages related to Jin Java Bridge messages now. And also, recently we started working on other areas. For example, Printing, Extensions, Android WebView, and so on. 49 messages have been migrated and 150 messages still remain. 24% has done since August 2019. We have been working on migrating the legacy IPC to Mojo in other modules since BlinkOn 13. All IPCs were successfully completed to migrate to Mojo in Android WebView, Media, Printing modules since BlinkOn13. And now, Igalia has been working on converting in Extensions. Besides that, the Java legacy IPC conversion for the communication between C++ native and Java layer for Android was held for a while because there are some issues with WebView API in the content layer.
We have been working on migrating the legacy IPC to Mojo in other modules since BlinkOn 13. All IPCs were successfully completed to migrate to Mojo in Android WebView, Media, Printing modules since BlinkOn13. And now, Igalia has been working on converting in Extensions. Besides that, the Java legacy IPC conversion for the communication between C++ native and Java layers for Android was held for a while because there are some issues with WebView API in the content layer.
The graph of the progress of the legacy IPC migration [2]
The table of the progress of the legacy IPC migration [2]
I shared this progress in the lightning talk of BlinkOn14. You can the video and the slides on the links.

References

[1] OnionSoup 2.0
[2] Migration to Legacy IPC messages

How Chromium Got its Mojo?

Chromium IPC

Chromium has a multi-process architecture to become more secure and robust like modern operating systems, and it means that Chromium has a lot of processes communicating with each other. For example, renderer process, browser process, GPU process, utility process, and so on. Those processes have been communicating using IPC [1].

Why is Mojo needed?

As a long-term intent, the Chromium team wanted to refactor Chromium into a large set of smaller services. To achieve that, they had considered below questions [3]

  • Which services we bring up?
  • How can we isolate these services to improve security and stability?
  • Which binary features can we ship?

They learned much from using the legacy Chromium IPC and maintaining Chromium dependencies over the past years. They felt a more robust messaging layer could allow them to integrate a large number of components without link-time interdependencies as well as help to build more and better features, faster, and with much less cost to users. So, that’s why Chromium team begins to make the Mojo communication framework.

From the performance perspective, Mojo is 3 times faster than IPC, and ⅓ less context switching compared to the old IPC in Chrome [3]. Also, we can remove unnecessary layers like content/renderer layer to communicate between different processes. Because combined with generated code from the Mojom IDL, we can easily connect interface clients and implementations across arbitrary inter-process boundaries. Lastly, Mojo is a collection of runtime libraries providing a platform-agnostic abstraction of common IPC primitives. So, we can build higher-level bindings APIs to simplify messaging for developers writing C++, Java, Javascript.

Status of migrating legacy IPC to Mojo

Igalia has been working on the migration since this year in earnest. But, hundreds of IPCs still remain in Chromium. The below chart shows the progress of migrating legacy IPC to Mojo [4].

Mojo Terminology

Let’s take a look at the key terminology before starting the migration briefly.

  • Message Pipe: A pair of endpoints and either endpoint may be transferred over another message pipe. Because we bootstrap a primordial message pipe between the browser process and each child process, eventually this means that a new pipe we create ultimately sends either end to any process, and the two ends will still be able to talk to each other seamlessly and exclusively. We don’t need to use routing ID anymore. Each point has a queue of incoming messages.
  • Mojom file: Define interfaces, which are strongly-typed collections of messages. Each interface message is roughly analogous to a single prototype message
  • Remote: Used to send messages described by the interface.
  • Receiver: Used to receive the interface messages sent by Remote.
  • PendingRemote: Typed container to hold the other end of a Receiver’s pipe.
  • PendingReceiver: Typed container to hold the other end of a Remote’s pipe.
  • AssociatedRemote/Receiver: Similar to a Remote and a Receiver. But, they run on multiple interfaces over a single message pipe while preserving message order, because the AssociatedRemote/Receiver was implemented by using the IPC::Channel used by legacy IPC messages.

Example of migrating a legacy IPC to Mojo

In the following example, we migrate WebTestHostMsg_SimulateWebNotificationClose to illustrate the conversion from legacy IPC to Mojo.

The existing WebTestHostMsg_SimulateWebNotificationClose IPC

  1. Message definition
    File: content/shell/common/web_test/web_test_messages.h

    IPC_MESSAGE_ROUTED2(WebTestHostMsg_SimulateWebNotificationClose,
                        std::string /*title*/,  bool /*by_user*/)
  2. Send the message in the renderer
    File: content/shell/renderer/web_test/blink_test_runner.cc

    void BlinkTestRunner::SimulateWebNotificationClose(
        const std::string& title, bool by_user) {
      Send(new WebTestHostMsg_SimulateWebNotificationClose(
        routing_id(), title, by_user));
    }
  3. Receive the message in the browser
    File: content/shell/browser/web_test/web_test_message_filter.cc

    bool WebTestMessageFilter::OnMessageReceived(
        const IPC::Message& message) {
      bool handled = true;
      IPC_BEGIN_MESSAGE_MAP(WebTestMessageFilter, message)
        IPC_MESSAGE_HANDLER(
            WebTestHostMsg_SimulateWebNotificationClose,
            OnSimulateWebNotificationClose)
  4. Call the handler in the browser
    File: content/shell/browser/web_test/web_test_message_filter.cc
void WebTestMessageFilter::OnSimulateWebNotificationClose(
    const std::string& title, bool by_user) {
  DCHECK_CURRENTLY_ON(BrowserThread::UI);
  GetMockPlatformNotificationService()->
      SimulateClose(title, by_user);
}

Call flow after migrating the legacy IPC to Mojo

We begin to migrate WebTestHostMsg_SimulateWebNotificationClose to WebTestClient interface from here. First, let’s see an overall call flow through simple diagrams. [5]

  1. The WebTestClientImpl factory method is called with passing the WebTestClientImpl PendingReceiver along to the Receiver.
  2. The receiver takes ownership of the WebTestClientImpl PendingReceiver’s pipe endpoint and begins to watch it for incoming messages. The pipe is readable immediately, so a task is scheduled to read the pending SimulateWebNotificationClose message from the pipe as soon as possible.
  3. The WebTestClientImpl message is read and deserialized, then, it will make the Receiver to invoke the WebTestClientImpl::SimulateWebNotificationClose() implementation on its bound WebTestClientImpl.

Migrate the legacy IPC to Mojo

  1. Write a mojom file
    File: content/shell/common/web_test/web_test.mojom

    module content.mojom;
    
    // Web test messages sent from the renderer process to the
    // browser. 
    interface WebTestClient {
      // Simulates closing a titled web notification depending on the user
      // click.
      //   - |title|: the title of the notification.
      //   - |by_user|: whether the user clicks the notification.
      SimulateWebNotificationClose(string title, bool by_user);
    };
  2. Add the mojom file to a proper GN target.
    File: content/shell/BUILD.gn

    mojom("web_test_common_mojom") {
      sources = [
        "common/web_test/fake_bluetooth_chooser.mojom",
        "common/web_test/web_test.mojom",
        "common/web_test/web_test_bluetooth_fake_adapter_setter.mojom",
      ]
  3. Implement the interface files
    File: content/shell/browser/web_test/web_test_client_impl.h

    #include "content/shell/common/web_test.mojom.h"
    
    class WebTestClientImpl : public mojom::WebTestClient {
     public:
      WebTestClientImpl() = default;
      ~WebTestClientImpl() override = default;
    
      WebTestClientImpl(const WebTestClientImpl&) = delete;
      WebTestClientImpl& operator=(const WebTestClientImpl&) = delete;
    
      static void Create(
          mojo::PendingReceiver<mojom::WebTestClient> receiver);
     private:
      // WebTestClient implementation.
     void SimulateWebNotificationClose(const std::string& title,
                             bool by_user) override;
    };
  4. Implement the interface files
    File: content/shell/browser/web_test/web_test_client_impl.cc

    void WebTestClientImpl::SimulateWebNotificationClose(
        const std::string& title, bool by_user) {
       DCHECK_CURRENTLY_ON(BrowserThread::UI);
       GetMockPlatformNotificationService()->
            SimulateClose(title, by_user);
    }
  5. Creating an interface pipe
    File: content/shell/renderer/web_test/blink_test_runner.h

    mojo::AssociatedRemote<mojom::WebTestClient>&
        GetWebTestClientRemote();
    mojo::AssociatedRemote<mojom::WebTestClient>
        web_test_client_remote_;

    File: content/shell/renderer/web_test/blink_test_runner.cc

    mojo::AssociatedRemote<mojom::WebTestClient>&
    BlinkTestRunner::GetWebTestClientRemote() {
      if (!web_test_client_remote_) {
         RenderThread::Get()->GetChannel()->
            GetRemoteAssociatedInterface(&web_test_client_remote_);
         web_test_client_remote_.set_disconnect_handler(
            base::BindOnce( 
               &BlinkTestRunner::HandleWebTestClientDisconnected,
               base::Unretained(this)));
       }
       return web_test_client_remote_;
    }
  6. Register the WebTest interface
    File: content/shell/browser/web_test/web_test_content_browser_client.cc

    void WebTestContentBrowserClient::ExposeInterfacesToRenderer {
       ...
       associated_registry->AddInterface(base::BindRepeating(
             &WebTestContentBrowserClient::BindWebTestController,
             render_process_host->GetID(),
             BrowserContext::GetDefaultStoragePartition(
                   browser_context())));
     }
     void WebTestContentBrowserClient::BindWebTestController(
         int render_process_id,
         StoragePartition* partition,
         mojo::PendingAssociatedReceiver<mojom::WebTestClient>
               receiver) {
       WebTestClientImpl::Create(render_process_id,
                          partition->GetQuotaManager(),
                         partition->GetDatabaseTracker(),
                         partition->GetNetworkContext(),
                         std::move(receiver));
     } 
  7. Call an interface message in the renderer
    File: content/shell/renderer/web_test/blink_test_runner.cc

    void BlinkTestRunner::SimulateWebNotificationClose(
     const std::string& title, bool by_user) {
     GetWebTestClientRemote()->
         SimulateWebNotificationClose(title, by_user);
    }
  8. Receive the incoming message in the browser
    File: content/shell/browser/web_test/web_test_client_impl.cc

    void WebTestClientImpl::SimulateWebNotificationClose(
     const std::string& title, bool by_user) {
     DCHECK_CURRENTLY_ON(BrowserThread::UI);
     GetMockPlatformNotificationService()->
         SimulateClose(title, by_user);
    }

Appendix: A case study of Regression

There were a lot of flaky web test failures after finishing the migration of WebTestHostMsg to Mojo. The failures were caused by using ‘Remote’ instead of ‘AssociatedRemote’ for WebTestClient interface in the BlinkTestRunner class. Because BlinkTestRunner was using the WebTestControlHost interface for ‘PrintMessage’ as an ‘AssociatedRemote’. But, ‘Remote’ used by WebTestClient didn’t guarantee the message order between ‘PrintMessage’ and ‘InitiateCaptureDump’ message implemented by different interfaces(WebTestControlHost vs. WebTestClient). Thus, tests had often finished before receiving all logs. The actual results could be different from the expected results.

Changing Remote with AssociatedRemote for the WebTestClient interface solved the flaky test issues.


[1] Inter-process Communication (IPC)
[2] Mojo in Chromium
[3] Mojo & Servicification Performance Notes
[4] Chrome IPC legacy Conversion Status
[5] Convert Legacy IPC to Mojo

The story of the webOS Chromium contribution over the past year

In this article, I share how I started webOS Chromium upstream, what webOS patches were contributed by LG Electronics, and how I’ve contributed to Chromium.

First, let’s briefly describe the history of the webOS. WebOS was created by Palm, Inc. Palm Inc. was acquired by HP in 2010 and HP made the platform open source, so it then became open webOS. In January 2014 the operation system was sold to LG Electronics. LG Electronics has been shipping the webOS for their TV and signage products since. LG Electronics has also been spreading the webOS to more of their products.

The webOS uses Chromium to run web applications. So, Chromium is a very important component in the webOS. As other Chromium embedders, the webOS also has many downstream patches. So, LG Electronics has tried to contribute own downstream patches to the Chromium open source project to reduce the effort to catch up to the latest Chromium version as well as to improve the quality of the downstream patches. As one of LG Electronics contractors for the last one and half years, I’ve started to work on the webOS Chromium contribution since September 2017. So, let’s start to explain the process of contributing:

1. The Corporate CLA

The Chromium project only accepts patches after the contributor signs a Contributor License Agreement (CLA). There are two kinds of CLA, one for individual and one corporate contributors. If a company signs the corporate CLA, then the individual contributors are exempt from signing an individual CLA, however, they must use their corporate email address as well as join the google group which was created when the corporate CLA was signed. LG Electronics signed up the corporate CLA and they were added to AUTHOR file.

  • Corporate Contributor License Agreement (Link)

  • Individual Contributor License Agreement (Link)

2. List upstreamable patches in webOS

After finishing the registration of the corporate CLA, I started to list up upstreamable webOS patches. It seemed to me that there were two categories in the patches. One was new features for the webOS. The other one was bug fixes. In the case of new features, the patches were mainly to improve the performance or to make LG products like TV and signage use less memory. I tried to list upstreamable patches among those patches. The patch criteria was either to improve the performance or obtain a benefit on the desktop. I thought this would allow owners to accept and merge the patch into the mainline more easily.

3. What patches have been merged to Chromium mainline?

Before uploading webOS patches, I merged the patches to replace deprecated WTF or base utilities (WTF::RefPtr, base::MakeUnique) with c++ standard things. I thought that it would be good to show that LG Electronics started to contribute to Chromium. After replacing all of them, I could start to contribute webOS patches in earnest. I’ve since merged webOS patches to reduce memory usage, release more used memory under OOM, add a new content API to suspend/resume DOM operation, and so on. Below is the list of the main patches I successfully merged.

  1. New content API to suspend/resume DOM operation
  2. Release more used memory under an out-of-memory situation
  3. Introduce new command line switches for embedded devices

4. Trace LG Electronics contribution stats

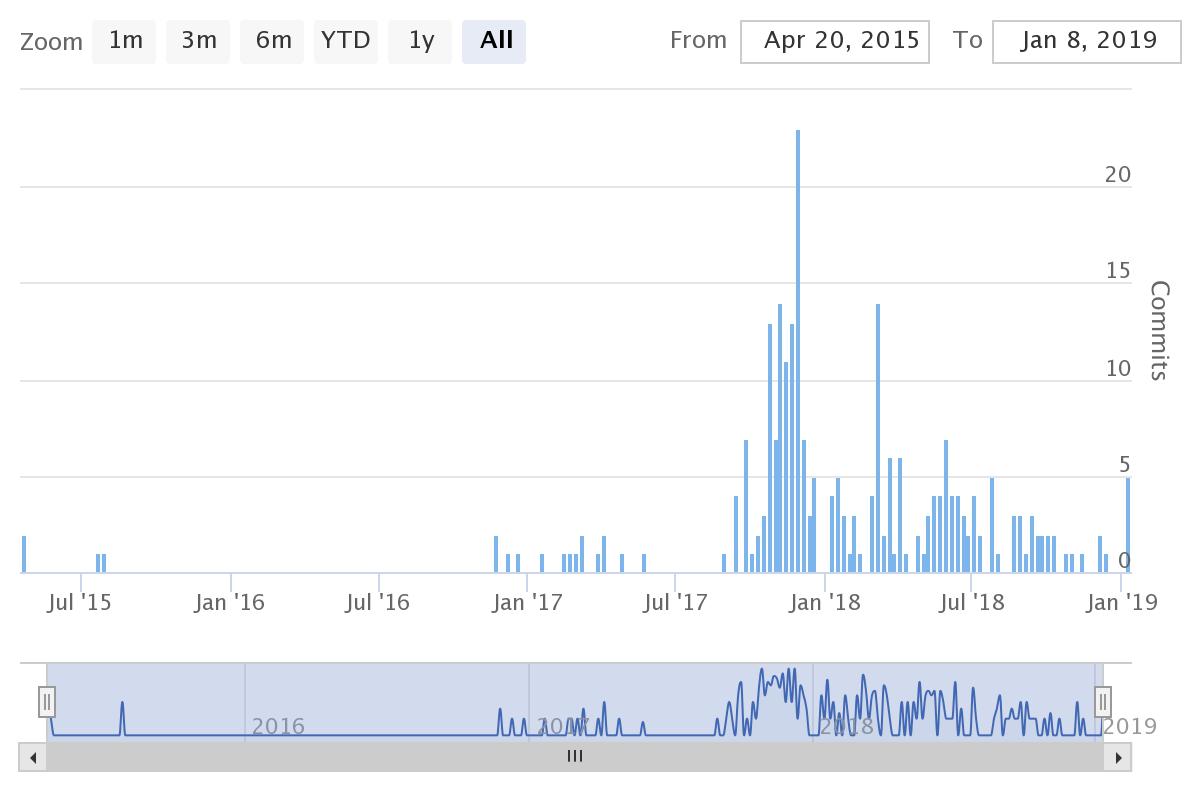
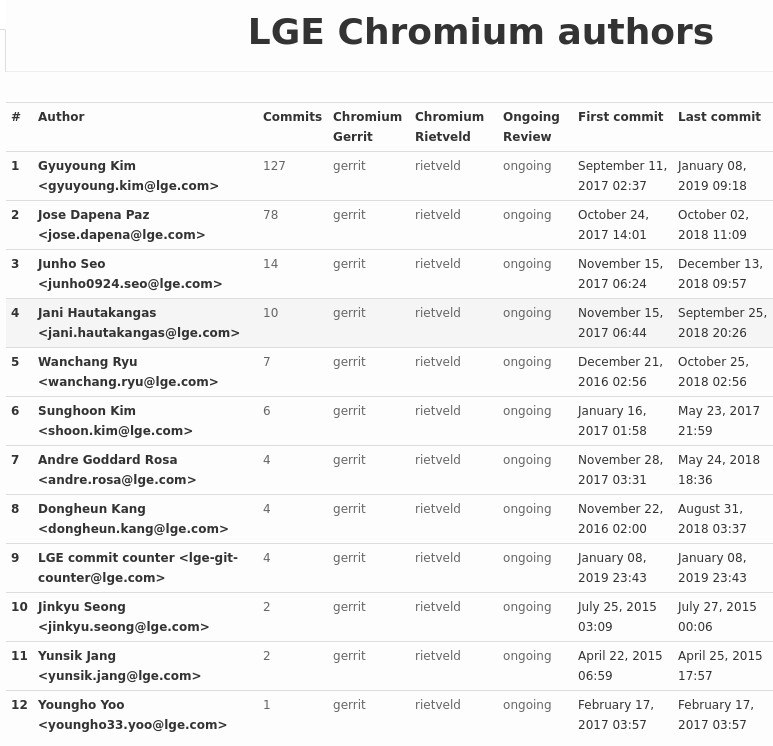
As more webOS patches have been merged to Chromium mainline, I thought that it would be good if we run a tool to chase all LG Electronics Chromium contributions so that LG Electronics’s Chromium contribution efforts are well documented. To do this I set up the LG Electronics Chromium contribution stats using the GitStats tool. The tool has been generating the stats every day.

I was happy to work on the webOS upstream project over the past year. It was challenging work because the downstream patch should show some benefits in Chromium mainline. I’m sure that LG Electronics will continue to keep contributing good patches to webOS and I hope they’re going to become a good partner as well as a contributor in Chromium.

How to develop Chromium with Visual Studio Code on Linux?

How have you been developing Chromium? I have often been asked what is the best tool to develop Chromium. I guess Chromium developers have been usually using vim, emacs, cscope, sublime text, eclipse, etc. And they have used GDB or console logs for debugging. But, in case of Windows, developers have used Visual Studio. Although Visual Studio supports powerful features to develop C/C++ programs, unfortunately, it couldn’t be used by other platform developers. However, recently I notice that Visual Studio Code also can support to develop Chromium with the nice editor, powerful debugging tools, and a lot of extensions. And, even it can work on Linux and Mac because it is based on Electron. Nowadays I’m developing Chromium with VS Code. I feel that VS Code is one of the very nice tools to develop Chromium. So I’d like to share my experience how to develop Chromium by using the Visual Studio Code on Ubuntu.

Default settings for Chromium

There is already an article about how to set up the environment to build Chromium in VS codeSo to start, you need to prepare the environment settings. This section just lists key points in the instructions.
* https://chromium.googlesource.com/chromium/src/+/lkcr/docs/vscode.md

  1. Download VS Code
    https://code.visualstudio.com/docs/setup/setup-overview
  2. Launch VS Code in chromium/src
    $ code .
  3. Install useful extensions
    1. c/c++ for visual studio code – Code formatting, debugging, Intellisense.
    2.  Toggle Header/Source Toggles between .cc and .h with F4. The C/C++ extension supports this as well through Alt+O but sometimes chooses the wrong file when there are multiple files in the workspace that have the same name.
    3. you-complete-me YouCompleteMe code completion for VS Code. It works fairly well in Chromium. To install You-Complete-Me, enter these commands in a terminal:
      $ git clone https://github.com/Valloric/ycmd.git ~/.ycmd 
      $ cd ~/.ycmd 
      $ git submodule update --init --recursive 
      $ ./build.py --clang-completer
    4. Rewrap – Wrap lines at 80 characters with Alt+Q.
    5. Highlighter Line – Highlights the current line in the editor. Find your location in your editor easily.
  4. Setup for Chromium
    1.  Chromium added the default settings files for vscode. We can move them to //src/.vscode folder.
      1. Workspace setting
        https://cs.chromium.org/chromium/src/tools/vscode/settings.json5
      2. Task setting
        https://cs.chromium.org/chromium/src/tools/vscode/tasks.json5
      3. Launch setting
        – https://cs.chromium.org/chromium/src/tools/vscode/launch.json5
  5. Key mapping
    * Ctrl+P: opens a search box to find and open a file.
    * F1 or Ctrl+Shift+P: opens a search box to find a command
      (e.g. Tasks: Run Task).
    * Ctrl+K, Ctrl+S: opens the key bindings editor.
    * Ctrl+`: toggles the built-in terminal.
    * Ctrl+Shift+M: toggles the problems view (linter warnings, 
      compile errors and warnings). You'll swicth a lot between
      terminal and problem view during compilation.
    * Alt+O: switches between the source/header file.
    * Ctrl+G: jumps to a line.
    * F12: jumps to the definition of the symbol at the cursor
      (also available on right-click context menu).
    * Shift+F12 or F1: CodeSearchReferences, Return shows all
      references of the symbol at the cursor.
    * F1: CodeSearchOpen, Return opens the current file in
      Code Search.
    * Ctrl+D: selects the word at the cursor. Pressing it multiple
      times multi-selects the next occurrences, so typing in one
      types in all of them, and Ctrl+U deselects the last occurrence.
    * Ctrl+K+Z: enters Zen Mode, a fullscreen editing mode with
      nothing but the current editor visible.
    * Ctrl+X: without anything selected cuts the current line.
      Ctrl+V pastes the line.
  6. (Optional) Color setting
    • Press Ctrl+Shift+P, color, Enter to pick a color scheme for the editor

Additional settings after the default settings.

  1. Set workspaceRoot to .bashrc. (Because it will be needed for some extensions.)
    export workspaceRoot=$HOME/chromium/src
  2. Copy 3 settings files from //src/tools/vscode to //src/.vscode
    • $ mkdir .vscode/
      $ cp tools/vscode/settings.json5 .vscode/settings.json
      $ cp tools/vscode/tasks.json5 .vscode/tasks.json
      $ cp tools/vscode/launch.json5 .vscode/launch.json
    • You can find my configuration files based on the default files
      1. https://github.com/Gyuyoung/vscode
  3. Set ycmd path to .vscode/settings.json
    • // YouCompleteMe
      "ycmd.path": "<path>/.ycmd", // Please replace this path
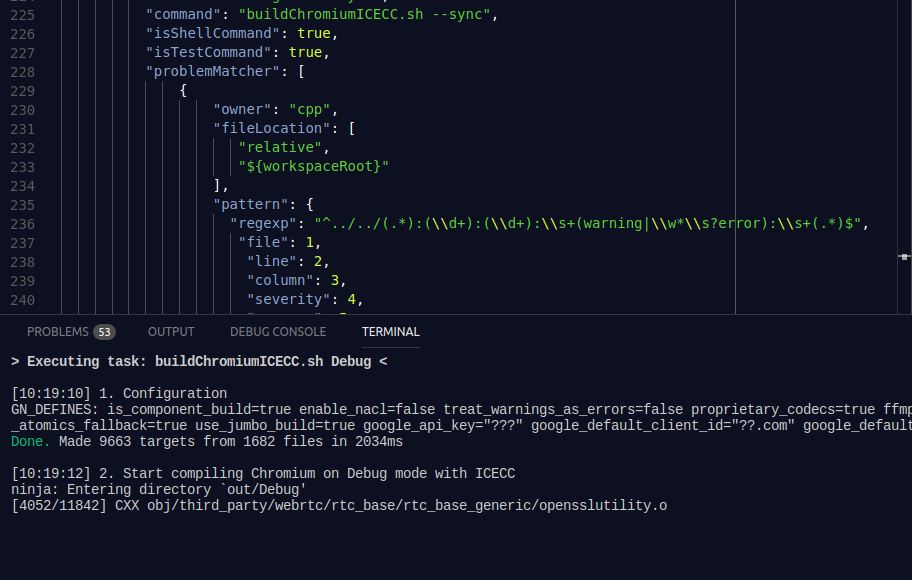
  4. Add new tasks to tasks.json in order to build Chromium by using ICECC.
{
  "taskName": "1-build_chrome_debug_icecc",
  "command": "buildChromiumICECC.sh Debug",
  "isShellCommand": true,
  "isTestCommand": true,
  "problemMatcher": [
    {
      "owner": "cpp",
      "fileLocation": [
        "relative",
        "${workspaceRoot}"
      ],
      "pattern": {
        "regexp": "^../../(.*):(\\d+):(\\d+):\\s+(warning|\\w*\\s?error):\\s+(.*)$",
        "file": 1,
        "line": 2,
        "column": 3,
        "severity": 4,
        "message": 5
      }
    },
    {
      "owner": "cpp",
      "fileLocation": [
        "relative",
        "${workspaceRoot}"
      ],
      "pattern": {
        "regexp": "^../../(.*?):(.*):\\s+(warning|\\w*\\s?error):\\s+(.*)$",
        "file": 1,
        "severity": 3,
        "message": 4
      }
    }
  ]
},
  1. Update “Chrome Debug” configuration in launch.json
{
  "name": "Chrome Debug",
  "type": "cppdbg",
  "request": "launch",
  "targetArchitecture": "x64",
  "environment": [
    {"name":"workspaceRoot", "value":"${HOME}/chromium/src"}
  ],
  "program": "${workspaceRoot}/out/Debug/chrome",
  "args": ["--single-process"],  // The debugger only can work with the single process mode for now.
  "preLaunchTask": "1-build_chrome_debug_icecc",
  "stopAtEntry": false,
  "cwd": "${workspaceRoot}/out/Debug",
  "externalConsole": true,
},

Screenshot after the settings

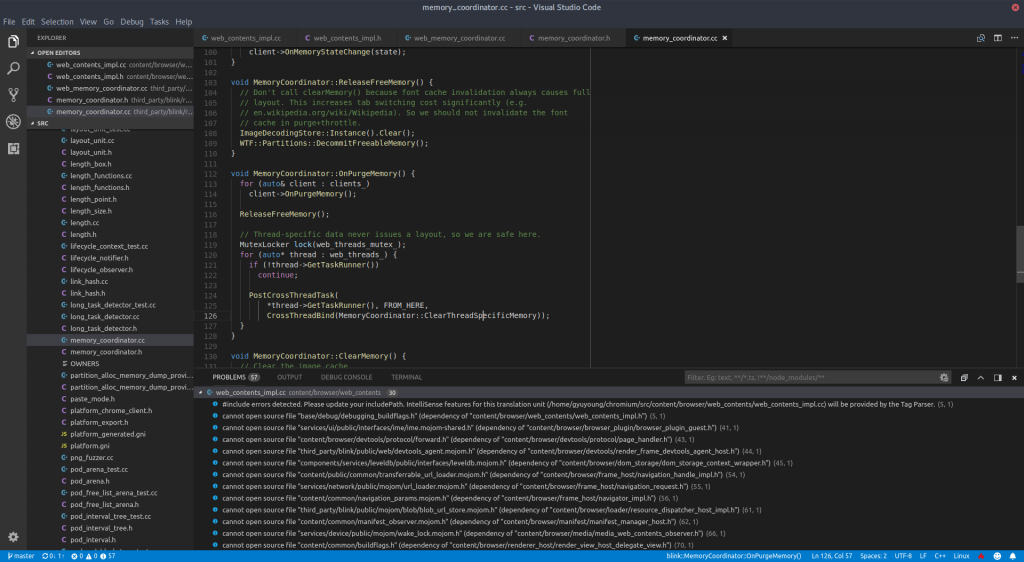
you will see this window after finishing all settings.

Build Chromium with ICECC in VS Code

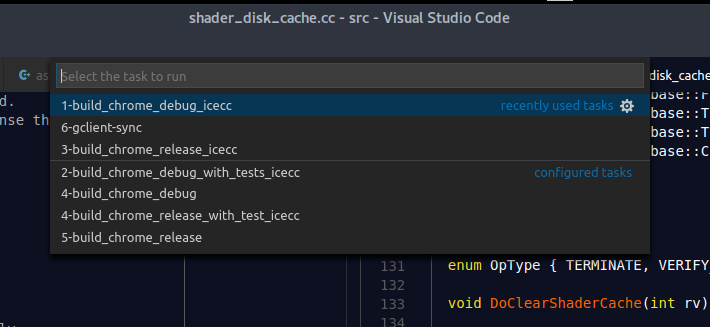
  1. Run Task (Menu -> Terminal -> Run Tasks…)
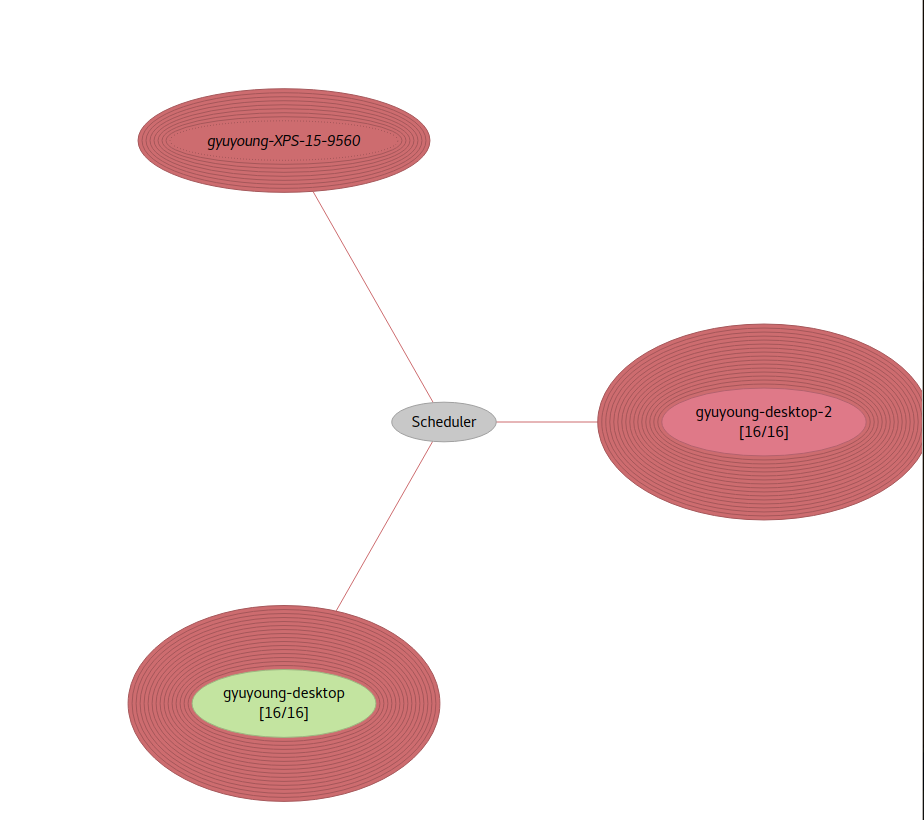
  2. Select 1-build_chrome_debug_icecc. VS Code will show an integrated terminal when building Chromium as below, On the ICECC monitor, you can see that VS Code builds Chromium by using ICECC.
 

Start debugging in VS Code

After completing the build, now is time to start debugging Chromium.

  1. Set a breakpoint
    1. F9 button or just click the left side of line number
  2. Launch debug
    1. Press F5 button
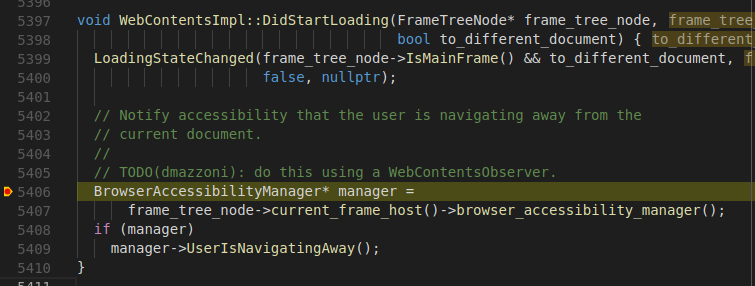
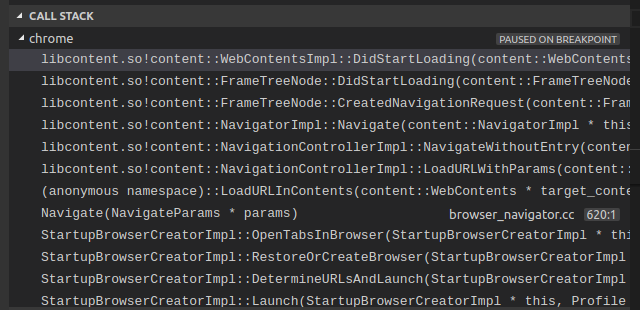
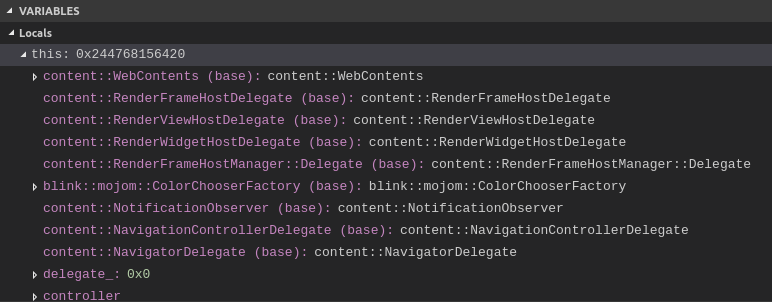
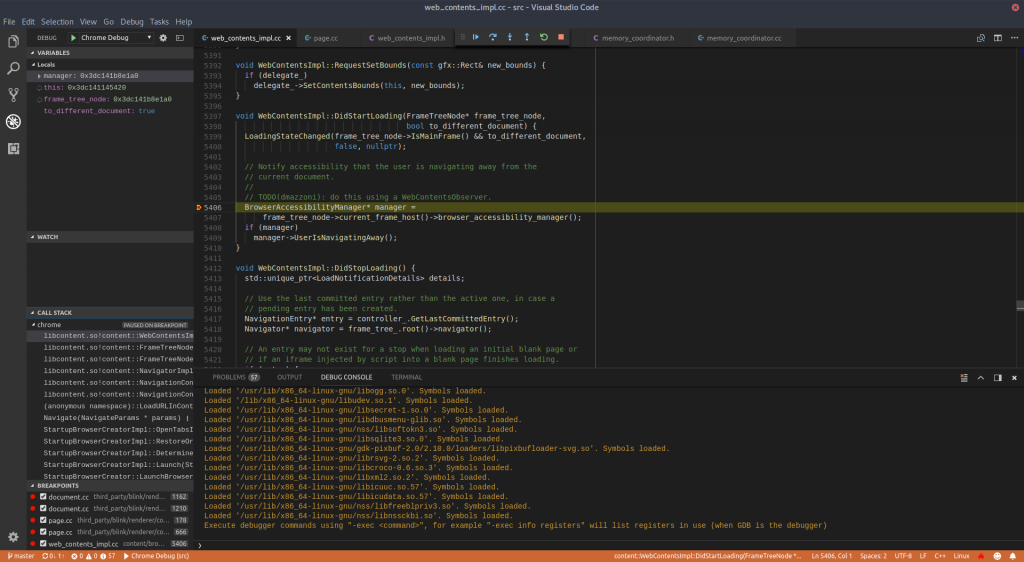
  3. Screen captures when debugger stopped at a breakpoint
    1. Overview
    2. Editor
    3. Call stack
    4. Variables
    5. Watch
    6. Breakpoints

Todo

In multiple processes model, VS Code can’t debug child processes yet (i.e. renderer process). According to C/C++ extension project site, they suggested us to add the below command to launch.json though, it didn’t work for Chromium when I tried.

"setupCommands": [
    { "text": "-gdb-set follow-fork-mode child" }
],

Reference

  1. Chromium VS Code setup: https://chromium.googlesource.com/chromium/src/+/lkcr/docs/vscode.md
  2. https://github.com/Microsoft/vscode-cpptools/blob/master/launch.md

Share my experience to build Chromium with ICECC and Jumbo

If you’re a Chromium developer, I guess that you’ve suffered from the long build time of Chromium like me. Recently, I’ve set up the icecc build environment for Chromium in the Igalia Korea office. Although there have been some instructions how to build Chromium with ICECC, I think that someone might feel they are a bit difficult. So, I’d like to share my experience how to set up the environment to build Chromium on the icecc with Clang on Linux in order to speed up the build of Chromium.

P.S. Recently Google announced that they will open Goma (Google internal distributed build system) for everyone. Let’s see goma can make us not to use icecc anymore 😉
https://groups.google.com/a/chromium.org/forum/?utm_medium=email&utm_source=footer#!msg/chromium-dev/q7hSGr_JNzg/p44IkGhDDgAJ

Prerequisites in your environment

  1. First, we should install the icecc on your all machines.
    sudo apt-get install icecc ccache [icecc-monitor]
  2. To build Chromium using icecc on the Clang, we have to use some configurations when generating the gn files. To do it as easily as possible, I made a script. So you just download it and register it to $PATH. 
    1. Clone the script project
      $ git clone https://github.com/Gyuyoung/ChromiumBuild.git

      FYI, you can see the detailed configuration here – https://github.com/Gyuyoung/ChromiumBuild/blob/master/buildChromiumICECC.sh

    2. Add your chromium/src path to buildChromiumICECC.sh
      # Please set your path to ICECC_VERSION and CHROMIUM_SRC.
      export CHROMIUM_SRC=$HOME/chromium/src
      export ICECC_VERSION=$HOME/chromium/clang.tar.gz
    3. Register it to PATH environment in .bashrc
      export PATH=/path/to/ChromiumBuild:$PATH
    4. Link Clang to icecream so that Clang gets redirected trough Icecream
      $ cd /usr/lib/icecc/bin
      $ sudo ln -s /usr/bin/icecc ./clang
      $ sudo ln -s /usr/bin/icecc ./clang++
    5. Add the patched Chromium version of the Clang executable to your PATH right after Icecream
      $ export PATH="/usr/lib/icecc/bin:$HOME/chromium/src/third_party/llvm-build/Release+Asserts/bin/:$PATH"
    6. Create a clang toolchain from the patched Chromium version
      I added the process to “sync” argument of buildChromiumICECC.sh. So please just execute the below command before starting compiling. Whenever you run it, clang.tar.gz will be updated every time with the latest Chromium version.

      $ buildChromiumICECC.sh sync

Build

  1. Run an icecc scheduler on a master machine,
    sudo service icecc-scheduler start
  2. Then, run an icecc daemon on each slave machine
    sudo service iceccd start

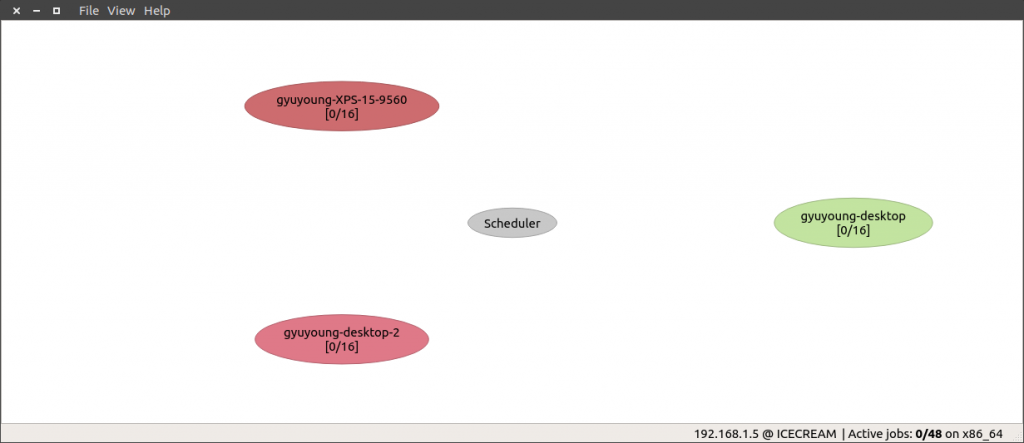
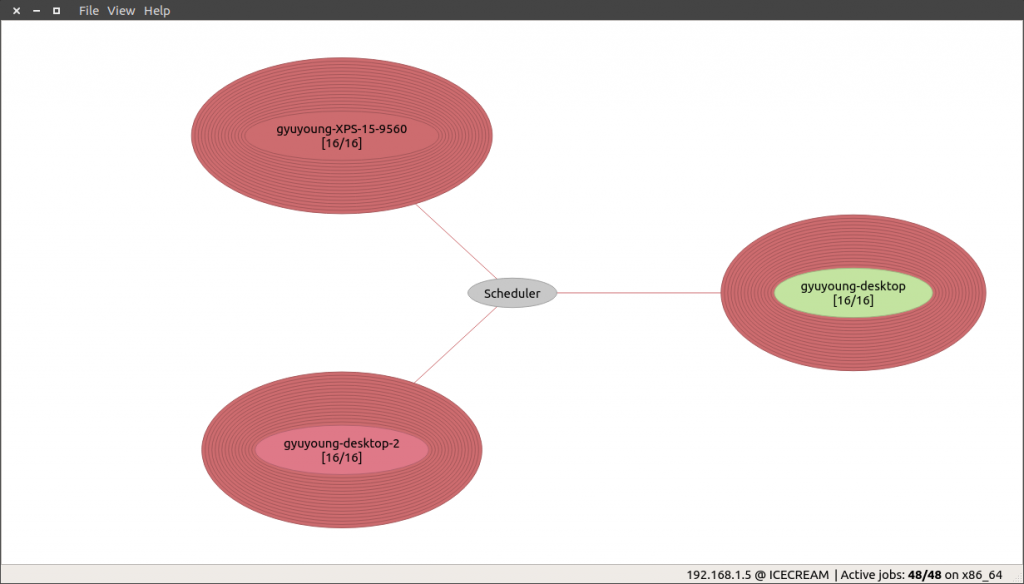
    If you run icemon, you can monitor the build status on the icecc.

  3. Start building in chromium/src
    $ buildChromiumICECC.sh Debug|Release

    When you start building Chromium, you’ll see that the icecc works on the monitor!

Build Time

In my case, I’ve  been using 1 laptop and 2 desktops for Chromium build. The HW information is as below,

  • Laptop (Dell XPS 15″ 9560)
    1. CPU: Intel(R) Core(TM) i7-7700HQ CPU @ 2.80GHz
    2. RAM: 16G
    3. SSD
  • Desktop 1
    1. CPU: Intel(R) Core(TM) i7-4790K CPU @ 4.00GHz
    2. RAM: 16G
    3. SSD
  • Desktop 2
    1. CPU: Intel(R) Core(TM) i7-4790K CPU @ 4.00GHz
    2. RAM: 16G
    3. SSD

I’ve measured how long time I’ve spent to build Chromium with the script in below cases,

  • Laptop
    • Build time on Release with the jumbo build: About 84 min
    • Build time on Release without the jumbo build: About 203 min
  • Laptop + Desktop 1 + Desktop 2
    • Build time on Release with the jumbo build: About 35 min
    • Build time on Release without the jumbo build: About 73 min

But these builds haven’t applied any object caching by ccache yet. If ccache works next time, the build time will be reduced. Besides, the build time is depended on the count of build nodes and performance. So this time can differ from your environment.

Troubleshooting

  1. Undeclared identifier
    1. Error message
      /home/gyuyoung/chromium/src/third_party/llvm-build/Release+Asserts
       /lib/clang/6.0.0/include/avx512vnniintrin.h:38:20:
       error: use of undeclared identifier '__builtin_ia32_vpdpbusd512_mask'
       return (__m512i) __builtin_ia32_vpdpbusd512_mask ((__v16si) __S, ^
    2. Solution
      Restart to icecc-scheduler and all icecc nodes.
  2. Out of Memory
    1. Error message
      LLVM ERROR: out of memory
    2. Solution
      • Add more physical RAM to the machine.
      • Alternatively, we can try to increase the space of swap. (But, this may not solve the OOM issue. In such a case, we should increase the physical RAM)
        • For example, create a 4G swap file
          $ size="4G" && file_swap=/swapfile_$size.img && sudo touch $file_swap && sudo fallocate -l $size /$file_swap && sudo mkswap /$file_swap && sudo swapon -p 20 /$file_swap
          

        • Make the swap file permanent
          # in your /etc/fstab file
          /swapfile    none    swap    sw,pri=10      0       0
          /swapfile_4G.img     none    swap    sw,pri=20      0       0
        • Check swap situation after reboot
          $ sudo swapon  -s
          Filename       Type     Size        Used    Priority
          /swapfile      file     262140      0       10
          /swapfile_4G.img       file     4194300     0       20

Reference

  1. WebKitGTK SpeedUpBuild: https://trac.webkit.org/wiki/WebKitGTK/SpeedUpBuild
  2. compiling-chromium-with-clang-and-icecc : http://mkollaro.github.io/2015/05/08/compiling-chromium-with-clang-and-icecc/
  3. Rune Lillesveen’s icecc-chromium project:
    https://github.com/lilles/icecc-chromium
  4. How to increase swap space?
    https://askubuntu.com/questions/178712/how-to-increase-swap-space

What is navigator.registerProtocolHandler?

UPDATE: I made a presentation at the lightning session of BlinkOn9 Sunnyvale.

Have you heard that navigator.registerProtocolHandler javascript API?

The API is to give you the power to add your customized scheme(a.k.a. protocol) to your website or web application. If you register your own custom scheme, it can help you to avoid collisions with other DNS, or help other people use it correctly, and be able to claim the moral high ground if they use it incorrectly. In this post, I would like to introduce the feature with some examples, and what I’ve contributed to the feature.

Introduction

The registerProtocolHandler had been started discussing since 2006. Finally, it was introduced in HTML5 for the first time.

This is a simple example of the use of navigator.registerProtocolHandler. Basically, the registerProtocolHandler takes three arguments,

  • scheme – The scheme that you want to handle. For example, mailto, tel, bitcoin, or irc.
  • url – A URL within your web application that can handle the specified scheme.
  • title – The title of the handler.
<script>
     navigator.registerProtocolHandler("web+search",
                                       "https://www.example/search/url=%s",
                                       "web search");
</script>
<a href="web+search:igalia">Igalia</a>

As this example, you can register a custom scheme with a URL that can be combined with the given URL(web+search:igalia)

However, you need to keep in mind some limitations when you use it.

  1. URL should include %s placeholder.
  2. You can register own custom handler only when the URL of the custom handler is same the website origin. If not, the browser will generate a security error.
  3. There are pre-defined schemes in the specification. Except for these schemes, you’re only able to use “web+foo” style scheme. But, the length of “web+foo” is at least five characters including ‘web+’ prefix. If not, the browser will generate a security error.
    • bitcoin, geo, im, irc, ircs, magnet, mailto, mms, news, nntp, openpgp4fpr, sip, sms, smsto, ssh, tel, urn, webcal, wtai, xmpp.
  4. Schemes should not contain any colons. For example, mailto: will generate an error. So, you have to just use mailto.

Status on major browsers

Firefox (3+)

When Firefox meets a webpage which includes navigator.registerProtocolHandler as below,

navigator.registerProtocolHandler("web+search",
                                  "https://www.example/search/url=%s",
                                  "web search");

It will show an alert bar just below the URL bar. Then, it will ask us if we want to add the URL to the Firefox handler list.

After allowing to add it to the supported handler list, you can see it in the Applications section of the settings page (about:preferences#general).

Now, the web+github custom scheme can be used in the site as below,

<a href="web+github:wiki">Wiki</a>
<a href="web+github:Pull requests">PR</a>

Chromium (13+)

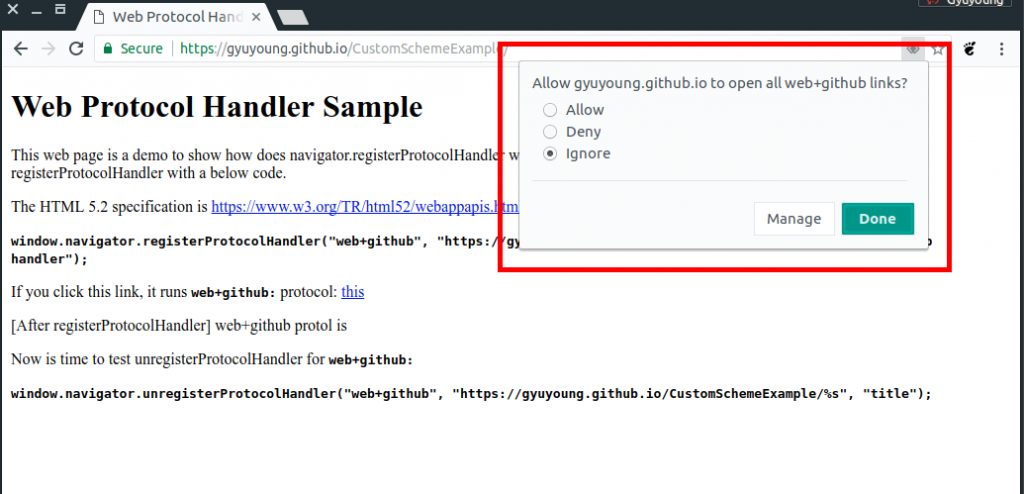
Let’s take a look Chrome on the registerProtocolHandler. In Chrome, Chrome shows a new button inside the URL bar instead of the alert bar in Firefox.

If you press the button, a dialog will be shown in order to ask if you allow the website to register the custom scheme.

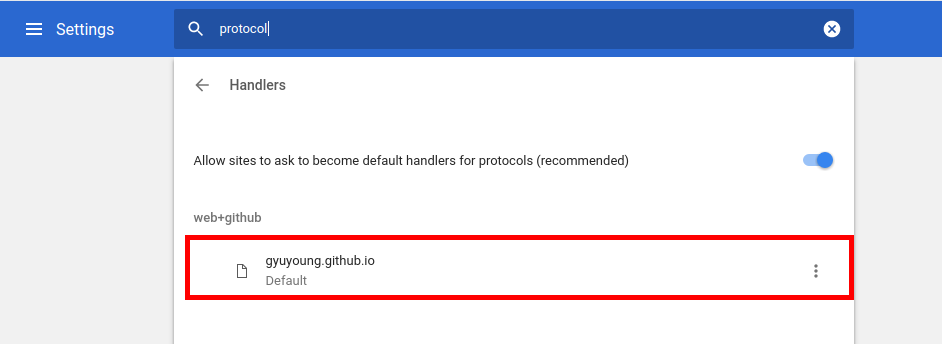
In the “Handlers” section of the settings (chrome://settings/handlers?search=protocol), you’re able to see that the custom handler was registered.

FYI, other browsers based on Chromium (i.e. Opera, Yandex, Whale, etc.) have handled it similar to Chrome unless each vendor has own specific behavior.

Safari (WebKit)

Though WebKit has supported this feature in WebCore and WebProcess of WebKit2, no browsers based on WebKit have supported this feature with UI. Although I had tried to implement it in UIProcess of WebKit2 through the webkit-dev mailing list so that browsers based on WebKit can support it, Unfortunately, some of Apple engineers had doubts about this feature though there were some agreements to support it in WebKit. So I failed to implement it in UIProcess of WebKit2.

My contributions in WebKit and Chromium

I’ve mainly contributed to apply new changes in the specification, to fix bugs and improve test cases. First, I’d like to introduce the bug that I modified in Chromium recently.

Let’s assume that URL has multiple placeholders(%s).

navigator.registerProtocolHandler("test",
                                  "http://example.com/%s/url=%s",
                                  "title");" 
<a href="test:duplicated_placeholders">this</a>

According to the specification, only first “%s” placeholder should be substituted, not substitute all placeholders. But, Chrome has substituted all placeholders with the given URL as below, even though Firefox has only substituted the first placeholder.

http://example.com/test%3Aduplicated_placeholders/url=test%3Aduplicated_placeholders

So I fixed the problem in [registerProtocolHandler] Only substitute the first “%s” placeholder. The latest Chromium substitutes only first placeholder like below,

http://example.com/test%3Aduplicated_placeholders/url=%s

This is a whole list what I’ve contributed both WebKit and Chromium so far.

  1.  WebKit
  2. Chromium

Summary

So far, we’ve looked at the navigator.registerProtcolHandler for your web application simply. The API can be useful if you want to make users use your web applications like a web-based email client or calendar.