
Code repository: have-fun-with-cam-and-berry
The system configuration #
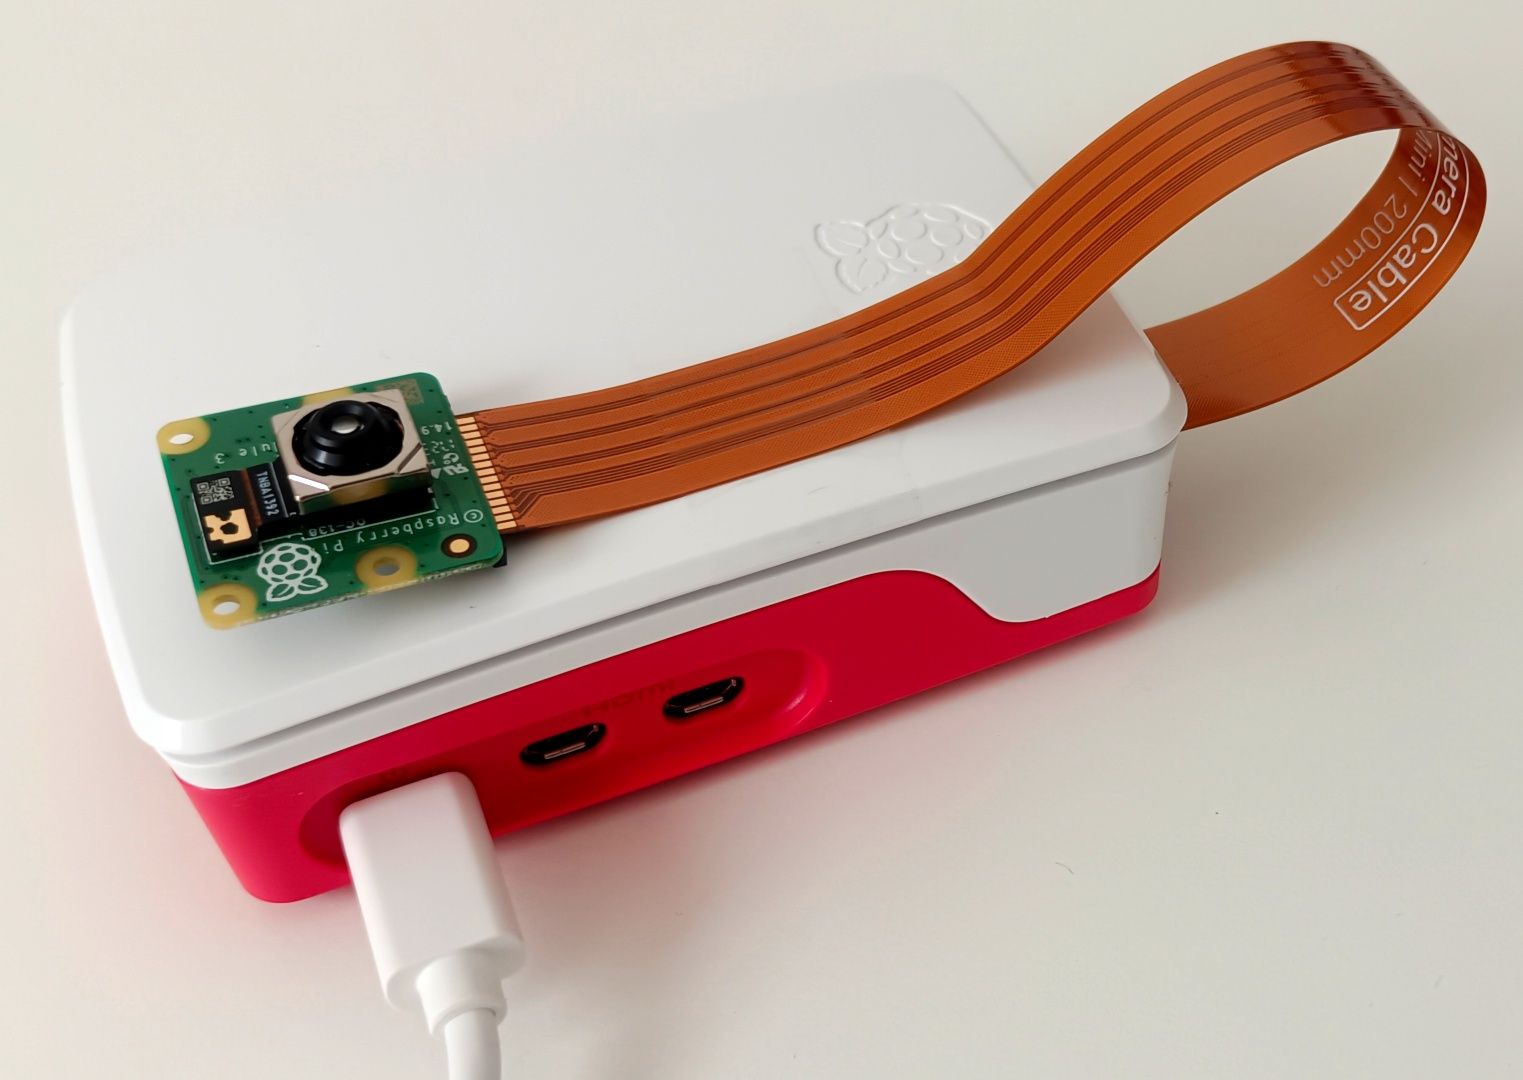
In this tutorial I’m using a Raspberry Pi 5 with a Camera Module 3. Be careful to use the right cable as the default white cable shipped with the camera is for older models of the Raspberry Pi.
In order to not have to switch keyboard, mouse, screen, any cables between the device and the development machine, the idea is to do the whole development remotely. Obviously, you can also follow the whole tutorial by developping directly on the Raspberry Pi itself as, once configured, local or remote development is totally transparent.
In my own configuration I only have the Raspberry Pi connected to its power cable and to my local Wifi network. I’m using Visual Studio Code with the Remote-SSH extension on the development machine. In reality the device may be located anywhere in the world as Visual Studio Code is using a SSH tunnel to manage the remote connection in a secure way.
Basically, once the Raspberry Pi OS installed and the device connected to the network, you can install the needed development tools (clang or gcc, git, meson, ninja, etc…) and that’s all. Everything else is done from the development machine where you will install Visual Studio Code and the Remote-SSH extension. The first time the IDE is connecting to the device through SSH, it will automatically install the tools required. The detailed installation process is described here. Once the IDE is connected to the device you can chose which extensions to install locally on the device (like the C/C++ or Meson extensions).
Some useful tricks:
- Append your public SSH key content (situated by default in
~/.ssh/id_rsa.pub) to the device~/.ssh/authorized_keysfile. It will allow you to connect to the device through ssh without having to enter each time a password. - Configure your ssh client (in the
~/.ssh/configfile) to forward the ssh agent. It will allow to use securely your local ssh keys to access remote git repositories from the remote device. A typical configuration block would be something like:Host berry [the friendly name that will appear in Visual Studio Code] HostName berry.local [the device hostname or IP address] User cam [the username used to access the device with ssh] ForwardAgent yes
With those simple tricks, just executing ssh berry is enough to connect to the device without any password and then
you can access any git repository locally just like if you were on the development machine itself.
You should also change, in the Meson extension configuration in Visual Studio Code, the build directory name and
replace the default builddir by just build because if you are not using
IntelliSense but another extension like
clangd, it will not find
the compile_commands.json file automatically. To update it directly, add this entry to the
~/.config/Code/User/settings.json file:
{
    ...
    "mesonbuild.buildFolder": "build"
}
Basic project initialization #
Let’s create the basic project structure with a simple meson.build file with a dependency on
libcamera:
project(
    'cam-and-berry',
    'cpp',
    version: '1.0',
    default_options: ['warning_level=3', 'werror=true', 'cpp_std=c++20'],
)

libcamera_dep = dependency('libcamera', required: true)

executable('cam-and-berry', 'main.cpp', dependencies: libcamera_dep)
And the basic main.cpp file with the libcamera initialization code:
#include <libcamera/libcamera.h>

using namespace libcamera;

int main()
{
    // Initialize the camera manager.
    auto camManager = std::make_unique<CameraManager>();
    camManager->start();

    return 0;
}
You can configure and build the project by calling:
meson setup build
ninja -C build
or by using the tools integrated into Visual Studio Code through the Meson extension.
In order to debug the executable inside the IDE, add a .vscode/launch.json file with this content:
{
    "version": "0.2.0",
    "configurations": [
        {
            "name": "Debug",
            "type": "cppdbg",
            "request": "launch",
            "program": "${workspaceFolder}/build/cam-and-berry",
            "cwd": "${workspaceFolder}",
            "stopAtEntry": false,
            "externalConsole": false,
            "MIMode": "gdb",
            "preLaunchTask": "Meson: Build all targets"
        }
    ]
}
Now, just pressing F5 will build the project and start the debug session on the device while being driven remotely from the development machine.
If everything has worked well so far, you should see the libcamera logs on stderr, something like:
[5:10:53.005657356] [4366] ERROR IPAModule ipa_module.cpp:171 Symbol ipaModuleInfo not found
[5:10:53.005916466] [4366] ERROR IPAModule ipa_module.cpp:291 v4l2-compat.so: IPA module has no valid info
[5:10:53.005942225] [4366]  INFO Camera camera_manager.cpp:327 libcamera v0.4.0+53-29156679
[5:10:53.013988595] [4371]  INFO RPI pisp.cpp:720 libpisp version v1.1.0 e7974a156008 27-01-2025 (21:50:51)
[5:10:53.035006731] [4371]  INFO RPI pisp.cpp:1179 Registered camera /base/axi/pcie@120000/rp1/i2c@88000/imx708@1a to CFE device /dev/media0 and ISP device /dev/media1 using PiSP variant BCM2712_D0
You can disable those logs by adding this line at the beginning of the main function:
logSetTarget(LoggingTargetNone);List cameras information #
While running (after calling start()) the
libcamera::CameraManager initializes and then
maintains up-to-date a vector of libcamera::Camera
instances each time a physical camera is connected to or removed from the system. In our case we can consider that the
Camera Module 3 will always be present as it is connected to the Raspberry internal connector.
We can list the available cameras at any moment by calling:
...

int main()
{
    ...

    // List cameras
    for (const auto& camera : camManager->cameras())
    {
        std::cout << "Camera found: " << camera->id() << std::endl;
    }

    return 0;
}
This should give an output like:
Camera found: /base/axi/pcie@120000/rp1/i2c@88000/imx708@1aEach retrieved camera has a list of specific properties and controls (which can be different for every model of
camera). This information can be listed using the camera properties() and controls() getters.
The idMap() getter in the libcamera::ControlList
class returns a map associating each property ID to a property description defined in a
libcamera::ControlId instance. It allows to retrieve
the property name and global caracteristics.
Using this information we can now have a complete description of the camera properties, available controls and their possible values:
...

// List cameras properties and controls
for (const auto& camera : camManager->cameras())
{
    std::cout << "Camera found: " << camera->id() << std::endl;

    auto& propertiesList = camera->properties();
    auto idMap = propertiesList.idMap();

    std::cout << "# Properties:" << std::endl;
    for (const auto& [id, value] : propertiesList)
    {
        auto property = idMap->at(id);
        std::cout << "  " << property->name() << "(" << id << ") = " << value.toString() << std::endl;
    }

    std::cout << "# Controls:" << std::endl;
    for (const auto& [control, info] : camera->controls())
    {
        std::cout << "  " << control->name() << " = " << info.toString() << std::endl;
    }
}

...
This should give an output like:
Camera found: /base/axi/pcie@1000120000/rp1/i2c@88000/imx708@1a
# Properties:
  SystemDevices(10) = [ 20753, 20754, 20755, 20756, 20757, 20758, 20759, 20739, 20740, 20741, 20742 ]
  ScalerCropMaximum(8) = (0, 0)/0x0
  PixelArrayActiveAreas(7) = [ (16, 24)/4608x2592 ]
  PixelArraySize(5) = 4608x2592
  Rotation(2) = 180
  Location(1) = 2
  ColorFilterArrangement(10001) = 0
  UnitCellSize(4) = 1400x1400
  Model(3) = imx708
# Controls:
  AwbEnable = [false..true]
  AwbMode = [0..7]
  ColourTemperature = [100..100000]
  Saturation = [0.000000..32.000000]
  HdrMode = [0..4]
  AeMeteringMode = [0..3]
  Contrast = [0.000000..32.000000]
  AeEnable = [false..true]
  ColourGains = [0.000000..32.000000]
  SyncFrames = [1..1000000]
  ExposureValue = [-8.000000..8.000000]
  AeFlickerMode = [0..1]
  ExposureTime = [1..66666]
  AeExposureMode = [0..3]
  SyncMode = [0..2]
  Brightness = [-1.000000..1.000000]
  Sharpness = [0.000000..16.000000]
  NoiseReductionMode = [0..4]
  AeConstraintMode = [0..3]
  StatsOutputEnable = [false..true]
  ScalerCrop = [(0, 0)/0x0..(65535, 65535)/65535x65535]
  FrameDurationLimits = [33333..120000]
  CnnEnableInputTensor = [false..true]
  AfRange = [0..2]
  AfTrigger = [0..1]
  LensPosition = [0.000000..32.000000]
  AfWindows = [(0, 0)/0x0..(65535, 65535)/65535x65535]
  AnalogueGain = [1.000000..16.000000]
  AfPause = [0..2]
  AfMetering = [0..1]
  AfSpeed = [0..1]
  AfMode = [0..2]
  AeFlickerPeriod = [100..1000000]
  ScalerCrops = [(0, 0)/0x0..(65535, 65535)/65535x65535]
Video live stream #
We are now going to see how we can extract frames from the camera. The camera is not producing frames by itself, the extraction process works on demand: you first need to send a request to the camera to ask for a new frame.
The libcamera library provides a queue to process all those requests. So, basically, you need to create some requests and push them to this queue. When the camera is ready to take an image, it will pop out the next request from the queue and fill its associated buffer with the image content. Once the image is ready, the camera sends a signal to the application to inform that the request has been completed.
If you want to take a simple photo you only need to send one request, but if you want to display or stream some live video you will need to recycle and re-queue the requests once the corresponding frame has been processed. In the following code this is what we are going to do as it will be easy to adapt the code to only take one photo.
flowchart TB
    A(Acquire camera) --> B(Choose configuration)
    B --> C(Allocate buffers and requests)
    C --> D(Start camera)
    D --> E
    subgraph L [Frames extraction loop]
        E(Push request) -->|Frame produced| F(("Request completed
        callback"))
        F --> G(Process frame)
        G --> E
    end
    L --> H(Stop camera)
    H --> I(Free buffers and requests)
    I --> J(Release camera)
In all cases, there are some steps to follow before sending requests to the camera.
Acquire the camera for an exclusive usage #
Let’s consider that we have a camera available and we selected it during the former cameras listing. Our selected
camera is called: selectedCamera and it’s a std::shared_ptr<Camera>.
We just have to call: selectedCamera->acquire(); to get an exclusive access to this camera. When we have finished
with it, we can release it by calling selectedCamera->release();.
Select a specific configuration #
Once the camera acquired for an exclusive access, we need to configure it. In particular, we need to choose the frames resolution and pixel format. This is done by creating a camera configuration that will be tweaked, validated and applied to the camera.
// Lock the selected camera and choose a configuration for video display.
selectedCamera->acquire();

auto camConfig = selectedCamera->generateConfiguration({StreamRole::Viewfinder});
if (camConfig->empty())
{
    std::cerr << "No suitable configuration found for the selected camera" << std::endl;
    return -2;
}
The libcamera::StreamRole allows to pre-configure the returned stream configurations depending on the intended usage: taking photos (in raw mode or not), doing some video capture for streaming or recording (may provide encoded streams if the camera is able to do it) or doing some video capture for local display.
It returns the default camera configurations for each stream role required.
The default configuration returned may be tweaked with user values. Once modified the configuration must be validated. The camera may refuse those changes or adjust them to fit the device limits. Once validated, the configuration is applied to the selected camera.
auto& streamConfig = camConfig->at(0);
std::cout << "Default camera configuration is: " << streamConfig.toString() << std::endl;

streamConfig.size.width = 1920;
streamConfig.size.height = 1080;
streamConfig.pixelFormat = formats::RGB888;

if (camConfig->validate() == CameraConfiguration::Invalid)
{
    std::cerr << "Invalid camera configuration" << std::endl;
    return -3;
}
std::cout << "Targeted camera configuration is: " << streamConfig.toString() << std::endl;

if (selectedCamera->configure(camConfig.get()) != 0)
{
    std::cerr << "Failed to update the camera configuration" << std::endl;
    return -4;
}
std::cout << "Camera configured successfully" << std::endl;
Allocate the buffers and requests for frames extraction #
The memory for the frames buffers and requests is held by the user. Indeed, the frame content itself is allocated through DMA buffers for which the libcamera::FrameBuffer instance is holding the file descriptors.
The frames buffers are allocated through a
libcamera::FrameBufferAllocator instance.
When this instance is deleted, all buffers in the internal pool are also deleted, including the associated DMA buffers.
So, the lifetime of the FrameBufferAllocator instance must be longer than the lifetime of all the requests associated
with buffers from its internal pool.
The same FrameBufferAllocator instance is used to allocate buffers pools for the different streams from the same
camera. In our case we are only using a single stream and so we will do the allocation only for this stream.
// Allocate the buffers pool used to fetch frames from the camera.
Stream* stream = streamConfig.stream();
auto frameAllocator = std::make_unique<FrameBufferAllocator>(selectedCamera);
if (frameAllocator->allocate(stream) < 0)
{
    std::cerr << "Failed to allocate buffers for the selected camera stream" << std::endl;
    return -5;
}

auto& buffersPool = frameAllocator->buffers(stream);
std::cout << "Camera stream has a pool of " << buffersPool.size() << " buffers" << std::endl;
Once we have the frames buffers allocated we can create the corresponding requests and associate each buffer with a request. So when the camera receives the request it will fill the associated frame buffer with the next image content.
// Create the requests used to fetch the actual camera frames.
std::vector<std::unique_ptr<Request>> requests;
for (auto& buffer : buffersPool)
{
    auto request = selectedCamera->createRequest();
    if (!request)
    {
        std::cerr << "Failed to create a frame request for the selected camera" << std::endl;
        return -6;
    }

    if (request->addBuffer(stream, buffer.get()) != 0)
    {
        std::cerr << "Failed to add a buffer to the frame request" << std::endl;
        return -7;
    }

    requests.push_back(std::move(request));
}
If the camera supports multistream, additional buffers can be added to a single request (using libcamera::Request::addBuffer) to capture frames for the other streams. However, only one buffer per stream is allowed in the same request.
Frames extraction loop #
Now that we have a pool of requests, each one with its associated frame buffer, we can send them to the camera for
processing. Each time the camera has finished with a request, by filling the associated buffer with the actual image,
it calls a requestCompleted callback and then continues with the next request in the queue.
When we receive the requestCompleted signal, we can extract the image content from the request buffer and process it.
Once the image processing is finished, we recycle the buffer and push again the request in the queue for the next
frames. To take a single photo we would only need one buffer and one request, and we would queue this request only once.
// Connect the requests execution callback, it is called each time a frame
// has been produced by the camera.
selectedCamera->requestCompleted.connect(selectedCamera.get(), [&selectedCamera](Request* request) {
    if (request->status() == Request::RequestCancelled)
    {
        return;
    }

    // We can directly take the first request buffer as we are managing
    // only one stream. In case of multiple streams, we should iterate
    // over the BufferMap entries or access the buffer by stream pointer.
    auto buffer = request->buffers().begin()->second;
    auto& metadata = buffer->metadata();
    if (metadata.status == FrameMetadata::FrameSuccess)
    {
        // As we are using a RGB888 color format we have only one plane, but
        // in case of using a multiplanes color format (like YUV420) we
        // should iterate over all the planes.
        std::cout << "Frame #" << std::setw(2) << std::setfill('0') << metadata.sequence
                    << ": time=" << metadata.timestamp << "ns, size=" << metadata.planes().begin()->bytesused
                    << ", fd=" << buffer->planes().front().fd.get() << std::endl;
    }
    else
    {
        std::cerr << "Invalid frame received" << std::endl;
    }

    // Reuse the request buffer and re-queue the request.
    request->reuse(Request::ReuseBuffers);
    selectedCamera->queueRequest(request);
});
Before queueing the first request we need to start the camera and we must stop it when we’ve finished with the frames extraction. The lifetime of all the requests pushed to the camera must be longer than this start/stop loop. Once the camera is stopped, we can delete the corresponding requests as they will not be used anymore.
This implies that the FrameBufferAllocator instance must also outlive this same start/stop loop. If you try to delete
the requests vector or the frameAllocator instance before stopping the camera, you will naturally trigger a
segmentation fault.
// Start the camera streaming loop and run it for a few seconds.
selectedCamera->start();
for (const auto& request : requests)
{
    selectedCamera->queueRequest(request.get());
}

std::this_thread::sleep_for(1500ms);
selectedCamera->stop();
At the end we clean up the resources. Here it is not really needed as the destructors will do automatically the job. But if you were building a more complex architecture and you need to explicitly free up the resources, that would be the order to follow.
With the current code the only important point here is to explicitly stop the camera before getting out of the main
function (and to implicitly trigger the destructors calls), else the frameAllocator instance will be destroyed while
the camera is still processing the associated requests, which will lead to a segmentation fault.
// Cleanup the resources. In fact those resources are automatically released
// when the corresponding destructors are called. The only compulsory call
// to make is selectedCamera->stop() as the camera streaming loop MUST be
// stopped before releasing the associated buffers pool.
frameAllocator.reset();
selectedCamera->release();
selectedCamera.reset();
camManager->stop();
If everything has worked well so far, you should see the following output:
Camera found: /base/axi/pcie@1000120000/rp1/i2c@88000/imx708@1a
# Properties:
  SystemDevices(10) = [ 20753, 20754, 20755, 20756, 20757, 20758, 20759, 20739, 20740, 20741, 20742 ]
  ScalerCropMaximum(8) = (0, 0)/0x0
  PixelArrayActiveAreas(7) = [ (16, 24)/4608x2592 ]
  PixelArraySize(5) = 4608x2592
  Rotation(2) = 180
  Location(1) = 2
  ColorFilterArrangement(10001) = 0
  UnitCellSize(4) = 1400x1400
  Model(3) = imx708
# Controls:
  AwbEnable = [false..true]
  AwbMode = [0..7]
  ColourTemperature = [100..100000]
  Saturation = [0.000000..32.000000]
  HdrMode = [0..4]
  AeMeteringMode = [0..3]
  Contrast = [0.000000..32.000000]
  AeEnable = [false..true]
  ColourGains = [0.000000..32.000000]
  SyncFrames = [1..1000000]
  ExposureValue = [-8.000000..8.000000]
  AeFlickerMode = [0..1]
  ExposureTime = [1..66666]
  AeExposureMode = [0..3]
  SyncMode = [0..2]
  Brightness = [-1.000000..1.000000]
  Sharpness = [0.000000..16.000000]
  NoiseReductionMode = [0..4]
  AeConstraintMode = [0..3]
  StatsOutputEnable = [false..true]
  ScalerCrop = [(0, 0)/0x0..(65535, 65535)/65535x65535]
  FrameDurationLimits = [33333..120000]
  CnnEnableInputTensor = [false..true]
  AfRange = [0..2]
  AfTrigger = [0..1]
  LensPosition = [0.000000..32.000000]
  AfWindows = [(0, 0)/0x0..(65535, 65535)/65535x65535]
  AnalogueGain = [1.000000..16.000000]
  AfPause = [0..2]
  AfMetering = [0..1]
  AfSpeed = [0..1]
  AfMode = [0..2]
  AeFlickerPeriod = [100..1000000]
  ScalerCrops = [(0, 0)/0x0..(65535, 65535)/65535x65535]
Default camera configuration is: 800x600-XRGB8888
Targeted camera configuration is: 1920x1080-RGB888
Camera configured successfully
Camera stream has a pool of 4 buffers
Frame #07: time=9764218484000ns, size=6220800, fd=31
Frame #08: time=9764269486000ns, size=6220800, fd=32
Frame #09: time=9764329905000ns, size=6220800, fd=33
Frame #10: time=9764389544000ns, size=6220800, fd=34
Frame #11: time=9764449731000ns, size=6220800, fd=31
Frame #12: time=9764509971000ns, size=6220800, fd=32
Frame #13: time=9764570430000ns, size=6220800, fd=33
Frame #14: time=9764630542000ns, size=6220800, fd=34
...
You can download the full code of this part here or directly access to the code repository.
Display the extracted images #
In this part, we are going to display the extracted frames using a small OpenGL ES application. This application will show a rotating cube with a metallic aspect displaying, on each face, the live video stream from the Raspberry Pi 5 camera with an orange/red shade, like in the following video:
For this, we need a little bit more code to initialize the window, the OpenGL context and manage the drawing. The full code is available at the code repository or you can download it here.
We are using the GLFW library to manage the EGL and OpenGL ES contexts and the GLM library to manage the 3D vectors and matrices. Those libraries are included as Meson wraps in the subprojects folder. So, just like with the previous code, to build the project you only need to execute:
meson setup build
ninja -C build
All the 3D rendering part is out of the scope of this tutorial and the corresponding classes have been grouped in the
src/rendering subfolder to help focussing on the Camera and CameraTexture classes. If you are also interested in
3D rendering you can find a lot of interesting material on the Web and, in particular,
Anton’s OpenGL 4 Tutorials or Learn OpenGL.
Camera <-> Renderer synchronization #
The Camera class is basically a wrapper of the code explained in the previous parts. In this case we are configuring
the camera to use a pixel format aligned on 32 bits (XRGB8888) to be compatible with the hardware accelerated
rendering.
// We need to choose a pixel format with a stride aligned on 32 bits to be
// compatible with the GLES renderer. We only need 2 buffers, while one
// buffer is used by the GLES renderer, the other one is filled by the
// camera next frame and then both buffers are swapped.
streamConfig.size.width = captureWidth;
streamConfig.size.height = captureHeight;
streamConfig.pixelFormat = libcamera::formats::XRGB8888;
streamConfig.bufferCount = 2;
We are also using 2 buffers as one buffer will be rendered on screen while the other buffer will receive the next camera frame, and then we’ll switch both buffers. We already know that when the requestCompleted signal is triggered, the corresponding buffer has finished being written with the next camera frame. This is our synchronization point to send this buffer to the rendering.
On the rendering side, we know that when the OpenGL buffers are swapped, the displayed image has been fully rendered. This is our synchronization point to recycle the buffer back the to camera rendering loop.
A specific wrapping class: Camera::Frame is used to exchange those buffers between the camera and the renderer. It is
passed through a std::unique_ptr to ensure an exclusive access from the camera or the renderer. When the instance is
destroyed, it automatically recycles the underlying buffer to make it available for the next camera frame.
When Camera::startCapturing is called, the camera starts producing frames continuously (like in the code from the
previous parts). Each new frame replaces the previous one which is automatically recycled during its destruction:
void Camera::onRequestCompleted(libcamera::Request* request)
{
    if (request->status() == libcamera::Request::RequestCancelled)
    {
        return;
    }

    // We can directly take the first request buffer as we are managing
    // only one stream. In case of multiple streams, we should iterate
    // over the BufferMap entries or access the buffer by stream pointer.
    auto buffer = request->buffers().begin()->second;
    if (buffer->metadata().status == libcamera::FrameMetadata::FrameSuccess)
    {
        // As we are using a XRGB8888 color format we have only one plane, but
        // in case of using a multiplanes color format (like YUV420) we
        // should iterate over all the planes.
        std::unique_ptr<Frame> frame(new Frame(this, request, buffer->cookie()));

        std::lock_guard<std::mutex> lock(m_nextFrameMutex);
        m_nextFrame = std::move(frame);
    }
    else
    {
        // Reuse the request buffer and re-queue the request.
        request->reuse(libcamera::Request::ReuseBuffers);
        m_selectedCamera->queueRequest(request);
    }
}

Camera::Frame::~Frame()
{
    auto camera = m_camera.lock();
    if (camera && m_request)
    {
        m_request->reuse(libcamera::Request::ReuseBuffers);
        camera->m_selectedCamera->queueRequest(m_request);
    }
}
At any moment the renderer can fetch this frame to render it:
void onRender(double time) noexcept override
{
    if (m_camera)
    {
        // We are fetching the next camera produced frame that is ready to
        // be drawn. If there is no new frame available, we are just
        // keeping on drawing the same frame.
        auto cameraFrame = m_camera->getNextFrame();
        if (cameraFrame)
        {
            // We need to keep a reference to the current drawn frame in
            // order to not have the Camera class recycle the underlying
            // dma-buf while the GLES renderer is still using it for
            // drawing. This is the Camera::Frame destructor which ensures
            // proper synchronization. When reaching this point, the
            // previous m_currentCameraFrame has been fully drawn (the GLES
            // buffers swap has just occurred on the previous onRender
            // call), when the unique_ptr is replaced the previous
            // Camera::Frame is destroyed which triggers the recycling of
            // its FrameBuffer (for the next camera frame capture), while
            // the new frame is locked for drawing until it is itself
            // replaced.
            m_currentCameraFrame = std::move(cameraFrame);

            // We can directly fetch and bind the corresponding GLES
            // texture from the FrameBuffer cookie.
            auto textureIndex = m_currentCameraFrame->getCookie();
            m_textures[textureIndex]->bind();

            // The texture mix value is only used to reuse the same shader
            // without and with a camera frame. Now that we have a frame to
            // draw we can show it.
            m_shader->setCameraTextureMix(1.0f);
        }
    }

    glClear(GL_COLOR_BUFFER_BIT | GL_DEPTH_BUFFER_BIT);

    glm::mat4 modelMatrix =
        glm::rotate(glm::mat4(1.0f), 1.5f * static_cast<float>(time), glm::vec3(0.8f, 0.5f, 0.4f));
    m_shader->setModelMatrix(modelMatrix);

    m_cube->draw();
}
As we have only 2 buffers and the access to each buffer is exclusive, the camera and renderer speeds are going to adjust each other. The underlying frame buffer is only recycled once destroyed, which only happens when replaced by the next available buffer.
N.B. The
Camera::onRequestCompletedcallback is called from a libcamera capturing thread while theAppRenderer::onRenderis called on the application main thread. The call to libcamera::Camera::queueRequest is thread-safe, but the access to thestd::unique_ptrmust be protected by a mutex to be passed to the render thread.
std::unique_ptr<Camera::Frame> Camera::getNextFrame() noexcept
{
    std::lock_guard<std::mutex> lock(m_nextFrameMutex);
    return std::move(m_nextFrame);
}
Convert a dma-buf to a texture #
A dma-buf can be attached to an EGLImage thanks to the EXT_image_dma_buf_import EGL extension:
// Create an EGLImage from the camera FrameBuffer.
// In our case we are using a packed color format (XRGB8888), so we
// only need the first buffer plane. In case of using a multiplanar color
// format (like YUV420 for example), we would need to iterate over all the
// color planes in the buffer and fill the EGL_DMA_BUF_PLANE[i]_FD_EXT,
// EGL_DMA_BUF_PLANE[i]_OFFSET_EXT and EGL_DMA_BUF_PLANE[i]_PITCH_EXT for
// each plane.
const auto& plane = buffer.planes().front();

const EGLAttrib attrs[] = {EGL_WIDTH,
                           streamConfiguration.size.width,
                           EGL_HEIGHT,
                           streamConfiguration.size.height,
                           EGL_LINUX_DRM_FOURCC_EXT,
                           streamConfiguration.pixelFormat.fourcc(),
                           EGL_DMA_BUF_PLANE0_FD_EXT,
                           plane.fd.get(),
                           EGL_DMA_BUF_PLANE0_OFFSET_EXT,
                           (plane.offset != libcamera::FrameBuffer::Plane::kInvalidOffset) ? plane.offset : 0,
                           EGL_DMA_BUF_PLANE0_PITCH_EXT,
                           streamConfiguration.stride,
                           EGL_NONE};

EGLImage eglImage = eglCreateImage(eglDisplay, EGL_NO_CONTEXT, EGL_LINUX_DMA_BUF_EXT, nullptr, attrs);
if (!eglImage)
{
    return nullptr;
}
N.B. It is important to use a pixel format compatible with the rendering device, else the
eglCreateImagefunction will fail with eglGetError() returningEGL_BAD_MATCH.
Then, the EGLImage can be attached to an external OpenGL ES texture using the OES_EGL_image_external OpenGL extension:
// Create the GLES texture and attach the EGLImage to it.
glGenTextures(1, &texture->m_texture);
glBindTexture(GL_TEXTURE_EXTERNAL_OES, texture->m_texture);
glTexParameteri(GL_TEXTURE_EXTERNAL_OES, GL_TEXTURE_MIN_FILTER, GL_LINEAR);
glTexParameteri(GL_TEXTURE_EXTERNAL_OES, GL_TEXTURE_MAG_FILTER, GL_LINEAR);
glTexParameteri(GL_TEXTURE_EXTERNAL_OES, GL_TEXTURE_WRAP_S, GL_CLAMP_TO_EDGE);
glTexParameteri(GL_TEXTURE_EXTERNAL_OES, GL_TEXTURE_WRAP_T, GL_CLAMP_TO_EDGE);
glEGLImageTargetTexture2DOES(GL_TEXTURE_EXTERNAL_OES, eglImage);
glBindTexture(GL_TEXTURE_EXTERNAL_OES, 0);

// Now that the EGLImage is attached to the texture, we can destroy it. The
// underlying dma-buf will be released when the texture is deleted.
eglDestroyImage(eglDisplay, eglImage);
The corresponding texture can be used like any other kind of texture by binding it to the GL_TEXTURE_EXTERNAL_OES
target. Still, the shader will need to use the same extension and a specific sampler to use this external texture
target:
#version 300 es
#extension GL_OES_EGL_image_external : require

precision mediump float;
....
uniform samplerExternalOES cameraTexture;
uniform float cameraTextureMix;
....
Although the dma-buf is wrapped by two layers (EGLImage and Texture), its content is never copied or transferred to the system CPU memory (RAM). This is the same memory space, allocated in a dedicated hardware memory, that is used to receive the camera frame content and display it on screen, allowing the kernel to optimize the corresponding resources.
The libcamera library is allocating the dma-bufs needed to store the captured frames content when calling
libcamera::FrameBufferAllocator:allocate.
So, we can create the corresponding external textures right after the Camera instance creation:
m_camera = Camera::create(m_width, m_height);
if (m_camera)
{
    // Create one texture per available camera buffer.
    for (const auto& request : m_camera->getRequests())
    {
        // We know that we are only using one stream and one buffer per
        // request. If we were using multiple streams at once, we
        // should iterate on the request BufferMap.
        auto [stream, buffer] = *request->buffers().begin();

        auto texture = CameraTexture::create(eglDisplay, stream->configuration(), *buffer);
        if (!texture)
        {
            std::cerr << "Failed to create a camera texture" << std::endl;

            m_textures.clear();
            m_camera.reset();
            m_shader.reset();
            m_cube.reset();

            return false;
        }

        // We are using the associated buffer cookie to store the
        // corresponding texture index in the internal vector. This way
        // it will be easy to fetch the right texture when a frame
        // buffer is ready to be drawn.
        m_textures.push_back(std::move(texture));
        buffer->setCookie(m_textures.size() - 1);
    }

    m_camera->startCapturing();
}